SpringSecurity笔记之helloworld
构建项目
前提
会SpringBoot和tymeleaf
目的
了解SpringSecurity的helloworld
感悟
(1)核心就是继承WebSecurityConfigurerAdapter实现类里的configure(HttpSecurity http) 方法
(2)handler和Filter是加功能的关键
项目下载
https://github.com/cbeann/Demoo/tree/master/springsecuritydemo
初始化项目SpringBoot+web+security
pom
<parent>
        <groupId>org.springframework.boot</groupId>
        <artifactId>spring-boot-starter-parent</artifactId>
        <version>2.1.7.RELEASE</version>
        <relativePath/> <!-- lookup parent from repository -->
    </parent>
    <groupId>com.example</groupId>
    <artifactId>springsecuritydemo</artifactId>
    <version>0.0.1-SNAPSHOT</version>
    <name>springsecuritydemo</name>
    <description>Demo project for Spring Boot</description>

    <properties>
        <java.version>1.8</java.version>
    </properties>

    <dependencies>
        <dependency>
            <groupId>org.springframework.boot</groupId>
            <artifactId>spring-boot-starter-security</artifactId>
        </dependency>
        <dependency>
            <groupId>org.springframework.boot</groupId>
            <artifactId>spring-boot-starter-web</artifactId>
        </dependency>

        <dependency>
            <groupId>org.springframework.boot</groupId>
            <artifactId>spring-boot-starter-test</artifactId>
            <scope>test</scope>
        </dependency>
        <dependency>
            <groupId>org.springframework.security</groupId>
            <artifactId>spring-security-test</artifactId>
            <scope>test</scope>
        </dependency>
    </dependencies>
测试
    @RequestMapping("/hello")
    @ResponseBody
    public String hello() {
        return "hello security";
    }
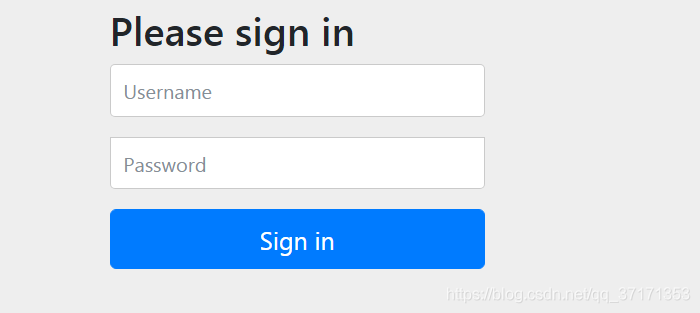
项目启动后在浏览器输入 localhost:8080 (会默认有一个登陆页面)

用户名默认为 user
密码在控制台中

修改上面默认的用户名和密码
 spring.security.user.name=root
 spring.security.user.password=123456
默认就是下面的配置
@Configuration
public class SecurityConfig extends WebSecurityConfigurerAdapter {

    @Override
    protected void configure(HttpSecurity http) throws Exception {

        http.formLogin()//表单登陆
                //http.httpBasic()//弹出框登陆
                .and()
                .authorizeRequests()//下面是请求配置
                .anyRequest()//任何请求
                .authenticated();//都要认证


    }
}
完善案例之数据库数据登陆(假数据)(模仿)
创建User实体类
1)实现UserDetails接口,注意完善里面的方法
2)注意,每一个了方法的含义以及返回值
package com.example.springsecuritydemo.entity;

import org.springframework.security.core.GrantedAuthority;
import org.springframework.security.core.authority.AuthorityUtils;
import org.springframework.security.core.userdetails.UserDetails;

import java.util.ArrayList;
import java.util.Collection;
import java.util.List;

/**
 * @author CBeann
 * @create 2019-08-16 10:22
 */
public class User implements UserDetails {

    private String username;
    private String password;

    private List<String> permissions = new ArrayList<>();

    /**
     * 是否被冻结、账号锁定等等标志位
     */
    private int sign = 1;

    @Override
    public String toString() {
        return "User{" +
                "username='" + username + ''' +
                ", password='" + password + ''' +
                ", permissions=" + permissions +
                ", sign=" + sign +
                '}';
    }

    public List<String> getPermissions() {
        return permissions;
    }

    public void setPermissions(List<String> permissions) {
        this.permissions = permissions;
    }

    public void setUsername(String username) {
        this.username = username;
    }

    public void setPassword(String password) {
        this.password = password;
    }

    public int getSign() {
        return sign;
    }

    public void setSign(int sign) {
        this.sign = sign;
    }

    public User(String username, String password) {
        this.username = username;
        this.password = password;
    }


    /**
     * 下边是接口的方法
     */
    @Override
    public Collection<? extends GrantedAuthority> getAuthorities() {

        StringBuffer stringBuffer = new StringBuffer("");
        for (String permission : permissions) {
            stringBuffer.append(permission + ",");
        }


        //permissions的格式为 damin,user,root(中间用逗号分开)
        String permissions = stringBuffer.substring(stringBuffer.length() - 1).toString();


        return AuthorityUtils.commaSeparatedStringToAuthorityList(permissions);
    }

    @Override
    public String getPassword() {
        return password;
    }

    @Override
    public String getUsername() {
        return username;
    }

    @Override
    //账号是否过期,true没有过期
    public boolean isAccountNonExpired() {
        //你的业务逻辑
        return true;
    }

    @Override
    //账号是否被锁定或者冻结,true为没有被冻结
    public boolean isAccountNonLocked() {
        //你的业务逻辑
        return true;
    }

    @Override
    //密码是否过期,true没有过期
    public boolean isCredentialsNonExpired() {
        //你的业务逻辑
        return true;
    }

    @Override
    //账号是否可用或者删除,true为没有被删除
    public boolean isEnabled() {
        //你的业务逻辑
        return true;
    }
}
实现自定义密码加密器(本文没有做任何加密)
(1)实现PasswordEncoder接口,实现encode加密算法和macthes比较算法(此处没有加密,直接返回明文)
(2)将自定义加密算法注入到容器中
package com.example.springsecuritydemo.config;

import org.springframework.security.crypto.password.PasswordEncoder;

/**
 * @author CBeann
 * @create 2019-08-16 15:57
 */
public class MyPasswordEncoder implements PasswordEncoder {
    @Override
    public String encode(CharSequence charSequence) {//加密算法,此处没有加密
        String str = charSequence.toString();
        return str;
    }

    @Override
    public boolean matches(CharSequence charSequence, String s) {

        String target = charSequence.toString();
        if (target != null && s != null && target.equals(s)) {
            System.out.println("登陆成功");
            return true;
        }
        System.out.println("登陆失败");
        return false;
    }
}
    @Bean
    public PasswordEncoder passwordEncoder() {
        return new MyPasswordEncoder();
    }
dao层(查询数据库)(此处用的静态数据)
package com.example.springsecuritydemo.dao;

import com.example.springsecuritydemo.entity.User;
import org.springframework.stereotype.Repository;

import java.util.Arrays;
import java.util.HashMap;
import java.util.Map;

/**
 * @author CBeann
 * @create 2019-08-16 10:21
 */
@Repository
public class UserDao {

    public static Map<String, User> users = new HashMap<>();

    static {
        //初始化数据,假装自己查数据库
        User user = new User("zhangsan", "123456");
        user.setPermissions(Arrays.asList("admin", "user"));
        User user2 = new User("lisi", "123456");
        user2.setPermissions(Arrays.asList("user"));
        users.put(user.getUsername(), user);
        users.put(user2.getUsername(), user2);


    }


    public User getUser(String username) {
        return users.getOrDefault(username,null);

    }

}
编写登陆验证的类
(1)个人感觉类似Shiro里的自定义realm,这里自动实现授权和验证
(2)实现UserDetailsService接口里的loadUserByUsername方法,返回一个UserDetails的实现类,框架会自动调用UserDetails接口里的方法进行秘密校验,授权等等
(3)将该类注入到容器中
(4)此方法里返回一个UserDetail接口的对象,这就是为什么User实现UserDetail接口
package com.example.springsecuritydemo.service;

import com.example.springsecuritydemo.dao.UserDao;
import com.example.springsecuritydemo.entity.User;
import org.springframework.beans.factory.annotation.Autowired;
import org.springframework.security.core.userdetails.UserDetails;
import org.springframework.security.core.userdetails.UserDetailsService;
import org.springframework.security.core.userdetails.UsernameNotFoundException;
import org.springframework.stereotype.Component;

/**
 * @author CBeann
 * @create 2019-08-16 10:20
 */
@Component
public class MyUserDetailService implements UserDetailsService {

    @Autowired
    private UserDao userDao;


    @Override
    public UserDetails loadUserByUsername(String username) throws UsernameNotFoundException {
        System.out.println("登陆用户:" + username);

        //查询数据库
        User user = userDao.getUser(username);
        if(user==null){
            throw new UsernameNotFoundException("账号不存在:UsernameNotFoundException");
        }

        return user;

    }
}
自定义登陆页面
加入tymeleaf依赖
<dependency>
            <groupId>org.springframework.boot</groupId>
            <artifactId>spring-boot-starter-thymeleaf</artifactId>
        </dependency>
关闭缓存
spring.thymeleaf.cache=falseloginController
@Controller
public class LoginController {

    @RequestMapping("/login")
    public String login(){
        System.out.println("-----------login-------------");
        return "login/mylogin";

    }


}
在templates下创建 login/mylogin.html
<!DOCTYPE html>
<html lang="en">
<head>
    <meta charset="UTF-8">
    <title>登陆</title>
</head>
<body>
<h1>登陆页面</h1>
<form method="post" action="/authentication/form">
    用户名:<input type="text"  name="username"/><br/>
    密码:<input type="password"  name="password"/><br/>
    <button  type="submit">登陆</button>
</form>
</body>
</html>
修改Security的配置类的configure方法
package com.example.springsecuritydemo.config;

import org.springframework.context.annotation.Bean;
import org.springframework.context.annotation.Configuration;
import org.springframework.security.config.annotation.web.builders.HttpSecurity;
import org.springframework.security.config.annotation.web.configuration.WebSecurityConfigurerAdapter;
import org.springframework.security.crypto.password.PasswordEncoder;

/**
 * @author CBeann
 * @create 2019-08-16 9:34
 * SpringSecurty核心配置
 */
@Configuration
public class SecurityConfig extends WebSecurityConfigurerAdapter {


    /**
     * 配置密码加密器,可以自定义加密器,实现PasswordEncoder接口
     */
    @Bean
    public PasswordEncoder passwordEncoder() {
        return new MyPasswordEncoder();
    }


    @Override
    protected void configure(HttpSecurity http) throws Exception {
        //表单登陆
        http.formLogin()
                //http.httpBasic()//弹出框登陆
                //告诉系统自动定登陆页面
                .loginPage("/login")
                //告诉系统这个URL为登陆请求,系统会走登陆验证的过滤器
                .loginProcessingUrl("/authentication/form")
                .and()
                .authorizeRequests()//下面是请求配置
                .antMatchers("/login").permitAll()//当访问此URL(/login)时不需要验证
                .anyRequest()//任何请求
                .authenticated()//都要认证
                .and().csrf().disable();


    }
}
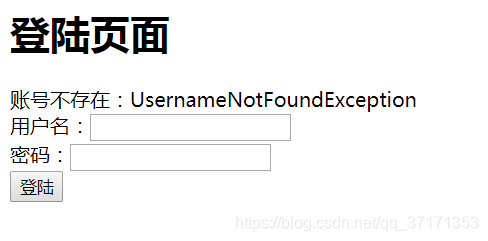
就可以用自定义的页面进行登陆了,此时有一个问题,登陆失败怎么回显???就是下面的自定义成功、失败处理
自定义登陆成功处理和自定义登陆失败处理
自定义登陆成功处理(比如把user对象存到session中,发送登陆成功短息)
1)创建自定义登陆类
(2)继承SavedRequestAwareAuthenticationSuccessHandler,实现onAuthenticationSuccess方法
(3)在onAuthenticationSuccess方法中实现自己的成功登陆处理,比如用户加积分、登陆次数等等
(4)将类放在容器中
package com.example.springsecuritydemo.handler;


import com.example.springsecuritydemo.entity.User;
import org.springframework.security.core.Authentication;
import org.springframework.security.web.authentication.SavedRequestAwareAuthenticationSuccessHandler;
import org.springframework.stereotype.Component;

import javax.servlet.ServletException;
import javax.servlet.http.HttpServletRequest;
import javax.servlet.http.HttpServletResponse;
import java.io.IOException;

/**
 * @author CBeann
 * @create 2019-08-16 21:23
 */
@Component("myAuthenticationSuccessHandler")
public class MyAuthenticationSuccessHandler extends SavedRequestAwareAuthenticationSuccessHandler {

    @Override
    public void onAuthenticationSuccess(HttpServletRequest httpServletRequest,
                                        HttpServletResponse httpServletResponse,
                                        Authentication authentication) throws IOException, ServletException {
        System.out.println("登陆成功----------MyAuthenticationSuccessHandler");
        System.out.println(authentication);
        //获取用户的信息
        User loginUser = (User) authentication.getPrincipal();
        //给用户法发个积分,做个记录等操作
        //XXXService.method1()


        //调用框架原来的跳转
        super.onAuthenticationSuccess(httpServletRequest, httpServletResponse, authentication);

    }
}
自定义登陆失败处理(比如表单回显)
(1)创建自定义登陆类
(2)继承SimpleUrlAuthenticationFailureHandler,实现onAuthenticationFailure方法
(3)在onAuthenticationFailure方法中实现自己的失败处理,比如跳转到失败页面或者登陆页面
(4)将类放在容器中
package com.example.springsecuritydemo.handler;

import org.springframework.security.core.AuthenticationException;
import org.springframework.security.web.authentication.SimpleUrlAuthenticationFailureHandler;
import org.springframework.stereotype.Component;

import javax.servlet.ServletException;
import javax.servlet.http.HttpServletRequest;
import javax.servlet.http.HttpServletResponse;
import java.io.IOException;

/**
 * @author CBeann
 * @create 2019-08-17 9:32
 */
@Component("myAuthenticationFailureHandler")
public class MyAuthenticationFailureHandler extends SimpleUrlAuthenticationFailureHandler {

    @Override
    public void onAuthenticationFailure(HttpServletRequest request, HttpServletResponse response, AuthenticationException exception) throws IOException, ServletException {


        //不同的异常会有不同的信息,比如账号不存在、密码错误(坏的凭证)、账号不可用等等
        String message = exception.getMessage();


        //将错误信息回显到登陆页面
        request.setAttribute("msg", message);
        request.getRequestDispatcher("/login").forward(request, response);

//        response.setContentType("application/json;charset=UTF-8");
//        response.getWriter().write("登陆失败:"+message);


    }
}
修改Security配置类(显式的设置登陆成功、失败的处理器)
package com.example.springsecuritydemo.config;

import com.example.springsecuritydemo.service.MyUserDetailService;
import org.springframework.beans.factory.annotation.Autowired;
import org.springframework.context.annotation.Bean;
import org.springframework.context.annotation.Configuration;
import org.springframework.security.authentication.dao.DaoAuthenticationProvider;
import org.springframework.security.config.annotation.web.builders.HttpSecurity;
import org.springframework.security.config.annotation.web.configuration.WebSecurityConfigurerAdapter;
import org.springframework.security.crypto.password.PasswordEncoder;
import org.springframework.security.web.authentication.AuthenticationFailureHandler;
import org.springframework.security.web.authentication.AuthenticationSuccessHandler;

/**
 * @author CBeann
 * @create 2019-08-16 9:34
 * SpringSecurty核心配置
 */
@Configuration
public class SecurityConfig extends WebSecurityConfigurerAdapter {


    @Autowired
    private MyUserDetailService myUserDetailService;

    /**
     * 解决UsernameNotFoundException不能被捕获的问题
     */
    @Bean
    public DaoAuthenticationProvider authenticationProvider() {
        DaoAuthenticationProvider provider = new DaoAuthenticationProvider();
        provider.setHideUserNotFoundExceptions(false);
        provider.setUserDetailsService(myUserDetailService);
        provider.setPasswordEncoder(passwordEncoder);
        return provider;
    }


    /**
     * 配置密码加密器,可以自定义加密器,实现PasswordEncoder接口
     */
    @Bean
    public PasswordEncoder passwordEncoder() {
        return new MyPasswordEncoder();
    }

    @Autowired
    private PasswordEncoder passwordEncoder;


    @Autowired
    private AuthenticationSuccessHandler authenticationSuccessHandler;


    @Autowired
    private AuthenticationFailureHandler authenticationFailureHandler;


    @Override
    protected void configure(HttpSecurity http) throws Exception {
        //表单登陆
        http.formLogin()
                //http.httpBasic()//弹出框登陆
                //告诉系统自动定登陆页面
                .loginPage("/login")
                //告诉系统这个URL为登陆请求,系统会走登陆验证的过滤器
                .loginProcessingUrl("/authentication/form")//告诉系统登陆请求的url
                .successHandler(authenticationSuccessHandler)//自定义登陆成功处理
                .failureHandler(authenticationFailureHandler)//自定义登陆失败处理
                .and()
                .authorizeRequests()//下面是请求配置
                .antMatchers("/login").permitAll()//当访问此URL(/login)时不需要验证
                .anyRequest()//任何请求
                .authenticated()//都要认证
                .and().csrf().disable();


    }
}
登陆页面修改
<!DOCTYPE html>
<html lang="en" xmlns:th="http://www.thymeleaf.org">
<head>
    <meta charset="UTF-8">
    <title>登陆</title>
</head>
<body>
<h1>登陆页面</h1>
<span th:text="${msg}"></span>
<form method="post" action="/authentication/form">
    用户名:<input type="text" name="username"/><br/>
    密码:<input type="password" name="password"/><br/>
    <button type="submit">登陆</button>
</form>
</body>
</html>
测试

相关文章
- 在 Go 里用 CGO?这 7 个问题你要关注!
- 9款优秀的去中心化通讯软件 Matrix 的客户端
- 求职数据分析,项目经验该怎么写
- 在OKR中,我看到了数据驱动业务的未来
- 火山引擎云原生大数据在金融行业的实践
- OpenHarmony富设备移植指南(二)—从postmarketOS获取移植资源
- 《数据成熟度指数》报告:64%的企业领袖认为大多数员工“不懂数据”
- OpenHarmony 小型系统兼容性测试指南
- 肯睿中国(Cloudera):2023年企业数字战略三大趋势预测
- 适用于 Linux 的十大命令行游戏
- GNOME 截图工具的新旧截图方式
- System76 即将推出的 COSMIC 桌面正在酝酿大变化
- 2GB 内存 8GB 存储即可流畅运行,Windows 11 极致精简版系统 Tiny11 发布
- 迎接 ecode:一个即将推出的具有全新图形用户界面框架的现代、轻量级代码编辑器
- loongarch架构介绍(三)—地址翻译
- Go 语言怎么解决编译器错误“err is shadowed during return”?
- 敏捷:可能被开发人员遗忘的部分
- Denodo预测2023年数据管理和分析的未来
- 利用数据推动可持续发展
- 在 Vue3 中实现 React 原生 Hooks(useState、useEffect),深入理解 React Hooks 的

