SpringCloud学习(四):微服务入驻eurekaServer
2023-03-14 22:47:09 时间
一、安装Eureka服务端
1、创建module
创建一个模块用来放置eureka
2、修改pom文件
<?xml version="1.0" encoding="UTF-8"?>
<project xmlns="http://maven.apache.org/POM/4.0.0"
         xmlns:xsi="http://www.w3.org/2001/XMLSchema-instance"
         xsi:schemaLocation="http://maven.apache.org/POM/4.0.0 http://maven.apache.org/xsd/maven-4.0.0.xsd">
    <parent>
        <artifactId>cloud</artifactId>
        <groupId>com.shang.cloud</groupId>
        <version>1.0-SNAPSHOT</version>
    </parent>
    <modelVersion>4.0.0</modelVersion>

    <artifactId>cloud-eureka-server7001</artifactId>

    <dependencies>
        <!--eureka-server-->
        <dependency>
            <groupId>org.springframework.cloud</groupId>
            <artifactId>spring-cloud-starter-netflix-eureka-server</artifactId>
        </dependency>
        <!-- 引入自己定义的api通用包,可以使用Payment支付Entity -->
        <dependency>
            <groupId>com.shang.cloud</groupId>
            <artifactId>cloud-api-commons</artifactId>
            <version>${project.version}</version>
        </dependency>
        <!--boot web actuator-->
        <dependency>
            <groupId>org.springframework.boot</groupId>
            <artifactId>spring-boot-starter-web</artifactId>
        </dependency>
        <dependency>
            <groupId>org.springframework.boot</groupId>
            <artifactId>spring-boot-starter-actuator</artifactId>
        </dependency>
        <!--一般通用配置-->
        <dependency>
            <groupId>org.springframework.boot</groupId>
            <artifactId>spring-boot-devtools</artifactId>
            <scope>runtime</scope>
            <optional>true</optional>
        </dependency>
        <dependency>
            <groupId>org.projectlombok</groupId>
            <artifactId>lombok</artifactId>
        </dependency>
        <dependency>
            <groupId>org.springframework.boot</groupId>
            <artifactId>spring-boot-starter-test</artifactId>
            <scope>test</scope>
        </dependency>
        <dependency>
            <groupId>junit</groupId>
            <artifactId>junit</artifactId>
        </dependency>
    </dependencies>

</project>
其中和eurekaServer有关的是这个依赖:
<!--eureka-server-->
        <dependency>
            <groupId>org.springframework.cloud</groupId>
            <artifactId>spring-cloud-starter-netflix-eureka-server</artifactId>
        </dependency>
3、编写yml文件
server:
  port: 7001


eureka:
  instance:
    hostname: eureka7001.com #eureka服务端的实例名称
  client:
    register-with-eureka: false     #false表示不向注册中心注册自己。
    fetch-registry: false     #false表示自己端就是注册中心,我的职责就是维护服务实例,并不需要去检索服务
    service-url:
      #集群指向其它eureka
      #defaultZone: http://eureka7002.com:7002/eureka/
      #单机就是7001自己
      defaultZone: http://eureka7001.com:7001/eureka/
    #server:
    #关闭自我保护机制,保证不可用服务被及时踢除
    #enable-self-preservation: false
    #eviction-interval-timer-in-ms: 2000
4、编写主启动类
package com.shang.cloud;

import org.springframework.boot.SpringApplication;
import org.springframework.boot.autoconfigure.SpringBootApplication;
import org.springframework.cloud.netflix.eureka.server.EnableEurekaServer;

@SpringBootApplication
@EnableEurekaServer //声明哪个类是eurekaServer
public class EurekaMain7001 {

    public static void main(String[] args) {
        SpringApplication.run(EurekaMain7001.class, args);
    }
}
二、支付微服务8001入驻eurekaServer
1、在pom文件中增加eurekaClient的依赖
<!--eureka-client-->
        <dependency>
            <groupId>org.springframework.cloud</groupId>
            <artifactId>spring-cloud-starter-netflix-eureka-client</artifactId>
        </dependency>
2、在yml文件中增加eurekaClient的有关配置
eureka:
  client:
    #表示是否将自己注册进EurekaServer默认为true。
    register-with-eureka: true
    #是否从EurekaServer抓取已有的注册信息,默认为true。单节点无所谓,集群必须设置为true才能配合ribbon使用负载均衡
    fetchRegistry: true
    service-url:
      #单机版
      defaultZone: http://localhost:7001/eureka
      # 集群版
      #defaultZone: http://eureka7001.com:7001/eureka,http://eureka7002.com:7002/eureka
  instance:
    instance-id: payment8001
    #访问路径可以显示IP地址
    prefer-ip-address: true
    #Eureka客户端向服务端发送心跳的时间间隔,单位为秒(默认是30秒)
    #lease-renewal-interval-in-seconds: 1
    #Eureka服务端在收到最后一次心跳后等待时间上限,单位为秒(默认是90秒),超时将剔除服务
    #lease-expiration-duration-in-seconds: 2
3、在主启动类上添加eurekaClient的注解
@EnableEurekaClient三、订单微服务80入驻eurekaServer
步骤与8001一致
yml文件:(因为不想和Nginx抢80端口,于是改成了90)
server:
  port: 90


spring:
  application:
    name: cloud-order-service

eureka:
  client:
    #表示是否将自己注册进EurekaServer默认为true。
    register-with-eureka: true
    #是否从EurekaServer抓取已有的注册信息,默认为true。单节点无所谓,集群必须设置为true才能配合ribbon使用负载均衡
    fetchRegistry: true
    service-url:
      #单机
      defaultZone: http://localhost:7001/eureka
四、测试
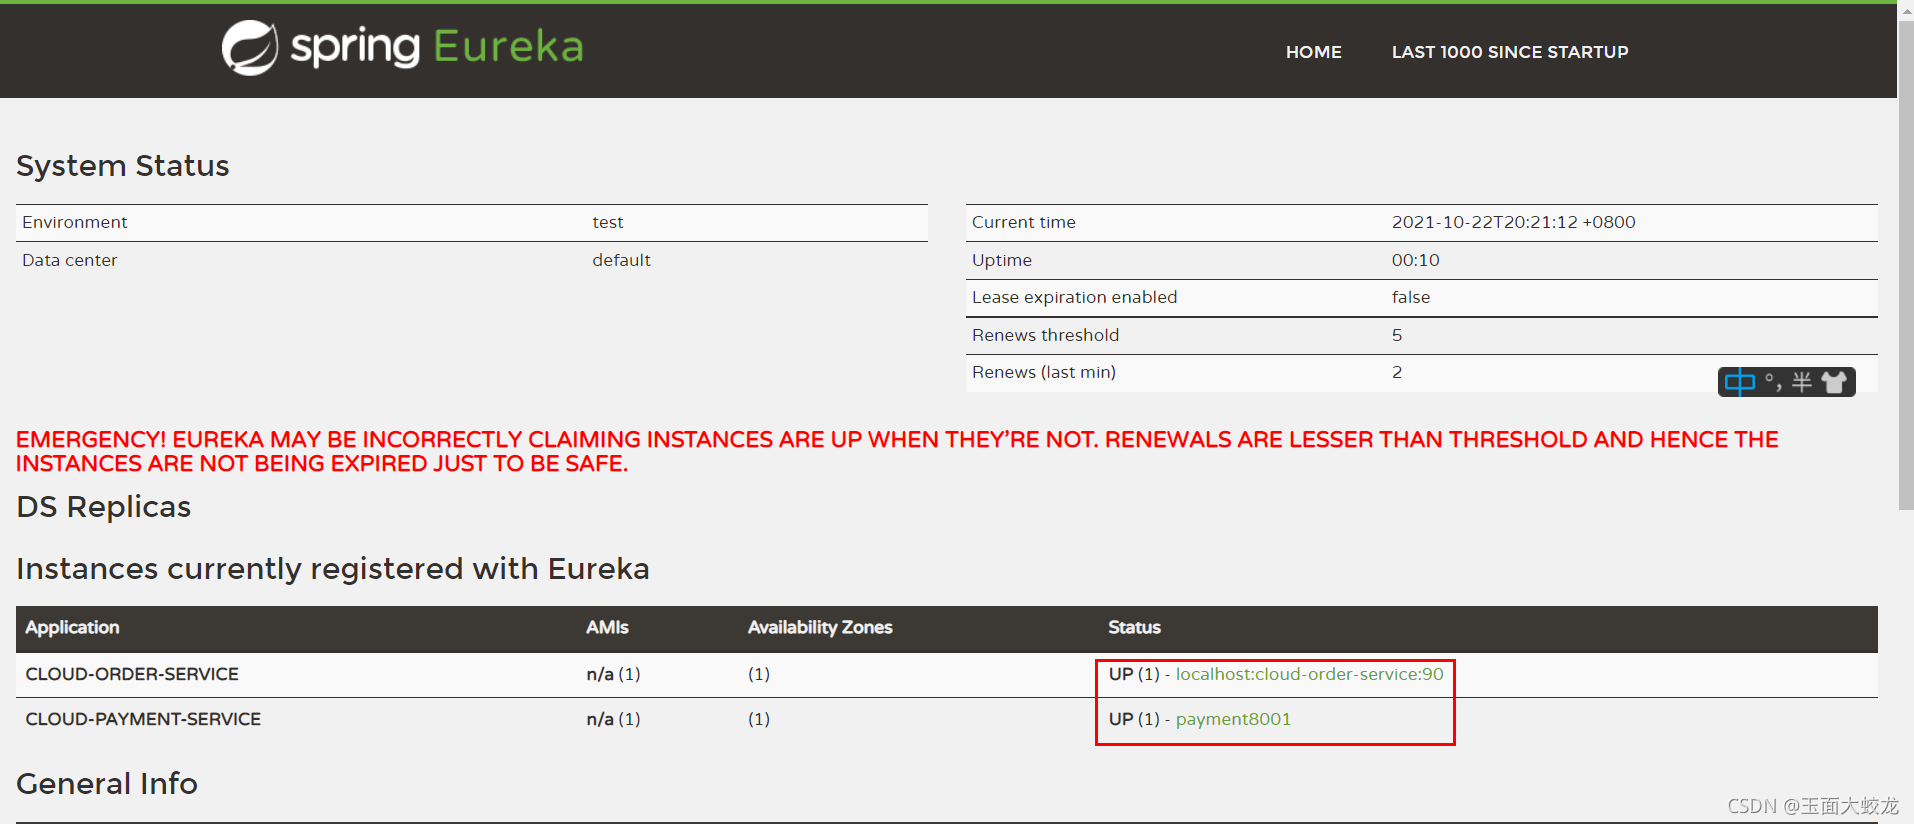
浏览器地址输入 http://localhost:7001/ ,如果一切正常,可以进入eureka的页面,并且下面显示两个正在运行的客户端

再测试模块原有的功能,也是正常的。
相关文章
- 如何在 Ubuntu 20.04 上设置支持 HTTP/2 的 Nginx
- Windows 11获累积更新:引入大眼夹在内新Emoji 修复性能变慢问题
- Linux内核增加HDF驱动子系统
- 手把手教你使用 Gpio 子系统 API
- Starwind 配置 ISCSI 共享存储
- 谷歌 Chrome 将推出新的下载管理界面,类似微软 Edge 浏览器
- Windows 10强烈不建议安装这两款软件,严重拖慢电脑运行!旧电脑的噩耗
- Windows 10系统电脑图标箭头怎么去掉?Windows 10去除桌面图标箭头的方法
- Windows 11提高电池寿命的六个技巧,笔记本电脑的福音
- 谷歌为未知的“创新AR设备”打造操作系统
- 务必更新!Chrome浏览器出现高危安全漏洞:已推送紧急修复补丁
- 手把手教你给 SSH 启用二次身份验证
- 在 Linux 上安装 Nginx 搭建属于自己的 Web 服务器
- 关于 Kubernetes 的 Secret 并不安全这件事
- OpenHarmony 源码解析之电源管理亮灭屏功能
- 启动速度提升25.8% Chrome在Windows上运行得更快了
- 好叭科技:OpenHarmony轻智能手表OS底层技术开源,商业成果共享
- Linux 中断子系统:中断处理知识点大全
- Chrome的年度优秀浏览器插件,用完我香疯了
- 我们一起深入多线程面试连环炮

