应用容器化是企业应用现代化进程中的重要环节之一, 基于Kubernetes的容器集群被大量用户在云上和云下使用。Amazon EKS服务可以帮助用户快速创建基于Kubernetes的集群,Amazon EKS会把Kubernetes的控制平面进行托管,这将大大降低了部署Kubernetes集群的复杂度。与此同时,Amazon EKS服务也提供了高可用的架构以及丰富的安全管理功能。
在很多大型企业内部,基于安全的考虑,也有大量的业务希望部署在纯私有的网络环境内,业务底层的容器不需要被Internet直接访问,但容器集群的Worker node以及内部容器需要能够通过被严格管理的代理来访问Internet安装软件或者进行必要的互联网交互。本篇博客将会演示如何在中国区搭建一个私有的Amazon EKS集群,并利用Http代理的方式让Worker Node可以访问互联网。
Amazon EKS集群网络模式
Amazon EKS集群由2个VPC组成,一个被托管的控制平面的VPC和一个属于客户管理的数据平面的VPC,客户自己的容器运行在数据平面的VPC内。按照集群API Servers终端节点不同访问模式分为三种:
- 公有:集群终端节点可从您 的 VPC 外部访问。Worker Node流量将会离开客户的VPC 以连接到终端节点。
- 公有和私有:集群终端节点可从您 的 VPC 外部访问。Worker Node流量到终端节点的流量将始终位于客户的VPC 中。
- 私有:集群终端节点仅可通过您的 VPC 访问。从Worker Node流量到终端节点的流量将始终位于客户的VPC 中。
解决方案
为了保证客户EKS在纯私有的网络环境中,我们需要使用到私有的EKS集群,关于私有的EKS集群请参考:https://docs.amazonaws.cn/eks/latest/userguide/private-clusters.html
私有EKS集群虽然可以支持EKS集群本身的全内网环境,但EKS集群必须要和云上包括(EC2,ECR以及S3)等其它云服务正常通信才能实现整个集群的正常运行,这一部分主要依赖VPC终端节点(PrivateLink和Gateway Endpoint)实现内网的通信的需求。除此之外,Worker Node访问Internet部分需要借助于部署在相同VPC内public subnet的AWS NAT Gateway或者Internet Proxy实现。很多企业习惯使用自建Proxy的方式更加精细的控制互联网的访问,本方案我们仅讨论自建Proxy的方式。
整体架构
这次的方案部署在宁夏区域,本次需要的服务和架构如下图:

部署过程
- 创建VPC
本次创建的VPC包含2个私有子网作为数据平面的子网,另外还有1个公有子网用来安装代理服务器。
创建VPC过程具体过程省略,但需要注意Worker Node所在的VPC的dhcp options sets配置必须要包含domain-name 和 domain-name-servers,否则会遇到Nodes fail to join cluster报错。

其它更多EKS故障定位可参考:https://docs.aws.amazon.com/eks/latest/userguide/troubleshooting.html
- 创建Amazon EC2,STS, S3以及Amazon ECR服务的VPC Endpoint
创建Amazon EC2, STS和ECR服务的PrivateLink,其中ECR包含ecr.api和ecr.dkr两个, 其中ECR.API用于对 Amazon ECR API 执行的调用,ecr.dkr用于 Docker Registry API, 如 push 和 pull 这样的 Docker 客户端命令使用此终端节点。Subnet选择第一步创建的两个 私有子网,安全组选择创建默认的安全组即可,后面我们还会用到这个安全组创建EKS集群,其它保持默认即可, 同样的方法创建完成共计4个PrivateLink。

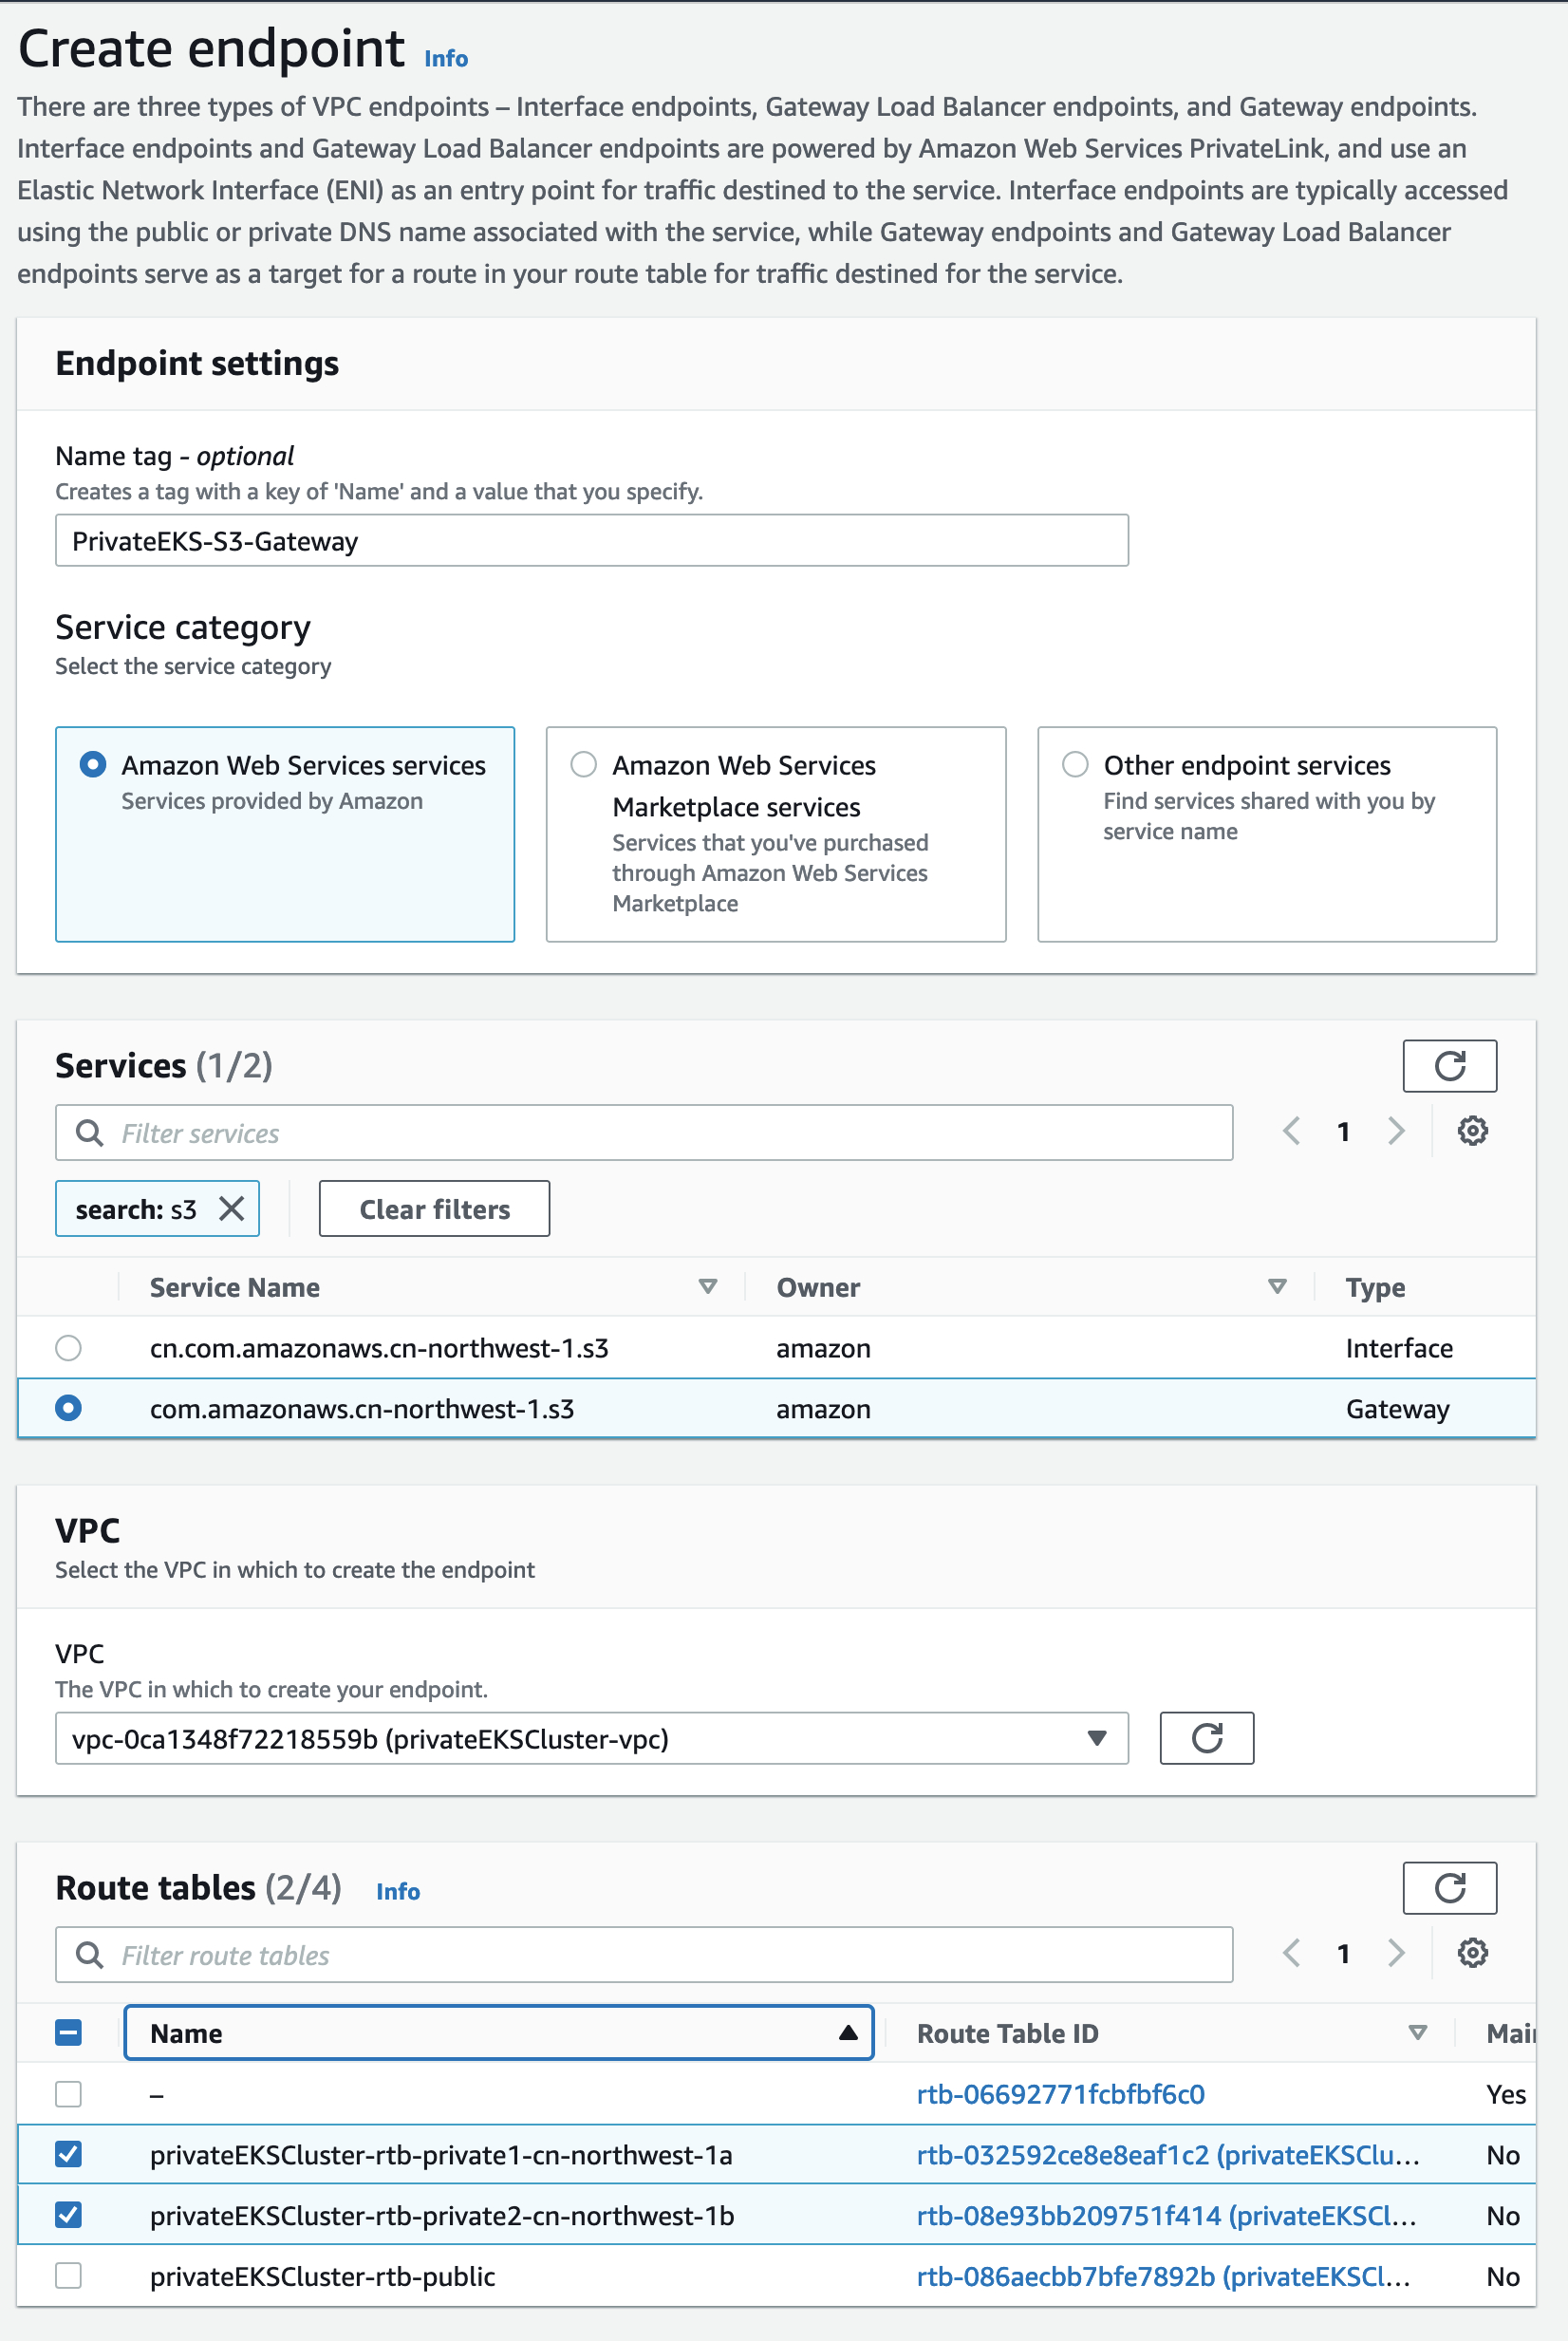
创建S3的Gateway Endpoint, 路由表选择2个私有子网使用的路由表.

创建完成后,查看所有的Endpoint如下图所示:

如需要访问其它云上服务,请使用相同方法添加其他Endpoint。
- 创建EC2,部署Squid代理
选择在创建的公有子网中新建一个EC2作为代理,镜像选择标准的Amazon Linux2即可。 需要注意的是:
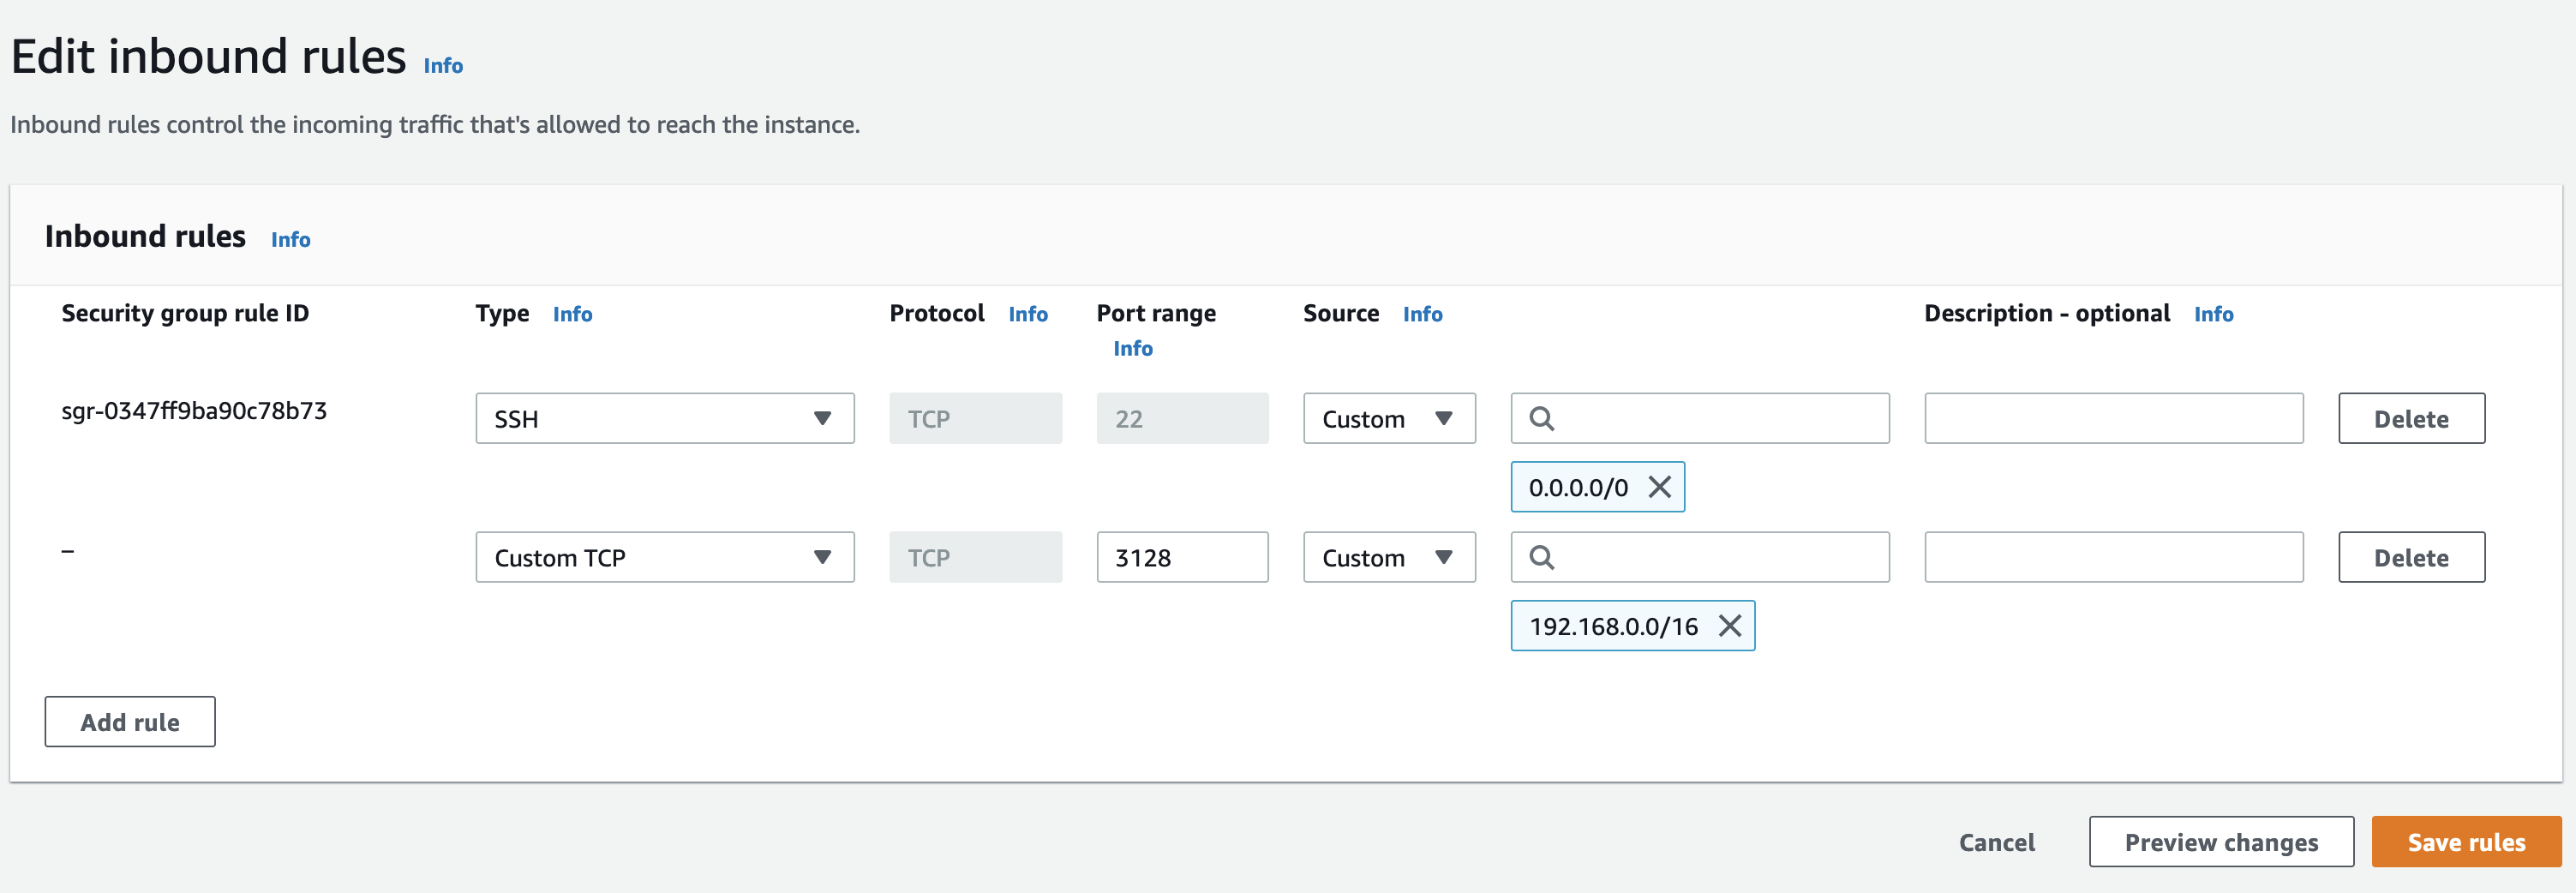
Squid默认使用3128端口作为代理,注意EC2的安全组需要允许VPC网段访问3128端口。

修改EC2的安全组,增加一个Default的安全组,以便这台代理服务器可以使用第二步创建的Endpoint。

由这台充当代理的EC2需要有利用eksctl创建EKS集群的权限,我们可以新建一个IAM的用户来创建集群,并配置。
关于创建IAM用户可以参考:https://docs.amazonaws.cn/en_us/IAM/latest/UserGuide/id_users_create.html
具体权限配置可以参考:https://eksctl.io/usage/minimum-iam-policies/
登录到代理服务器中,安装并配置Squid代理, 编辑配置文件squid.conf
sudo yum install -y squid
cd /etc/squid
sudo vim squid.conf
添加:
acl local src 192.168.0.0/16 #允许VPC所在网段内所有客户机访问代理服务器
http_access allow local #该记录一定要添在deny all之前,允许本地访问

启动squid服务
sudo systemctl start squid
sudo systemctl enable squid
安装kubectl和jq等工具
sudo curl --silent --location -o /usr/local/bin/kubectl https://s3.us-west-2.amazonaws.com/amazon-eks/1.21.5/2022-01-21/bin/linux/amd64/kubectl
sudo chmod +x /usr/local/bin/kubectl
sudo yum -y install jq gettext bash-completion moreutils
安装eksctl
curl --silent --location "https://github.com/weaveworks/eksctl/releases/latest/download/eksctl_$(uname -s)_amd64.tar.gz" | tar xz -C /tmp
sudo mv -v /tmp/eksctl /usr/local/bin
- 创建私有EKS集群
登录代理服务器,替换黄色部分子网id,运行脚本利用eksctl新建一个私有的EKS集群。
cat << EOF > TestPrivateCluster.yaml
---
apiVersion: eksctl.io/v1alpha5
kind: ClusterConfig

metadata:
  name: TestPrivateCluster
  region: cn-northwest-1
  version: "1.22"

privateCluster:
  enabled: true
  skipEndpointCreation: true

vpc:
  subnets:
    private:
      cn-northwest-1a:
        id: subnet-0ffd48b2177be2c4f
      cn-northwest-1b:
        id: subnet-075a318d953f56a32
EOF
eksctl create cluster -f TestPrivateCluster.yaml
在创建完成后,可以看到如下的输出:
2022-10-08 16:06:24 [✔]  using existing VPC (vpc-0ca1348f72218559b) and subnets (private:map[cn-northwest-1a:{subnet-0ffd48b2177be2c4f cn-northwest-1a 192.168.128.0/20 0 } cn-northwest-1b:{subnet-075a318d953f56a32 cn-northwest-1b 192.168.144.0/20 0 }] public:map[])

2022-10-08 16:16:55 [✔]  saved kubeconfig as "/home/ec2-user/.kube/config"
2022-10-08 16:16:55 [✔]  all EKS cluster resources for "TestPrivateCluster" have been created
2022-10-08 16:17:56 [✖]  unable to use kubectl with the EKS cluster (check 'kubectl version'): Unable to connect to the server: dial tcp 192.168.144.67:443: i/o timeout

2022-10-08 16:22:35 [✔]  EKS cluster "TestPrivateCluster" in "cn-northwest-1" region is ready
红色的报错部分是因为新建的集群是私有集群,为了让本机器能够访问新建的集群,我们需要修改EKS 集群的安全组,让代理机器可以连接到集群。
export CLUSTER_SECURITY_GROUP=$(aws eks describe-cluster --name TestPrivateCluster|jq -r .cluster.resourcesVpcConfig.clusterSecurityGroupId)
export LOCAL_IPV4=$(curl -s 169.254.169.254/latest/meta-data/local-ipv4)
aws ec2 authorize-security-group-ingress --group-id ${CLUSTER_SECURITY_GROUP} --protocol tcp --port 443 --cidr ${LOCAL_IPV4}/32
修改Endpoint的默认安全组,添加入站规则允许EKS集群的安全组访问到Endpoint,类型为https(443),以便集群内的Worker Node可以通过Endpoint访问对应的服务。

关于集群的创建,完整创建步骤也可参考:
https://docs.aws.amazon.com/eks/latest/userguide/create-cluster.html
https://eksctl.io/usage/eks-private-cluster/
配置ConfigMap将代理地址写入到kube-proxy以及aws-node
首先,确认EKS集群的CIDR Block
kubectl get service kubernetes -o jsonpath='{.spec.clusterIP}'; echo
返回结果会是10.100.0.1和172.20.0.1两者中的一个, 这里以10.100.0.1为例。
cat << EOF > proxy-environment-variables.yaml
---
apiVersion: v1
kind: ConfigMap
metadata:
   name: proxy-environment-variables
   namespace: kube-system
data:
   HTTP_PROXY: http://##REPLACE THE HOST:##REPLACE THE PORT
   HTTPS_PROXY: http://##REPLACE THE HOST:##REPLACE THE PORT
   NO_PROXY: 10.100.0.0/16,localhost,127.0.0.1,192.168.0.0/16,169.254.169.254,,.internal,s3.amazonaws.com.cn,.s3.cn-northwest-1.amazonaws.com.cn,api.ecr.cn-northwest-1.amazonaws.com.cn,dkr.ecr.cn-northwest-1.amazonaws.com.cn,ec2.cn-northwest-1.amazonaws.com.cn
EOF
kubectl apply -f proxy-environment-variables.yaml
更新aws-node和 kube-proxy的pods
kubectl patch -n kube-system -p '{ "spec": {"template": { "spec": { "containers": [ { "name": "aws-node", "envFrom": [ { "configMapRef": {"name": "proxy-environment-variables"} } ] } ] } } } }' daemonset aws-node
kubectl patch -n kube-system -p '{ "spec": {"template":{ "spec": { "containers": [ { "name": "kube-proxy", "envFrom": [ { "configMapRef": {"name": "proxy-environment-variables"} } ] } ] } } } }' daemonset kube-proxy
kubectl set env daemonset/kube-proxy --namespace=kube-system --from=configmap/proxy-environment-variables --containers='*'
kubectl set env daemonset/aws-node --namespace=kube-system --from=configmap/proxy-environment-variables --containers='*'
- 创建Worker NodeGroup
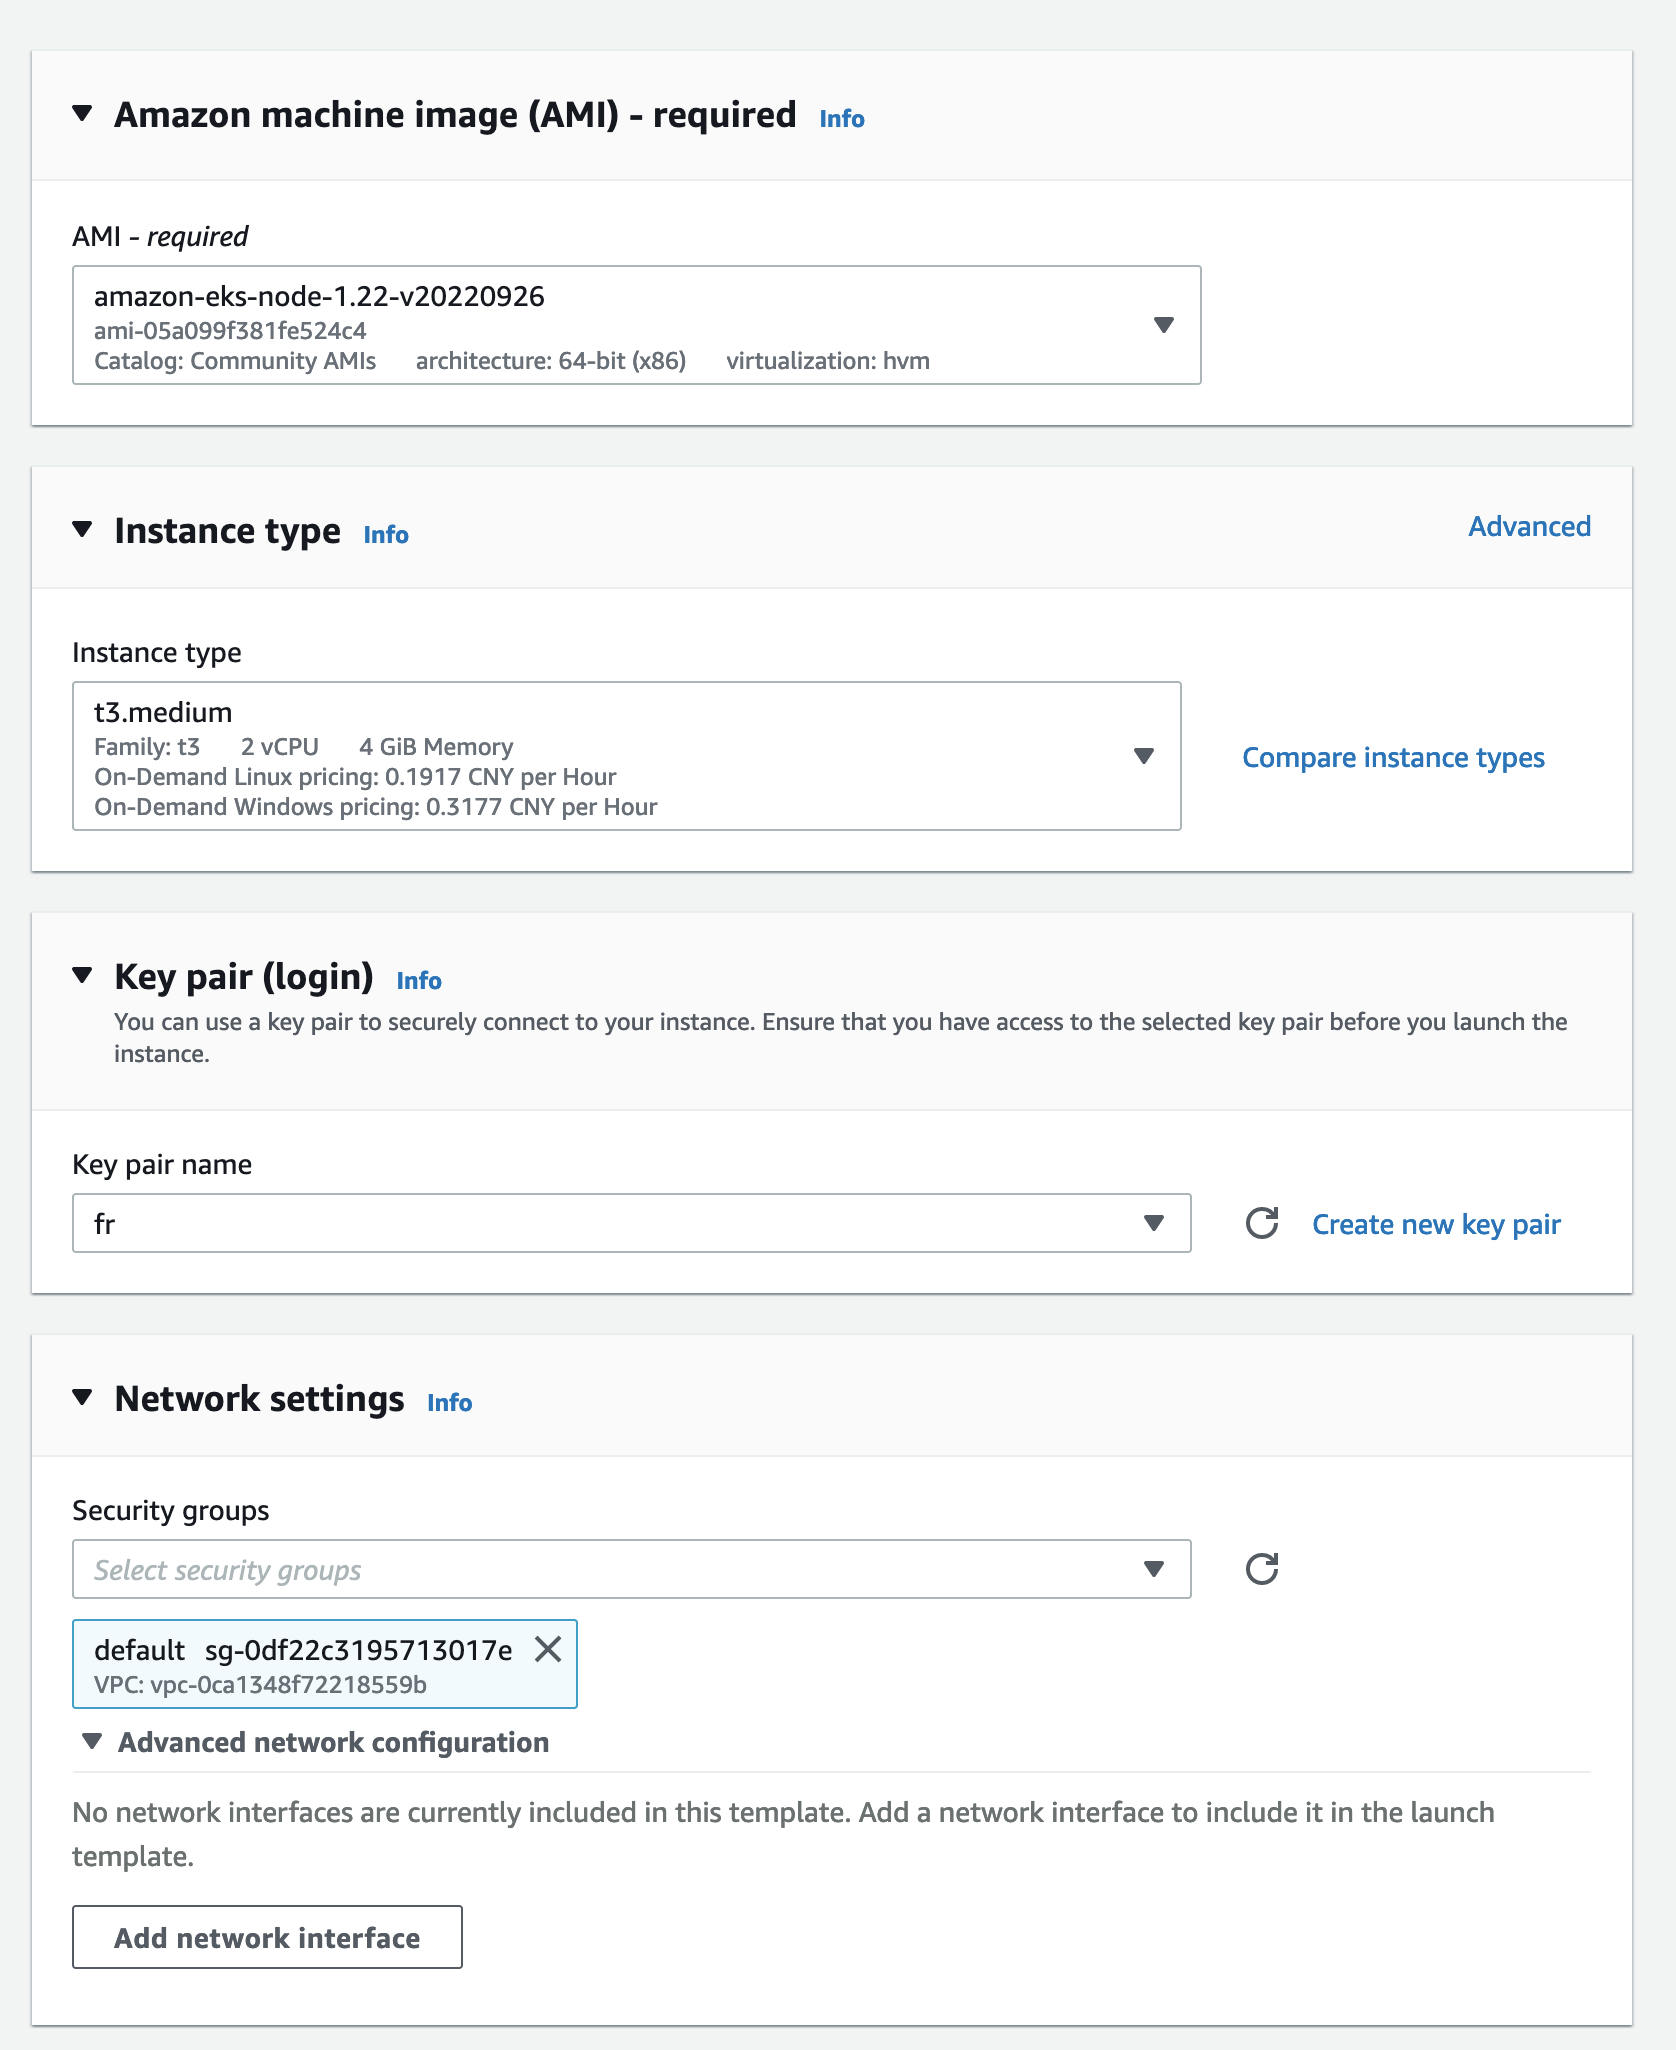
创建EC2 启动模版, 供后续创建Worker Node使用。
选择AWS Managed EKS AMI,注意AMI中的K8s版本需要和EKS集群的保持一致,笔者选择的版本如下(K8s-1.22), 为了能够通过ssh访问Worker Node,建议配置Key Pair。

需要注意的是,安全组的配置,选择VPC Endpoint所使用的安全组,本例中使用的是名为Default的安全组,以保证利用Launch Template创建的EC2能够正常访问Endpoint。
编辑高级设置下的User Data,将代理服务器地址信息写入到EKS集群中, 如果您已为 Amazon EKS 集群启用终端节点私有访问,则必须将 Amazon EKS 终端节点添加到 NO_PROXY 变量。
关于User Data的编写规则请参考:https://docs.aws.amazon.com/zh_cn/eks/latest/userguide/launch-templates.html
示例代码:请查看并确认标蓝部分
Content-Type: multipart/mixed; boundary="==BOUNDARY=="
MIME-Version: 1.0
--==BOUNDARY==
Content-Type: text/cloud-boothook; charset="us-ascii"

#Set the proxy hostname and port PROXY="##REPLACE THE HOST:##REPLACE THE PORT"
MAC=$(curl -s http://169.254.169.254/latest/meta-data/mac/)
VPC_CIDR=$(curl -s http://169.254.169.254/latest/meta-data/network/interfaces/macs/$MAC/vpc-ipv4-cidr-blocks | xargs | tr ' ' ',')

#Create the docker systemd directory
mkdir -p /etc/systemd/system/docker.service.d

#Configure yum to use the proxy
cloud-init-per instance yum_proxy_config cat << EOF >> /etc/yum.conf
proxy=http://$PROXY
EOF

#Set the proxy for future processes, and use as an include file
cloud-init-per instance proxy_config cat << EOF >> /etc/environment
http_proxy=http://$PROXY
https_proxy=http://$PROXY
HTTP_PROXY=http://$PROXY
HTTPS_PROXY=http://$PROXY
# We have added EC2, S3 and ECR url in no_proxy part, but these URLs belong to Beijing region. If your cluster is in Ning Xia region, please update accordingly.No proxy ensure the requests to these URLs will NOT use Proxy
no_proxy=$VPC_CIDR,localhost,127.0.0.1,169.254.169.254,.internal,s3.amazonaws.com.cn,.s3.cn-northwest-1.amazonaws.com.cn,api.ecr.cn-northwest-1.amazonaws.com.cn,dkr.ecr.cn-northwest-1.amazonaws.com.cn,.dkr.ecr.cn-northwest-1.amazonaws.com.cn,ec2.cn-northwest-1.amazonaws.com.cn
NO_PROXY=$VPC_CIDR,localhost,127.0.0.1,169.254.169.254,.internal,s3.amazonaws.com.cn,.s3.cn-northwest-1.amazonaws.com.cn,api.ecr.cn-northwest-1.amazonaws.com.cn,dkr.ecr.cn-northwest-1.amazonaws.com.cn,.dkr.ecr.cn-northwest-1.amazonaws.com.cn,ec2.cn-northwest-1.amazonaws.com.cn
EOF

#Configure docker with the proxy
cloud-init-per instance docker_proxy_config tee <<EOF /etc/systemd/system/docker.service.d/proxy.conf >/dev/null
[Service]
EnvironmentFile=/etc/environment
EOF

#Configure the kubelet with the proxy
cloud-init-per instance kubelet_proxy_config tee <<EOF /etc/systemd/system/kubelet.service.d/proxy.conf >/dev/null
[Service]
EnvironmentFile=/etc/environment
EOF

#Reload the daemon and restart docker to reflect proxy configuration at launch of instance
cloud-init-per instance reload_daemon systemctl daemon-reload
cloud-init-per instance enable_docker systemctl enable --now --no-block docker

--==BOUNDARY==
Content-Type:text/x-shellscript; charset="us-ascii"

#!/bin/bash
set -o xtrace
set -ex
#Please replace the value of B64_CLUSTER_CA, you can find the cert from EKS console, or use the follow command to get the url. #aws eks describe-cluster --name TestPrivateCluster|jq -r .cluster.certificateAuthority.data B64_CLUSTER_CA=##REPLACE CLUSTER_CA
#Please replace the value of API_SERVER_URL, you can find the API server endpoint from EKS, or use the following command to get API SERVER URL
#aws eks describe-cluster --name TestPrivateCluster|jq -r .cluster.endpoint API_SERVER_URL=https://A46194B43FFD44D5E0535535409CC8AC.yl4.cn-northwest-1.eks.amazonaws.com.cn #Please replace the DNS IP with your own, you can usekubectl get service kube-dns -n kube-system -o json|jq -r .spec.clusterIP
#replace the DNS IP
#kubectl get service kube-dns -n kube-system -o json|jq -r .spec.clusterIP K8S_CLUSTER_DNS_IP=10.100.0.10
#Set the proxy variables before running the bootstrap.sh script
set -a
source /etc/environment

#Please replace $ReplaceClusterName with cluster name.
/etc/eks/bootstrap.sh TestPrivateCluster --b64-cluster-ca $B64_CLUSTER_CA --apiserver-endpoint $API_SERVER_URL --dns-cluster-ip $K8S_CLUSTER_DNS_IP

--==BOUNDARY==--
创建完成后会生成如下启动模版实例
- 创建EKS Node group
继续上面的操作,登录操作的代理服务器,修改下面的脚本,替换掉启动模版id和集群名称的参数, 使用eksctl在EKS集群中新建一个托管节点组。

cat << EOF > nodegroup.yaml
---
apiVersion: eksctl.io/v1alpha5
kind: ClusterConfig

metadata:
  name: TestPrivateCluster
  region: cn-northwest-1

managedNodeGroups:
- name: managedNodeGroup1
  launchTemplate:
    id: lt-09b78a0d71d7f4cdd
  minSize: 2
  desiredCapacity: 2
  maxSize: 2
  labels:
    role: worker
  tags:
    nodegroup-name: managed-ng-1
  privateNetworking: true
EOF
eksctl create nodegroup -f nodegroup.yaml
- 验证集群node和pod正常工作,并能够通过代理访问互联网
登录代理服务器, 运行get node -A查看所有的node状态。
从输出可以看到,新建的两个node节点已经添加到集群中,状态为Ready。
NAME                                                 STATUS   ROLES    AGE   VERSION
ip-192-168-138-208.cn-northwest-1.compute.internal   Ready    <none>   19m   v1.22.12-eks-ba74326
ip-192-168-147-209.cn-northwest-1.compute.internal   Ready    <none>   19m   v1.22.12-eks-ba74326
利用ssh运行命令行可以看到,该node可以通过代理访问互联网(需要替换掉pem文件)。
ssh -i xxxxx.pem ec2-user@192.168.138.208 "curl https://www.amazonaws.cn"
该命令行返回可以看到,可以正常访问www.amazonaws.cn的网站。
运行get pods -A查看所有的pod状态。
从输出结果可以看到,aws-node/coredns/kube-proxy的pods都在运行状态。
NAMESPACE     NAME                       READY   STATUS    RESTARTS   AGE
kube-system   aws-node-bppmt             1/1     Running   0          2m6s
kube-system   aws-node-h6fwh             1/1     Running   0          2m4s
kube-system   coredns-7764867755-5rvgm   1/1     Running   0          6m59s
kube-system   coredns-7764867755-dwvf4   1/1     Running   0          6m59s
kube-system   kube-proxy-f98jr           1/1     Running   0          2m4s
kube-system   kube-proxy-jsd9m           1/1     Running   0          2m6s
查看其中一个kube-proxy的详细信息。
kubectl describe pod kube-proxy-jsd9m -n kube-system
部分截图如下:

从截图可以看出,kube-proxy的环境变量HTTPS_PROXY,HTTP_PROXY,NO_PROXY取自我们创建的名字为proxy-environment-variables 的ConfigMap, 设置的http代理变量。
总结:
- Amazon EKS私有集群的Worker Node可以通过Endpoint内网完成注册,并添加到私有集群中, 也可以利用com.amazonaws.region-code.ecr.api 和com.amazonaws.region-code.ecr.dkr 以及 Amazon S3 网关端点访问到ECR摘取镜像。
- Amazon EKS私有集群通过部署在Public Subnet中的Http Proxy代理可以连接互联网,Worker Node可以正常访问互联网。
参考文档
本篇作者