
面试官问道:常见的跨域处理方式有哪些?
1.写在前面
同域和跨域问题是老生常谈的问题,同源无外乎:主机、端口号、协议保持一致,当其中一个不一致的时候就是存在跨域问题,这时候就需要我们进行处理。
常见的跨域方案有以下九种:
- JSONP
- CORS
- postMessage
- webSocket
- window.name + iframe
- document.domain + iframe
- location.hash + iframe
- nginx反向代理
- http-proxy
2.JSONP
JSONP(JSON with Padding) 是JSON的一种‘使用模式’,可以跨域的获取到数据。
手写JSONP代码的思路是:
- 设置等待我们请求的url,将参数对象params的参数进行拼接得到一个字符串
- 构造script
- js代码使用document.createElement创建一个script标签
- 返回一个Promise,无论最终是返回成功还是失败的数据,都要对script标签进行移除
请求页面代码index.html:
<script>
function jsonp({url, params,cb}){
    return new Promise((resolve,reject)=>{

        params = {...params, cb} //wd=yichuan_i_love_you&cb=show
        let arrs = [];
        for(let key in params){
            arrs.push(`${key}=${params[key]}`)
        }
        let script = document.createElement("script");
        script.src = `${url}?${arrs.join("&")}`;
        document.body.appendChild(script);
        window[cb] = function(data){
            try{
                resolve(data)
            }catch(e){
                reject(e)
            }finally{
                // 最后要移除此标签
                script.parentNode.removeChild(script);
            }
        }
    })
}
// 只能发送get请求,不支持post put delete
// 不安全,容易被xss攻击
jsonp({
    url:"http://localhost:3000/say",
    params:{wd:"yichuan_i_love_you"},
    cb:"show"
}).then(data=>{
    console.log(data);
})
</script>
服务器代码:
const express = require("express")
const app = express()

app.get("/say",(req,res)=>{
    const {wd, cb} = req.query;
    console.log("wd", wd);
    res.end(`${cb}("Pingping i love you")`)
})

app.listen(3000,()=>{
    console.log(`this is server is running...`);
})
服务器打印:

页面数据打印:
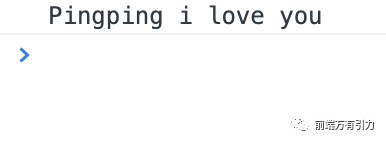
我们看到当刘拉你去通过jsonp向后端请求时,后端接收请求后进行打印数据,而后向前端返回Pingping i love you在控制台进行打印。
3.CORS
我们知道JSONP也可以跨域,那为什么还要使用CORS呢?
- jsonp只可以使用 GET 方式提交
- 不好调试,在调用失败的时候不会返回任何状态码
- 安全性问题
当提供JSONP的服务被恶意注入漏洞,那么它返回数据的JS内容就被人控制了,这样调用这个JSONP的网站都会存在这个漏洞,因此必须在确保JSONP内容安全可靠的时候才能进行使用。
CORS是一个W3C标准,全称是"跨域资源共享"(Cross-origin resource sharing),他允许浏览器向跨源服务器发送XMLHttpRequest请求,从而克服啦 AJAX 只能同源使用的限制。
CORS需要浏览器和服务器同时支持,整个 CORS通信过程,都是浏览器自动完成不需要用户参与,对于开发者来说,CORS的代码和正常的 AJAX 没有什么差别,浏览器一旦发现跨域请求,就会添加一些附加的头信息。
但是,CORS仅支持IE10以上的版本。
index.html
<script>
    const xhr = new XMLHttpRequest;
    // true 开启异步
    xhr.open("GET","http://localhost:3001/getData",true);
    xhr.onreadystatechange = ()=>{
        if(xhr.readyState === 4){
            if(200 <= xhr.status && xhr.status < 300 || xhr.status === 304){
                console.log(xhr.response);
            }
        }
    }
    xhr.send()
</script>
server01.js
const express = require("express");
const app = express();
app.use(express.static(__dirname));
app.listen(3002,()=>{
    console.log(`http://localhost:3002`);
});
server02.js
const express = require("express")

const app = express()

app.get("/getData",(req,res)=>{
    const {wd, cb} = req.query;
    console.log("wd", wd);
    res.end(`${cb}("Pingping i love you")`)
})

app.listen(3001,()=>{
    console.log(`this is server is running...`);
})
我们看到,当写好了ajax请求代码,在启动server01.js服务后,在浏览器向后端请求数据,我们发现出现了跨域报错。

那么我们需要在后端服务进行设置Access-Control-Allow-Origin实现跨域请求。
const whitList = ["http://localhost:3002"]
app.use((req, res, next)=>{
    const origin = req.headers.origin;
    if(whitList.includes(origin)){
        // 设置哪个源可以访问我们
        res.setHeader("Access-Control-Allow-Origin",origin);
        // 允许携带哪个头访问我
        res.setHeader("Access-Control-Allow-Headers","name");
        // 允许哪个方法访问我 默认允许get post请求
        res.setHeader("Access-Control-Allow-Methods","PUT");
        // 允许携带cookie
        res.setHeader("Access-Control-Allow-Credentials",true);
        // 预检的存活时间
        res.setHeader("Access-Control-Max-Age",10);
        // 允许返回的头
        res.setHeader("Access-Control-Expose-Headers","name");
        if(req.method === "OPTIONS"){
            res.end();//OPTIONS请求不做任何处理
        }

    }
    next()
})
此时,我们看到:

4.postMessage
postMessage是H5引入的API,postMessage()方法允许来自不同源的脚本采用异步方式进行有效的通信,可以实现跨文本文档、多窗口、跨域消息传递。多用于窗口间数据通信,这也使它成为跨域通信的一种有效的解决方案。
发送数据:
otherWindow.postMessage(message, targetOrigin, [transfer]);
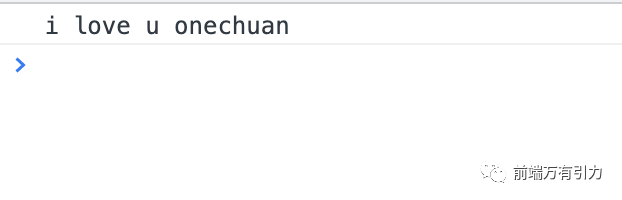
pingping.html
<h1>i love u onechuan</h1>
<script>
    window.onmessage = (e)=>{
        console.log(e.data);
        e.source.postMessage("i love u too, onechuan", e.origin)
    }
</script>
onechuan.html
<iframe src="http://localhost:3001/pingping.html"  frameborder="0" id="frame" onload="load()"></iframe>
<script>
    function load(){
        const frame = document.getElementById("frame");
        frame.contentWindow.postMessage("i love u pingping", "http://localhost:3001")
        window.onmessage = (e)=>{
            console.log(e.data);
        }
    }
</script>
我们可以看到,在onechuan.html中通过postMessage请求并展示了pingping.html页面的数据,控制台出现了i love u onechuan。

5.window.name+iframe
window.name属性name 值在不同的页面(甚至不同域名)加载后依旧存在(如果没修改则值不会变化),并且可以支持非常长的 name 值(2MB)。并且使用window.name很方便。
name 在浏览器环境中是一个全局/window对象的属性,且当在 iframe 中加载新页面(可以是不同域的)时,name 的属性值依旧保持不变(只要不重新赋值)。name属性的值虽然不变,但对它的访问还是受到同域原则,不允许访问。所以我们要把iframe重新定向回原域,这样name的值也没变,并且可以访问了。
- a.html和b.html是同域的 http://localhost:3000
- c.html 是独立的 http://localhost:3001
- a.html获取c.html的数据
- a.html先引用c.html,c把值放在window.name,把a引用的地址改为b.html
a.html
<iframe src="http://localhost:3001/c.html" frameborder="0" onload="load()" id="iframe"></iframe>
<script>

let first = true;
// onload事件会触发2次,第1次加载跨域页,并留存数据于window.name
function load(){
    // 第1次onload(跨域页)成功后,切换到同域代理页面
    if(first){
    //加载完url后,重新定向回原域
        let iframe = document.getElementById("iframe")
        iframe.src = "http://localhost:3000/b.html";
        first = false;
    }else{
        // 第2次onload(同域b.html页)成功后,读取同域window.name中数据
        console.log(iframe.contentWindow.name);
    }

}
</script>
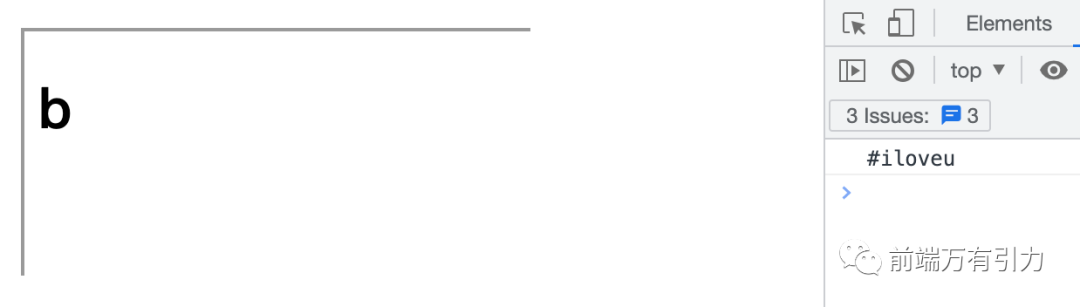
b.html为中间代理页,与a.html同域,内容为空。
c.html
<h1>c</h1>
<script>
    window.name = "ccc"
</script>
总结:通过iframe的src属性由外域转向本地域,跨域数据即由iframe的window.name从外域传递到本地域。这个就巧妙地绕过了浏览器的跨域访问限制,但同时它又是安全操作。
6.location.hash+iframe
实现原理:a.html欲与c.html跨域相互通信,通过中间页b.html来实现。三个页面,不同域之间利用iframe的location.hash传值,相同域之间直接js访问来通信。
路径后面的hash值可以用来通信,我们的目的从a想访问c,那么从a给c传一个hash值,c收到hash值后,c把hash值传递给b,那么b将结果放在a的hash值中。
a.html
<iframe src="http://localhost:3000/c.html#iloveu" frameborder="0"></iframe>
<script>
    //检测hash的变化
    window.onhashchange = ()=>{
        console.log(location.hash);
    }
</script>
b.html
<h1>b</h1>
<script>
    //b.html将结果放到a.html的hash值中,b.html可通过parent.parent访问a.html页面
    window.parent.parent.location.hash = location.hash
</script>
c.html
<script>
    console.log(location.hash);
    const iframe = document.createElement("iframe");
    iframe.src = "http://localhost:3000/b.html#iloveu";
    document.body.appendChild(iframe);
</script>
在a.html页面通过iframe打开c.html页面,而c.html中创建iframe标签设置src为b.html,最终打开了b.html页面,能够在控制台打印hash值。
7.document.domain + iframe
该方式只能用于二级域名相同的情况下,比如 a.onechuan.com 和 b.onechuan.com 适用于该方式。只需要给页面添加 document.domain ='onechuan.com' 表示二级域名都相同就可以实现跨域。
实现原理:两个页面都通过js强制设置document.domain为基础主域,就实现了同域。我们看个例子:页面a.onechuna.com:3000/a.html获取页面b.onechuan.com:3000/b.html中a的值
a.html
<iframe src="http://b.onechuan.com:3001/b.html" id="iframe" onload="load()" frameborder="0"></iframe>
<script>
// 域名 一级域名 二级域名
// www.onechuan.com
// oc.onechuan.com
// a是通过http://oc.onechuan.com
const iframe = document.getElementById("iframe")
document.domain = "onechuan.com"
function load(){
    console.log(iframe.contentWindow.b);
}
</script>
b.html
<script>
document.domain = "onechuan.com"
var b = 100;
</script>
设置host:
127.0.0.1 a.onechuan.com
127.0.0.1 b.onechuan.com
8.webSocket
WebSocket 是一种双向通信协议,在建立连接之后,WebSocket 的 server 与 client 都能主动向对方发送或接收数据。同时,WebSocket 在建立连接时需要借助 HTTP 协议,连接建立好了之后 client 与 server 之间的双向通信就与 HTTP 无关了。
实际使用的时候,我们会用封装好的Socket.io。
websocket.html
<script>
// 高级api 不兼容socket.io 一般使用它
let socket = new WebSocket("ws://localhost:3000")
socket.onopen = ()=>{
    socket.send("i love u pingping")
}
socket.onmessage = (e)=>{
    console.log(e.data);
}
</script>
server.js
const WebSocket = require("ws");
const wss = new WebSocket.Server({port:3000});
wss.on("connection",ws=>{
    ws.on("message",data=>{
        console.log("data",data);
        ws.send("i love u onechuan")
    })
})

9.nginx反向代理
使用nginx反向代理实现跨域,是最简单的跨域方式。只需要修改nginx的配置即可解决跨域问题,支持所有浏览器,支持session,不需要修改任何代码,并且不会影响服务器性能。
实现思路:通过nginx配置一个代理服务器(域名与domain1相同,端口不同)做跳板机,反向代理访问domain2接口,并且可以顺便修改cookie中domain信息,方便当前域cookie写入,实现跨域登录。
先下载nginx,然后将nginx目录下的nginx.conf修改如下:
// proxy服务器
server {
    listen       81;
    server_name  www.domain1.com;
    location / {
        proxy_pass   http://www.domain2.com:8080;  #反向代理
        proxy_cookie_domain www.domain2.com www.domain1.com; #修改cookie里域名
        index  index.html index.htm;

        # 当用webpack-dev-server等中间件代理接口访问nignx时,此时无浏览器参与,故没有同源限制,下面的跨域配置可不启用
        add_header Access-Control-Allow-Origin http://www.domain1.com;  #当前端只跨域不带cookie时,可为*
        add_header Access-Control-Allow-Credentials true;
    }
}
最后通过命令行nginx -s reload启动nginx。
index.html
var xhr = new XMLHttpRequest();
// 前端开关:浏览器是否读写cookie
xhr.withCredentials = true;
// 访问nginx中的代理服务器
xhr.open('get', 'http://www.domain1.com:81/?user=admin', true);
xhr.send();
server.js
var http = require('http');
var server = http.createServer();
var qs = require('querystring');
server.on('request', function(req, res) {
    var params = qs.parse(req.url.substring(2));
    // 向前台写cookie
    res.writeHead(200, {
        'Set-Cookie': 'l=a123456;Path=/;Domain=www.domain2.com;HttpOnly'   // HttpOnly:脚本无法读取
    });
    res.write(JSON.stringify(params));
    res.end();
});
server.listen('8080');
console.log('Server is running at port 8080...');
10.http-proxy
同源策略是浏览器需要遵循的标准,而如果是服务器向服务器请求就无需遵循同源策略。
代理服务器,需要做以下几个步骤:
- 接受客户端请求 。
- 将请求转发给服务器。
- 拿到服务器 响应 数据。
- 将 响应 转发给客户端。
我们先来看个例子:本地文件index.html文件,通过代理服务器http://localhost:3000向目标服务器http://localhost:4000请求数据。
// index.html(http://127.0.0.1:5500)
 <script src="https://cdn.bootcss.com/jquery/3.3.1/jquery.min.js"></script>
<script>
  $.ajax({
    url: 'http://localhost:3000',
    type: 'post',
    data: { name: 'xiamen', password: '123456' },
    contentType: 'application/json;charset=utf-8',
    success: function(result) {
      console.log(result) // {"title":"fontend","password":"123456"}
    },
    error: function(msg) {
      console.log(msg)
    }
  })
 </script>
server.js
// server1.js 代理服务器(http://localhost:3000)
const http = require('http')
// 第一步:接受客户端请求
const server = http.createServer((request, response) => {
  // 代理服务器,直接和浏览器直接交互,需要设置CORS 的首部字段
  response.writeHead(200, {
    'Access-Control-Allow-Origin': '*',
    'Access-Control-Allow-Methods': '*',
    'Access-Control-Allow-Headers': 'Content-Type'
  })
  // 第二步:将请求转发给服务器
  const proxyRequest = http
    .request(
      {
        host: '127.0.0.1',
        port: 4000,
        url: '/',
        method: request.method,
        headers: request.headers
      },
      serverResponse => {
        // 第三步:收到服务器的响应
        var body = ''
        serverResponse.on('data', chunk => {
          body += chunk
        })
        serverResponse.on('end', () => {
          console.log('The data is ' + body)
          // 第四步:将响应结果转发给浏览器
          response.end(body)
        })
      }
    )
    .end()
})
server.listen(3000, () => {
  console.log('The proxyServer is running at http://localhost:3000')
})
server2.js
// server2.js(http://localhost:4000)
const http = require('http')
const data = { title: 'fontend', password: '123456' }
const server = http.createServer((request, response) => {
  if (request.url === '/') {
    response.end(JSON.stringify(data))
  }
})
server.listen(4000, () => {
  console.log('The server is running at http://localhost:4000')
})
上述代码经过两次跨域,值得注意的是浏览器向代理服务器发送请求,也遵循同源策略,最后在index.html文件打印出{"title":"fontend","password":"123456"}。
11.参考文章
- 九种跨域方式实现原理(完整版)
- postMessage可太有用了
- 面试题之Jsonp的理解及手写代码
12.写在最后
我们知道JSONP只支持GET请求,不支持IE10以下的浏览器,且存在安全性问题容易被恶意劫持。而CORS支持所有类型的HTTP请求,是跨域HTTP请求的根本解决方案,实际生产中,使用得比较多的跨域方案是cors和nginx反向代理。
相关文章
- 如何一键开启云化升级,沃趣科技携手制造业带来最佳体验
- 产品动态 | QPlus V5.5.0 秒级精准恢复,数据安全新范式
- 沃趣科技与海量数据达成战略合作,携手打造信创数据库坚实基座
- 沃趣数据库云平台入选《2022年度浙江省首版次软件产品应用推广指导目录》
- 聚力协同,引领共创 | 沃趣科技助力2022「DaoCloud 道客」全国生态合作伙伴大会
- 喜讯 | 沃趣科技荣获2021年度中国交通运输协会科技进步奖二等奖
- 荣誉上榜 | 沃趣科技入选艾瑞咨询《2022年中国数据库研究报告》
- 数造创新,云筑未来 | 沃趣科技亮相第十三届中国数据库技术大会
- 沃趣科技入选《2022·爱分析数据库厂商全景报告》,荣膺数据库云管理平台市场代表厂商
- 美联储金融科技特别报告:隐私增强技术—分类、案例和考虑事项
- 在 Linux 上学习 C 语言的五种方式
- 国际清算银行:大型科技公司监管 寻找新的监管框架
- 2022 年 IDC 金融科技排名:最具价值和影响力的金融科技公司
- 高盛金融科技的全球投资版图
- 高盛的蜕变:高盛金融科技业务布局如何推动其转型科技公司
- OECD:人工智能、机器学习和大数据在金融领域的应用
- 全球资管巨头贝莱德的金融科技投资路径
- 投资的未来:入选美国金融科技50强的资管科技公司
- 开公司的目的 - 我的闪存
- 世界银行:金融科技如何促进中小企业融资