
基于HarmonyOS的AI图像识别应用开发(ETS)

前言
原本打算在九联开发板上搭配摄像头开发,去实现拍照并对图片进行AI识别的应用开发,但是遇到了点问题。
不过基于HarmonyOS的AI图像识别案例可以正常运作,于是作此文章作为小分享O(∩_∩)O。
概述
本案例是通过网络请求连接到百度云,调用百度云AI图像识别的API,再将结果返回至应用显示。百度云文档。
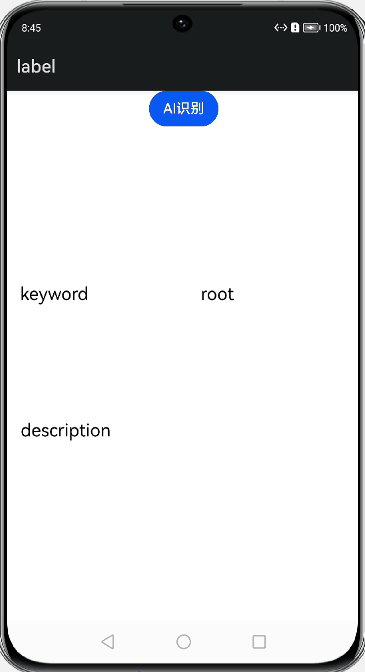
举例效果图:
正文
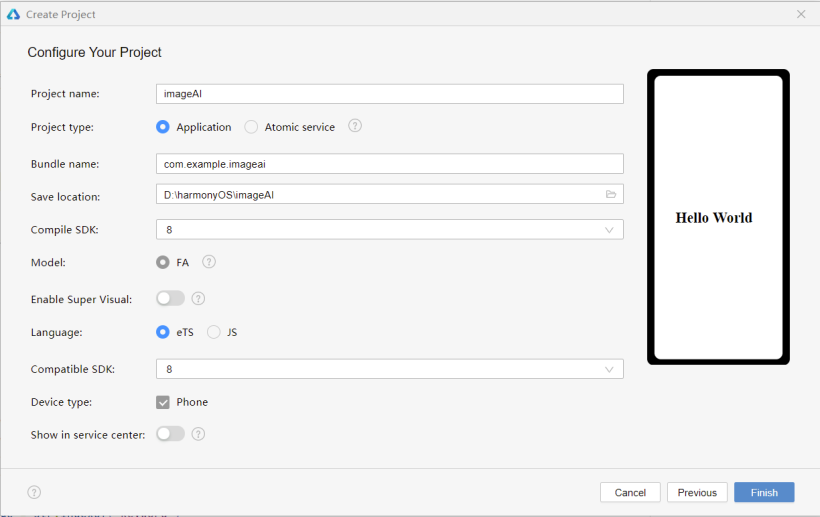
一、创建项目
项目选择HarmonyOS的Empty Ability模板,API选择8,语言选择ets。

二、添加权限及导入模块
1、在config.json文件中添加权限。
"reqPermissions": [
      {
        "name": "ohos.permission.INTERNET"
      }
    ]
2、在index.ets文件中导入模块,第一个是资源管理模块,第二个是网络模块。
import resourceManager from '@ohos.resourceManager';
import http from '@ohos.net.http';
三、创建网络请求并根据百度云API传参
-开源基础软件社区")
该API调用前需要获取access_token,具体方法见其文档(注意的是创建应用后要去开启图像识别的服务)。
-开源基础软件社区")
定义变量
access_token: string = 'Hello World'
Base64Str: string = 'Hello World'
result_description: string = 'description'
result_keyword: string = 'keyword'
result_root: string = 'root'
result_image: string = 'image'
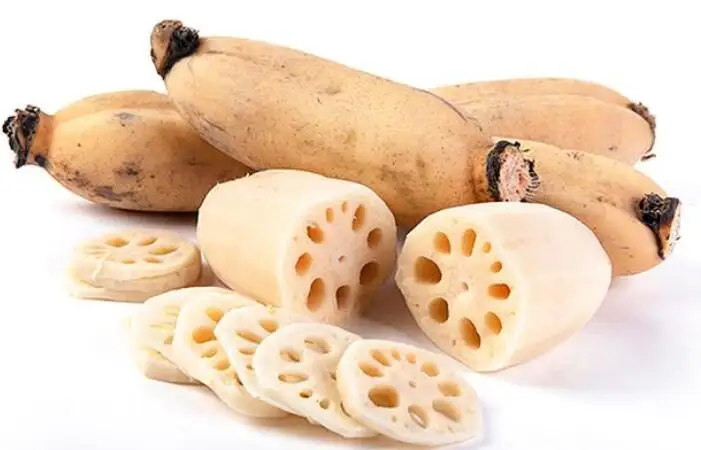
并上传要识别的图片到项目中,此案例中使用的是一张莲藕的图片。
编写函数获取access_token
GetAccessToken() {
    let httpRequest = http.createHttp();
    httpRequest.request(
//自行替换AK和SK
      "https://aip.baidubce.com/oauth/2.0/token?grant_type=client_credentials&client_id=【百度云应用的AK】&client_secret=【百度云应用的SK】",
      {
        method: http.RequestMethod.POST,
        connectTimeout: 60000,
        readTimeout: 60000,
      }, (err, data) => {
      if (!err) {
        let obj = JSON.parse(data.result.toString());
        this.access_token=obj.access_token
        console.info('Result1:' + data.result);
        console.info('Result1_token:' + this.access_token);
      } else {
        console.info('Result1_error:' + JSON.stringify(err));
        httpRequest.destroy();
      }
    })
  }
编写函数编码图片并去掉编码头
resourceManager.getResourceManager 此API只适用于FA模型,stage模型不适用。(所以在标准系统相机开发模型为stage时,不能用此方法对图片编码)。
//base64编码
GetBase64(){
    let that = this
    resourceManager.getResourceManager((error, mgr) => {
      if (error != null) {
        console.log("ResourceManager error is " + error)
      } else {
        mgr.getMediaBase64($r('app.media.lianou').id, (error, value) => {
          if (error != null) {
            console.log("base64_error is " + error)
          } else {
            console.info('base64_result:' + value)
            that.Base64Str = that.getCaption(value)
            console.info('base64Str:' + this.Base64Str)
          }
        });
      }
    });
  }
//去掉编码头
  getCaption(obj) {
    var index = obj.lastIndexOf("\,");
    obj = obj.substring(index + 1, obj.length);
    return obj;
  }
编写函数调用图像识别API
注:这里 header:{‘Content-Type’: ‘application/x-www-form-urlencoded’} 才能传image参数到百度云。HTTP请求头字段,默认{‘Content-Type’: ‘application/json’} 。笔者将能在harmonyOS模拟器上跑起来的同样代码复制到一个新建的openHarmony项目中,但是会报错:缺参。通过后台调试发现能接收url的参数access_token和header参数,当header为默认类型时能接收到extraData里的参数,但当header为’application/x-www-form-urlencoded’时,无法收到extraData里的参数,所以初步认为是笔者所用OH系统版本的网络请求库不支持application/x-www-form-urlencoded传参。
AI_request() {
    let httpRequest = http.createHttp();
    httpRequest.request(
      "https://aip.baidubce.com/rest/2.0/image-classify/v2/advanced_general?access_token="+ this.access_token,
      {
        method: http.RequestMethod.POST,
        header: {
          'Content-Type': 'application/x-www-form-urlencoded'
        },
        extraData: {
          'image': this.Base64Str,
          'baike_num': 1
        },
        connectTimeout: 60000,
        readTimeout: 60000,
      }, (err, data) => {
      if (!err) {
        let obj = JSON.parse(data.result.toString());
        this.result_description = obj.result[0].baike_info.description;
        this.result_keyword = obj.result[0].keyword;
        this.result_image = obj.result[0].baike_info.image_url;
        this.result_root = obj.result[0].root;

        console.info('Result_description:' + this.result_description)
        console.info('Result_keyword:' + this.result_keyword)
        console.info('Result_root:' + this.result_root)
        console.info('Result_image:' + this.result_image)
      } else {
        console.info('Result2_error:' + JSON.stringify(err));
        httpRequest.destroy();
      }
    })
  }
四、编写UI界面调用函数
因为图片编码需要点时间,为了避免传参时出现错误,于是添加了一个延迟函数。
build() {
    Column({ space: 10 }) {
      Button('AI识别')
        .onClick(() => {
          this.GetBase64()
          this.GetAccessToken()
          setTimeout(()=>{
            this.AI_request()
          },1400)
        })
      Image(this.result_image)
        .width(150)
        .height(150)

      Row({ space: 20 }) {
        Text(this.result_keyword)
          .fontSize(20)
          .width(150)
          .height(35)
          .textAlign(TextAlign.Start)
        .margin(15)
        Text(this.result_root)
          .fontSize(20)
          .textAlign(TextAlign.Start)
          .width(150)
          .height(35)
          .margin(15)
      }.width('100%')
      .height(35)

      Text(this.result_description)
        .fontSize(20)
        .textAlign(TextAlign.Start)
        .width('90%')
        .height(250)
    }
    .width('100%')
    .height('100%')

  }
}
结语
以上就是本次的小分享啦!
相关文章
- Jgit的使用笔记
- 利用Github Action实现Tornadofx/JavaFx打包
- 叹息!GitHub Trending 即将成为历史!
- 微软软了?开源社区讨论炸锅,GitHub CEO 亲自来答
- GitHub Trending 列表频现重复项,前后端都没去重?
- Photoshop Elements 2021版本软件安装教程(mac+windows全版本都有)
- (ps全版本)Photoshop 2020的安装与破解教程(mac+windows全版本都有)
- (ps全版本)Photoshop cc2018的安装与破解教程(mac+windows全版本,包括2023
- 环境搭建:Oracle GoldenGate 大数据迁移到 Redshift/Flat file/Flume/Kafka测试流程
- 每个开发人员都要掌握的:最小 Linux 基础课
- 来撸羊毛了!Windows 环境下 Hexo 博客搭建,并部署到 GitHub Pages
- 超实用!手把手入门 MongoDB:这些坑点请一定远离
- 【GitHub日报】22-10-09 zustand、neovim、webtorrent、express 等4款App今日上新
- 【GitHub日报】22-10-10 brew、minio、vite、seaweedfs、dbeaver 等8款App今日上新
- 【GitHub日报】22-10-11 cobra、grafana、vue、ToolJet、redwood 等13款App今日上新
- Photoshop 2018 下载及安装教程(mac+windows全版本都有,包括最新的2023)
- Photoshop 2017 下载及安装教程(mac+windows全版本都有,包括最新的2023)
- Photoshop 2020 下载及安装教程(mac+windows全版本都有,包括最新的2023)
- Photoshop 2023 资源免费下载(mac+windows全版本都有,包括最新的2023)
- 最新版本Photoshop CC2018软件安装教程(mac+windows全版本都有,包括2023