
K8S搭建ELK(Elasticsearch,Kibana,Logstash和Filebeat)
部署前提:
1、完成K8S集群搭建,搭建参考:
基于ECS云主机搭建k8s集群-详细过程_Soft_Engneer的博客-CSDN博客Kubernetes集群详细部署过程,K8s避坑记录,快速搭建环境并把主要时间花在专注k8s的学习上https://blog.csdn.net/Soft_Engneer/article/details/124517916?spm=1001.2014.3001.55022、完成GlusterFS共享存储部署,搭建参考:
docker pull docker.elastic.co/elasticsearch/elasticsearch:7.17.2
docker pull docker.elastic.co/kibana/kibana:7.17.2
docker pull docker.elastic.co/logstash/logstash:7.17.2
docker pull docker.elastic.co/beats/filebeat:7.17.2
一,搭建elasticsearch+kibana
elasticsearch配置文件:
[root@k8s-node01 elk]# more elasticsearch.yml
cluster.name: my-es
node.name: "node-1"
path.data: /usr/share/elasticsearch/data
#path.logs: /var/log/elasticsearch
bootstrap.memory_lock: false
network.host: 0.0.0.0
http.port: 9200
#集群个节点IP地址,也可以使用els、els.shuaiguoxia.com等名称,需要各节点能够解析
#discovery.zen.ping.unicast.hosts: ["172.16.30.11", "172.17.77.12"]
#集群节点数
#discovery.zen.minimum_master_nodes: 2
discovery.seed_hosts: ["127.0.0.1", "[::1]"]
cluster.initial_master_nodes: ["node-1"]
#增加参数,使head插件可以访问es
http.cors.enabled: true
http.cors.allow-origin: "*"
http.cors.allow-headers: Authorization,X-Requested-With,Content-Length,Content-Type
kibana配置文件:
kibana连接的主机使用了域名,是由有状态应用statefulset创建的Pod
[root@k8s-node01 elk]# more kibana.yml
server.port: 5601
server.host: "0.0.0.0"
elasticsearch.hosts: "http://es-kibana-0.es-kibana.kube-system:9200"
kibana.index: ".kibana"
创建elasticsearch和kibana的配置文件configmap:
kubectl create configmap es-config -n kube-system --from-file=elasticsearch.yml
kubectl create configmap kibana-config -n kube-system --from-file=kibana.yml
创建glusterfs存储,用于创建pv:
es-volume存储卷已创建,那么需要创建endpoint和svc:
es-endpoints.yaml
es-glusterfs-svc.yaml
[root@k8s-node01 elk]# more es-endpoints.yaml
apiVersion: v1
kind: Endpoints
metadata:
  name: glusterfs-es
  namespace: kube-system
subsets:
- addresses:
  - ip: 192.168.16.5
  ports:
  - port: 49155
- addresses:
  - ip: 192.168.16.4
  ports:
  - port: 49155
- addresses:
  - ip: 172.17.22.4
  ports:
  - port: 49155
[root@k8s-node01 elk]#
[root@k8s-node01 elk]# more es-glusterfs-svc.yaml
apiVersion: v1
kind: Service
metadata:
  name: glusterfs-es
  namespace: kube-system
spec:
  ports:
  - port: 49155

[root@k8s-node01 elk]#
创建服务:
[root@k8s-node01 elk]# kubectl create -f es-endpoints.yaml
[root@k8s-node01 elk]# kubectl create -f es-glusterfs-svc.yaml
es存储pvc,pv配置文件:es-pv.yaml和es-pvc.yaml
[root@k8s-node01 elk]# more es-pv.yaml
apiVersion: v1
kind: PersistentVolume
metadata:
  name: es-pv
  namespace: kube-system
spec:
  capacity:
    storage: 5Gi
  accessModes:
    - ReadWriteMany
  glusterfs:
    endpoints: "glusterfs-es"
    path: "es-volume"
    readOnly: false

[root@k8s-node01 elk]# more es-pvc.yaml
kind: PersistentVolumeClaim
apiVersion: v1
metadata:
  name: es-pv-claim
  namespace: kube-system
  labels:
    app: es
spec:
  accessModes:
    - ReadWriteMany
  resources:
    requests:
      storage: 5Gi

[root@k8s-node01 elk]#
创建pvc、pv:
[root@k8s-node01 elk]#
[root@k8s-node01 elk]# kubectl apply -f es-pv.yaml
persistentvolume/es-pv created
[root@k8s-node01 elk]# kubectl apply -f es-pvc.yaml
persistentvolumeclaim/es-pv-claim created
[root@k8s-node01 elk]#
[root@k8s-node01 elk]# kubectl get pv,pvc -A
NAME                          CAPACITY   ACCESS MODES   RECLAIM POLICY   STATUS   CLAIM                     STORAGECLASS   REASON   AGE
persistentvolume/es-pv        5Gi        RWX            Retain           Bound    kube-system/es-pv-claim                           26s
persistentvolume/prometheus   4Gi        RWX            Retain           Bound    prome-system/prometheus                           23h

NAMESPACE      NAME                                STATUS   VOLUME       CAPACITY   ACCESS MODES   STORAGECLASS   AGE
kube-system    persistentvolumeclaim/es-pv-claim   Bound    es-pv        5Gi        RWX                           22s
prome-system   persistentvolumeclaim/prometheus    Bound    prometheus   4Gi        RWX                           23h
创建es-kibana的yaml配置文件: es-statefulset.yaml
[root@k8s-node01 elk]# more es-statefulset.yaml
apiVersion: apps/v1
kind: StatefulSet
metadata:
  labels:
    app: es-kibana
  name: es-kibana
  namespace: kube-system
spec:
  replicas: 1
  selector:
    matchLabels:
      app: es-kibana
  serviceName: "es-kibana"
  template:
    metadata:
      labels:
        app: es-kibana
    spec:
      imagePullSecrets:
      - name: registry-pull-secret
      containers:
      - image: elasticsearch:7.17.2
        imagePullPolicy: IfNotPresent
        lifecycle:
          postStart:
            exec:
              command: [ "/bin/bash", "-c", "sysctl -w vm.max_map_count=262144; ulimit -l unlimited;chown -R elasticsearch:elasticsearch /usr/share/elasticsearch/da
ta;" ]
        name: elasticsearch
        resources:
          requests:
            memory: "800Mi"
            cpu: "800m"
          limits:
            memory: "1Gi"
            cpu: "1000m"
        ports:
        - containerPort: 9200
        - containerPort: 9300
        volumeMounts:
        - name: es-config
          mountPath: /usr/share/elasticsearch/config/elasticsearch.yml
          subPath: elasticsearch.yml
        - name: es-persistent-storage
          mountPath: /usr/share/elasticsearch/data
        env:
        - name: TZ
          value: Asia/Shanghai
      - image: kibana:7.17.2
        imagePullPolicy: IfNotPresent
        #command: [ "/bin/bash", "-ce", "tail -f /dev/null" ]
        name: kibana
        env:
        - name: TZ
          value: Asia/Shanghai
        volumeMounts:
        - name: kibana-config
          mountPath: /usr/share/kibana/config/kibana.yml
          subPath: kibana.yml
      volumes:
      - name: es-config
        configMap:
          name: es-config
      - name: kibana-config
        configMap:
          name: kibana-config
      - name: es-persistent-storage
        persistentVolumeClaim:
          claimName: es-pv-claim
      #hostNetwork: true
      #dnsPolicy: ClusterFirstWithHostNet
      # nodeSelector:
      #            kubernetes.io/hostname: 172.16.30.1
创建es-kibana应用:
[root@k8s-node01 elk]# kubectl create -f es-statefulset.yaml
statefulset.apps/es-kibana created
[root@k8s-node01 elk]#
[root@k8s-node01 elk]# kubectl get pod -o wide -n kube-system|grep es
es-kibana-0                          2/2     Running   0            18s   10.244.1.22    k8s-node01   <none>           <none>
[root@k8s-node01 elk]#
[root@k8s-node01 elk]#
使用curl命令测试elasticsearch是否正常:(es-kibana-0这个pod的IP:10.244.1.22)
[root@k8s-node01 elk]# kubectl get pod -o wide -n kube-system|grep es
es-kibana-0                          2/2     Running   0            18s   10.244.1.22    k8s-node01   <none>           <none>
[root@k8s-node01 elk]#
[root@k8s-node01 elk]# curl 10.244.1.22:9200
{
  "name" : "node-1",
  "cluster_name" : "my-es",
  "cluster_uuid" : "0kCaXU_CSpi4yByyW0utsA",
  "version" : {
    "number" : "7.17.2",
    "build_flavor" : "default",
    "build_type" : "docker",
    "build_hash" : "de7261de50d90919ae53b0eff9413fd7e5307301",
    "build_date" : "2022-03-28T15:12:21.446567561Z",
    "build_snapshot" : false,
    "lucene_version" : "8.11.1",
    "minimum_wire_compatibility_version" : "6.8.0",
    "minimum_index_compatibility_version" : "6.0.0-beta1"
  },
  "tagline" : "You Know, for Search"
}
[root@k8s-node01 elk]#
创建es-kibana的cluserip的svc:es-cluster-none-svc.yaml
[root@k8s-node01 elk]# more es-cluster-none-svc.yaml
apiVersion: v1
kind: Service
metadata:
  labels:
    app: es-kibana
  name: es-kibana
  namespace: kube-system
spec:
  ports:
  - name: es9200
    port: 9200
    protocol: TCP
    targetPort: 9200
  - name: es9300
    port: 9300
    protocol: TCP
    targetPort: 9300
  clusterIP: None
  selector:
    app: es-kibana
  type: ClusterIP
[root@k8s-node01 elk]#
[root@k8s-node01 elk]# kubectl apply -f es-cluster-none-svc.yaml
service/es-kibana created
[root@k8s-node01 elk]#
[root@k8s-node01 elk]# kubectl get svc -n kube-system|grep es-kibana
es-kibana      ClusterIP   None            <none>        9200/TCP,9300/TCP        29s
[root@k8s-node01 elk]#
[root@k8s-node01 elk]#
创建完以后kiban及可以正常连接elasticsearch了
为了查看方便创建一个nodeport类型的svc:es-nodeport-svc.yaml
[root@k8s-node01 elk]# more es-nodeport-svc.yaml
apiVersion: v1
kind: Service
metadata:
  labels:
    app: es-kibana
  name: es-kibana-nodeport-svc
  namespace: kube-system
spec:
  ports:
  - name: 9200-9200
    port: 9200
    protocol: TCP
    targetPort: 9200
    #nodePort: 9200
  - name: 5601-5601
    port: 5601
    protocol: TCP
    targetPort: 5601
    #nodePort: 5601
  selector:
    app: es-kibana
  type: NodePort
[root@k8s-node01 elk]# kubectl apply -f es-nodeport-svc.yaml
service/es-kibana-nodeport-svc created
[root@k8s-node01 elk]#
[root@k8s-node01 elk]# kubectl get svc -n kube-system|grep es-kibana
es-kibana                ClusterIP   None             <none>        9200/TCP,9300/TCP               3m39s
es-kibana-nodeport-svc   NodePort    10.110.159.163   <none>        9200:30519/TCP,5601:32150/TCP   13s
[root@k8s-node01 elk]#
[root@k8s-node01 elk]#
使用nodeip+port访问,本次端口为32150
页面显示正常即可

二,创建logstash服务
logstash.yml配置文件,输出至es使用域名配置:
[root@k8s-node01 elk]# more logstash.yml
http.host: "0.0.0.0"
xpack.monitoring.elasticsearch.hosts: http://es-kibana-0.es-kibana.kube-system:9200
logstash.conf配置文件:
[root@k8s-node01 elk]# more logstash.conf
input {
  beats {
     port => 5044
     client_inactivity_timeout => 36000
  }
}

filter {
 #需要配置否则host是一个json不是文本则无法输出至elasticsearch
  mutate {
    rename => { "[host][name]" => "host" }
  }
}

output {
           elasticsearch {
              hosts => ["http://es-kibana-0.es-kibana.kube-system:9200"]
              index => "k8s-system-log-%{+YYYY.MM.dd}"
           }
          stdout{
              codec => rubydebug
           }
}
[root@k8s-node01 elk]#
创建两个配置文件:
kubectl create configmap logstash-yml-config -n kube-system  --from-file=logstash.yml
kubectl create configmap logstash-config -n kube-system  --from-file=logstash.conf
logstash的yaml配置文件:
[root@k8s-node01 elk]# more logstash-statefulset.yaml
apiVersion: apps/v1
kind: StatefulSet
metadata:
  labels:
    app: logstash
  name: logstash
  namespace: kube-system
spec:
  serviceName: "logstash"
  replicas: 1
  selector:
    matchLabels:
      app: logstash
  template:
    metadata:
      labels:
        app: logstash
    spec:
      imagePullSecrets:
      - name: registry-pull-secret
      containers:
      - image: logstash:7.17.2
        name: logstash
        resources:
          requests:
            memory: "500Mi"
            cpu: "400m"
          limits:
            memory: "800Mi"
            cpu: "800m"
        volumeMounts:
        - name: logstash-yml-config
          mountPath: /usr/share/logstash/config/logstash.yml
          subPath: logstash.yml
        - name: logstash-config
          mountPath: /usr/share/logstash/pipeline/logstash.conf
          subPath: logstash.conf
        env:
        - name: TZ
          value: Asia/Shanghai
      volumes:
      - name: logstash-yml-config
        configMap:
          name: logstash-yml-config
      - name: logstash-config
        configMap:
          name: logstash-config
      #nodeSelector:
      # kubernetes.io/hostname: 172.16.30.1
[root@k8s-node01 elk]#
创建logstash应用:
[root@k8s-node01 elk]# kubectl create -f logstash-statefulset.yaml
statefulset.apps/logstash created
[root@k8s-node01 elk]#
[root@k8s-node01 elk]# kubectl get pod -o wide -n kube-system|grep logstash
logstash-0                           1/1     Running   0            24s   10.244.1.23    k8s-node01   <none>           <none>
[root@k8s-node01 elk]#
注意:logstash的默认启动端口在9600-9700之间,一般是9600,具体可以查看logstash的日志确认;

logstash的svc配置文件:
[root@k8s-node01 elk]# more logstash-none-svc.yaml
apiVersion: v1
kind: Service
metadata:
  labels:
    app: logstash
  name: logstash
  namespace: kube-system
spec:
  ports:
  - name: logstsh
    port: 5044
    protocol: TCP
    targetPort: 9600
  clusterIP: None
  selector:
    app: logstash
  type: ClusterIP
[root@k8s-node01 elk]#
[root@k8s-node01 elk]# kubectl create -f logstash-none-svc.yaml
service/logstash created
[root@k8s-node01 elk]#
三,创建filebeat服务
filebeat.yml配置文件:
[root@k8s-node01 elk]# more filebeat.yml
filebeat.inputs:
- type: log
  enabled: true
  paths:
    - /messages
  fields:
    app: k8s
    type: module
filebeat.config.modules:
  path: ${path.config}/modules.d/*.yml
  reload.enabled: false
setup.template.settings:
  index.number_of_shards: 3
setup.kibana:
output.logstash:
  hosts: ["logstash-0.logstash.kube-system:5044"]
processors:
  - add_host_metadata:
  - add_cloud_metadata:
[root@k8s-node01 elk]#
解析
容器日志路径为/messages 需要在启动Pod时候把该路径对应挂载
使用的是k8s内部的dns配置elasticsearch服务
创建filebeat的configmap
kubectl create configmap filebeat-config -n kube-system --from-file=filebeat.ymlfilebeat的yaml文件:
[root@k8s-node01 elk]# more filebeat-daemonset.yaml
apiVersion: apps/v1
kind: DaemonSet
metadata:
  labels:
    app: filebeat
  name: filebeat
  namespace: kube-system
spec:
  selector:
    matchLabels:
      app: filebeat
  template:
    metadata:
      labels:
        app: filebeat
    spec:
      imagePullSecrets:
      - name: registry-pull-secret
      containers:
      - image: elastic/filebeat:7.17.2
        name: filebeat
        volumeMounts:
        - name: filebeat-config
          mountPath: /etc/filebeat.yml
          subPath: filebeat.yml
        - name: k8s-system-logs
          mountPath: /messages
        args: [
          "-c", "/etc/filebeat.yml",
          "-e",
        ]
        resources:
          requests:
            cpu: 100m
            memory: 100Mi
          limits:
            cpu: 500m
            memory: 500Mi
        securityContext:
          runAsUser: 0
        env:
        - name: TZ
          value: "CST-8"
      volumes:
      - name: filebeat-config
        configMap:
          name: filebeat-config
      - name: k8s-system-logs
        hostPath:
          path: /var/log/messages
          type: File
[root@k8s-node01 elk]#
使用DaemonSet保证每个node有且仅调度一个Pod用于收集node主机的/var/log/messages日志
[root@k8s-node01 elk]# kubectl apply -f filebeat-daemonset.yaml
daemonset.apps/filebeat created
[root@k8s-node01 elk]#
[root@k8s-node01 elk]#
[root@k8s-node01 elk]# kubectl get pod -o wide -n kube-system|grep filebeat
filebeat-5h58b                       1/1     Running   0            24s     10.244.0.17    k8s-master   <none>           <none>
filebeat-7x9xm                       1/1     Running   0            24s     10.244.1.24    k8s-node01   <none>           <none>
filebeat-z6lwv                       1/1     Running   0            24s     10.244.2.6     k8s-node02   <none>           <none>
[root@k8s-node01 elk]#
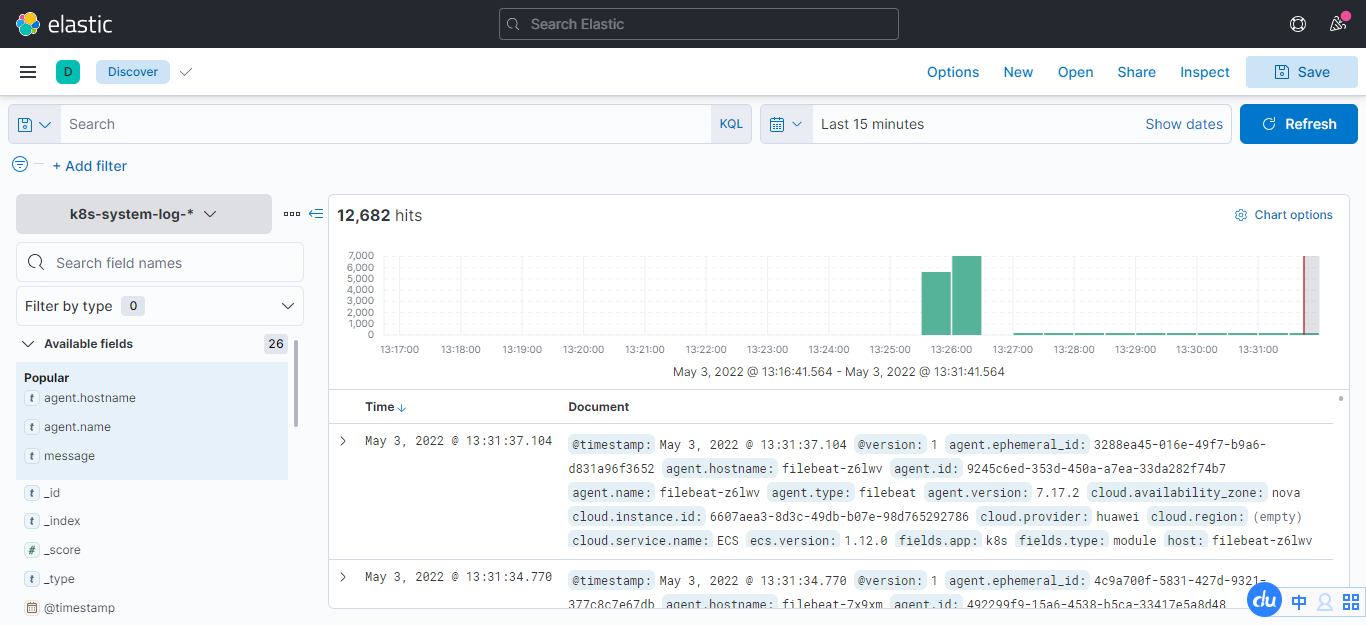
在kibana添加日志索引以后查看:
到discover页面,创建索引模式,“k8s-system-log-*” ,选择时间"timestamp",然后,就可以看到日志了
ELK日志系统搭建完成!
这篇博文写的不错,本文参考:k8s之使用k8s搭建ELK日志收集系统 - minseo - 博客园
相关文章
- 【技术种草】cdn+轻量服务器+hugo=让博客“云原生”一下
- CLB运维&运营最佳实践 ---访问日志大洞察
- vnc方式登陆服务器
- 轻松学排序算法:眼睛直观感受几种常用排序算法
- 十二个经典的大数据项目
- 为什么使用 CDN 内容分发网络?
- 大数据——大数据默认端口号列表
- Weld 1.1.5.Final,JSR-299 的框架
- JavaFX 2012:彻底开源
- 提升as3程序性能的十大要点
- 通过凸面几何学进行独立于边际的在线多类学习
- 利用行动影响的规律性和部分已知的模型进行离线强化学习
- ModelLight:基于模型的交通信号控制的元强化学习
- 浅谈Visual Source Safe项目分支
- 基于先验知识的递归卡尔曼滤波的代理人联合状态和输入估计
- 结合网络结构和非线性恢复来提高声誉评估的性能
- 最佳实践丨云开发CloudBase多环境管理实践
- TimeVAE:用于生成多变量时间序列的变异自动编码器
- 具有线性阈值激活的神经网络:结构和算法
- 内网渗透之横向移动 -- 从域外向域内进行密码喷洒攻击