
2020征文-手机深鸿会深大小组:鸿蒙HarmonyOS手机游戏之数字华容道
前言
12月16号HarmonyOS2.0手机开发者Beta版已经发布了,作为“1+8+N”战略的重要入口和生态核心,怎么能少得了手机应用开发呢,今天将由深鸿会深大学习小组从零基础开发第一个HarmonyOS手机小游戏——数字华容道(界面略丑陋,大佬别喷),此前已经在运动手表上成功开发了:HarmonyOS运动手表游戏合并、HarmonyOS手表游戏——数字华容道,同样是深鸿会深大小组学习完HarmonyOS后自行开发的一个鸿蒙demo,详细讲述了数字华容道在鸿蒙手机上开发思路。深鸿会深大学习小组是一群热衷于学习鸿蒙相关知识和开发鸿蒙相关应用的开发者们,我们的学习项目为:荔园Harmony、Awesome-HarmonyOS_木棉花,同时也欢迎与各位感兴趣的读者一起学习HarmonyOS开发,相互交流、共同进步。
概述
本个demo将从零基础开始完成鸿蒙小游戏APP在手机上的编译在项目中我们所使用到的软件为DevEco Studio,下载地址为:DevEco Studio下载、DevEco Studio安装教程,在项目中我们要实现的内容为数字华容道APP的开发。
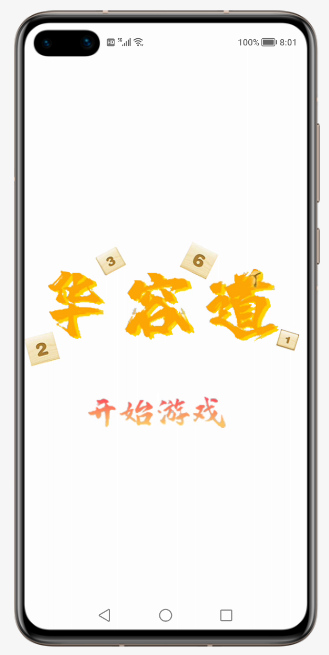
1. 打开引用首先为数字华容道的初始界面,点击开始游戏即会切换到数字华容道的游戏界面。
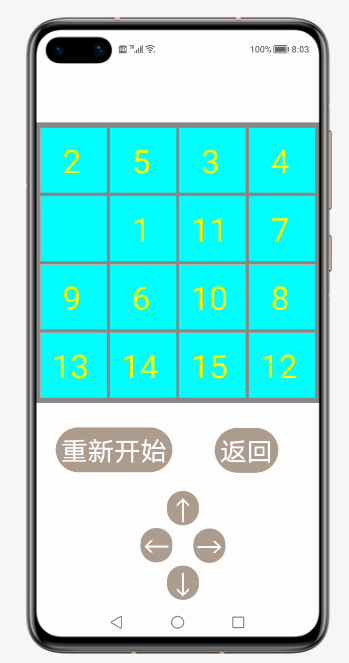
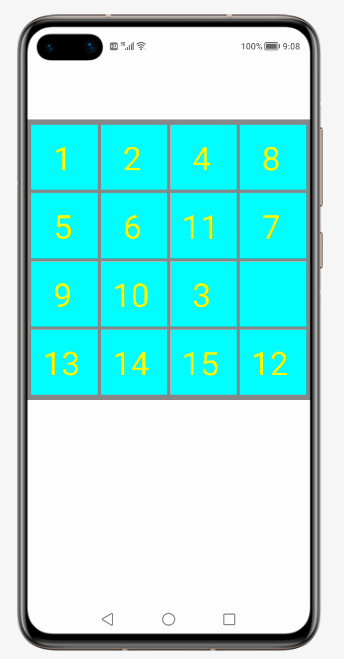
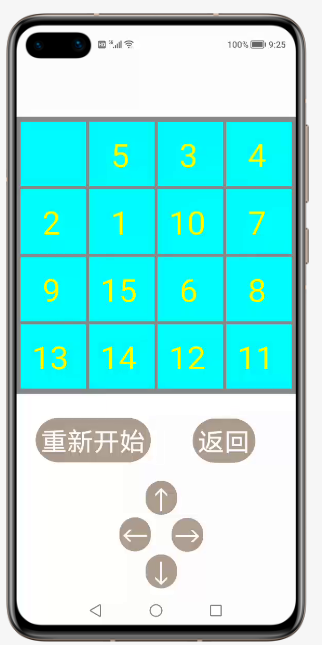
2. 进入数字华容道的游戏界面显示4*4的方阵,方阵中分布有随意打乱的1至15的数字和一个空白方格,方阵下方显示一个“重新开始”的按钮和一个“返回”按钮,点击“重新开始”按钮即会重新生成随意打乱的1至15的数字和一个空白方格的方阵,点击“返回”按钮即会切换到数字华容道的初始界面,最下方有四个指示不同方向箭头的按钮,点击任一按钮或向上、下、左、右任一方向滑动,空白方格周围对应位置的方格便会随之向对应的方向移动一格。
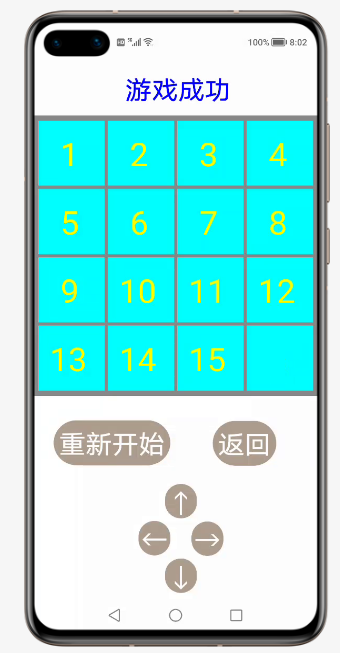
3. 经过若干次滑动或点击后,当所有的数字按顺序排列后,则会弹出游戏成功的界面,再滑动或点击也不会有任何变化。
正文
创建项目
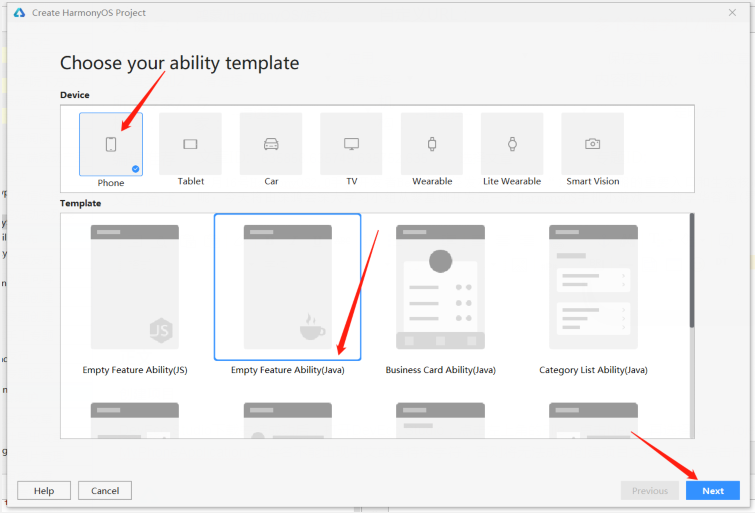
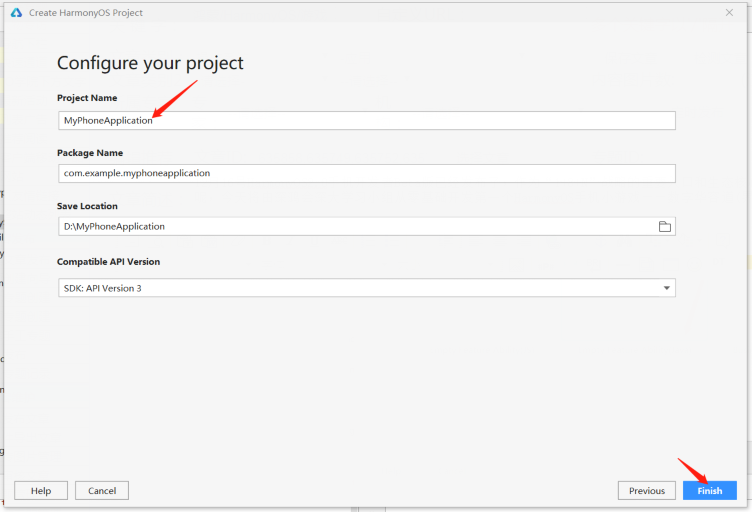
DevEco Studio下载安装成功后,打开DevEco Studio,点击左上角的File,点击New,再选择New Project,选择Phone选项,选择默认的模板(java版),然后选择保存路径,将文件命名为MyPhoneApplication(文件名不能出现中文或者特殊字符,否则将无法成功创建项目文件),最后点击Finish。
实现初始界面布局
首先,我们要先实现数字华容道的初始界面,点击开始游戏即会切换到另一个空白的界面。

1. 先在entry>src>main>config.json文件中最下方"launchType": "standard"的后面添加以下代码,并且将上方的“label”:“MyPhoneApplication”修改成"label": "数字华容道",这样就实现去掉应用上方的标题栏和将应用名称改为数字华容道了
config.json最下面部分代码:
- "orientation": "unspecified",
- "name": "com.example.myphoneapplication.MainAbility",
- "icon": "$media:icon",
- "description": "$string:mainability_description",
- "label": "数字华容道",
- "type": "page",
- "launchType": "standard",
- "metaData": {
- "customizeData": [
- {
- "name": "hwc-theme",
- "value": "androidhwext:style/Theme.Emui.Light.NoTitleBar",
- "extra": ""
- }
- ]
- }
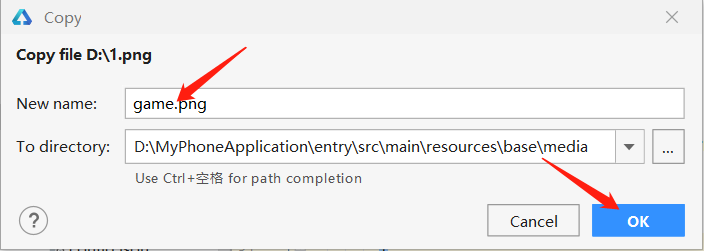
2. 先将我们事先准备好的图片复制粘贴到entry>src>main>resources>base>media文件夹中(ctrl+c、ctrl+v复制粘贴),并且命名为game,点击OK。
在entry>src>main>resources>base>layout>ability_main.xml中添加布局,先将事先存在的Text组件删去,添加Image图片组件,引入我们刚才复制粘贴的图片,再添加一个Button按钮组件,加入唯一标识符id并配置好其他相应的属性。
- xmlns:ohos="http://schemas.huawei.com/res/ohos"
- ohos:height="match_parent"
- ohos:width="match_parent"
- ohos:orientation="vertical">
- ohos:height="match_parent"
- ohos:width="match_parent"
- ohos:image_src="$media:game"
- ohos:layout_alignment="center"
- />
- ohos:id="$+id:button_game"
- ohos:height="150"
- ohos:width="515"
- ohos:text_alignment="center"
- ohos:top_margin="-810"
- ohos:left_margin="250"
- />
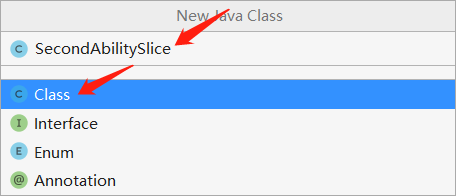
3. 在entry>src>main>java>com.example.myphoneapplication>slice中右键选择New>Java Class增加一个空白的类以用来后面编写数字华容道的游戏界面,并且命名为SecondAbilitySlice。
将entry>src>main>java>com.example.myphoneapplication>slice>SecondAbilitySlice中的代码修改成如下:
- package com.example.myphoneapplication.slice;
- import com.example.myphoneapplication.ResourceTable;
- import ohos.aafwk.ability.AbilitySlice;
- import ohos.aafwk.content.Intent;
- public class SecondAbilitySlice extends AbilitySlice {
- public void onStart(Intent intent) {
- super.onStart(intent);
- }
- @Override
- public void onActive() {
- super.onActive();
- }
- @Override
- public void onForeground(Intent intent) {
- super.onForeground(intent);
- }
- }
4. 在entry>src>main>java>com.example.myphoneapplication>slice>MainAbilitySlice中的onStart函数中添加一个按钮指向我们(2)中添加的按钮,按钮添加一个响应点击事件的函数,用parsent函数跳转到SecondAbilitySlice。
- package com.example.myphoneapplication.slice;
- import com.example.myphoneapplication.ResourceTable;
- import ohos.aafwk.content.Intent;
- import ohos.agp.components.Button;
- import ohos.agp.components.Component;
- public class MainAbilitySlice extends ohos.aafwk.ability.AbilitySlice {
- @Override
- public void onStart(Intent intent) {
- super.onStart(intent);
- super.setUIContent(ResourceTable.Layout_ability_main);
- Button button = (Button) findComponentById(ResourceTable.Id_button_game);
- button.setClickedListener(new Component.ClickedListener() {
- @Override
- public void onClick(Component component) {
- present(new SecondAbilitySlice(),new Intent());
- }
- });
- }
- @Override
- public void onActive() {
- super.onActive();
- }
- @Override
- public void onForeground(Intent intent) {
- super.onForeground(intent);
- }
- }
至此,这一部分就完成了。
实现数字的随机打乱
然后我们要在数字华容道的游戏界面生成随意打乱的1至15的数字和一个空白方格的方阵。
在entry>src>main>java>com.example.myphoneapplication>slice>SecondAbilitySlice编写代码。
先定义个一个位置布局layout和一个二维数组grids,创建函数initializeinitialize()分别对其初始化,在onStart函数中调用函数initializeinitialize()。
- private float starX, starY, distanceX, distanceY;
- private DirectionalLayout layout;
- private int[][] grids;
- public void onStart(Intent intent) {
- super.onStart(intent);
- initialize();
- }
- public void initialize(){
- layout = new DirectionalLayout(this);
- grids = new int[][]{{1, 2, 3, 4}, {5, 6, 7, 8,}, {9, 10, 11, 12}, {13, 14, 15, 0}};
- }
然后定义函数drawGrids(int[][] grids)用于绘制4*4方阵和其二维数组对应的数字。
- public void drawGrids(int[][] grids){
- layout.setLayoutConfig((new ComponentContainer.LayoutConfig(ComponentContainer.LayoutConfig.MATCH_PARENT,ComponentContainer.LayoutConfig.MATCH_PARENT)));
- Component.DrawTask task=new Component.DrawTask() {
- public void onDraw(Component component, Canvas canvas) {
- Paint mPaint = new Paint();
- mPaint.setColor(Color.GRAY);
- RectFloat rect=new RectFloat(2,230,1078,1306);
- canvas.drawRect(rect,mPaint);
- for(int row = 0; row < 4; row++){
- for(int column = 0; column < 4; column++){
- mPaint.setColor(Color.CYAN);
- RectFloat rectFloat=new RectFloat(22+column*262,250+row*262,272+column*262,500+row*262);
- canvas.drawRect(rectFloat,mPaint);
- mPaint.setColor(Color.YELLOW);
- mPaint.setTextSize(125);
- if(grids[row][column]!=0){
- if(grids[row][column]<10){
- canvas.drawText(mPaint, String.valueOf(grids[row][column]),105+column*262,425+row*262);
- }
- else{
- canvas.drawText(mPaint, String.valueOf(grids[row][column]),65+column*262,425+row*262);
- }
- }
- }
- }
- }
- };
- layout.addDrawTask(task);
- setUIContent(layout);
- }
再定义函数changeGrids(int[][] grids,int direction),每次接收一个方向,2表示上移,-1表示左移,1表示右移,-2表示下移,找出空白方格所在位置对应的二维数组下标,对应的方格和空白方格对应的二维数组的数值对调。
- public void changeGrids(int[][] grids,int direction){
- int row_0 = 3;
- int column_0 = 3;
- int temp;
- for(int row = 0; row < 4; row++) {
- for (int column = 0; column < 4; column++) {
- if(grids[row][column] == 0){
- row_0 = row;
- column_0 = column;
- }
- }
- }
- if(direction == -1 && (column_0 + 1) <= 3){
- temp = grids[row_0][column_0 + 1];
- grids[row_0][column_0 + 1] = grids[row_0][column_0];
- grids[row_0][column_0] = temp;
- }else if (direction == 1 && (column_0 - 1) >= 0) {
- temp = grids[row_0][column_0 - 1];
- grids[row_0][column_0 - 1] = grids[row_0][column_0];
- grids[row_0][column_0] = temp;
- } else if (direction == 2 && (row_0 + 1) <= 3) {
- temp = grids[row_0 + 1][column_0];
- grids[row_0 + 1][column_0] = grids[row_0][column_0];
- grids[row_0][column_0] = temp;
- } else if (direction == -2 && (row_0 - 1) >= 0) {
- temp = grids[row_0 - 1][column_0];
- grids[row_0 - 1][column_0] = grids[row_0][column_0];
- grids[row_0][column_0] = temp;
- }
- }
定义函数createGrids(int[][] grids)用于随机生成一个表示方向的数字,循环调用函数changeGrids(grids,direction)用于随机打乱二维数组对应的数字。
- public void createGrids(int[][] grids){
- int[] array = {-1,-2,1,2};
- for(int i = 0; i < 100; i++){
- int random = (int)Math.floor(Math.random()*4);
- int direction = array[random];
- changeGrids(grids,direction);
- }
- }
最后在initialize()函数中调用createGrids(grids)函数和drawGrids(grids)函数。
- public void initialize(){
- layout = new DirectionalLayout(this);
- grids = new int[][]{{1, 2, 3, 4}, {5, 6, 7, 8,}, {9, 10, 11, 12}, {13, 14, 15, 0}};
- createGrids(grids);
- drawGrids(grids);
- }
至此,这一部分完成了。
实现滑动或点击调换数字
添加“重新开始”和“返回”按钮,在最下方添加四个指示不同方向箭头的按钮,点击任一按钮或向上、下、左、右任一方向滑动,空白方格周围对应位置的方格便会随之向对应的方向移动一格。
在entry>src>main>java>com.example.myphoneapplication>slice>SecondAbilitySlice编写代码。
先定义一个函数drawButton()用于绘制所有的按钮,四个指示不同方向箭头的按钮分别添加四个响应点击事件的函数,分别调用对应的changeGrids(grids,direction)函数实现空白方格周围对应位置的方格便会随之向对应的方向移动一格,并调用drawGrids(grids)函数用于绘制新的方阵。
- public void drawButton(){
- Button button=new Button(this);
- button.setText("重新开始");
- button.setTextSize(100);
- button.setTextAlignment(TextAlignment.CENTER);
- button.setTextColor(Color.WHITE);
- button.setMarginTop(1400);
- button.setMarginLeft(80);
- button.setPadding(20,20,20,20);
- ShapeElement background = new ShapeElement();
- background.setRgbColor(new RgbColor(174, 158, 143));
- background.setCornerRadius(100);
- button.setBackground(background);
- layout.addComponent(button);
- Button button0=new Button(this);
- button0.setText("返回");
- button0.setTextSize(100);
- button0.setTextAlignment(TextAlignment.CENTER);
- button0.setTextColor(Color.WHITE);
- button0.setMarginTop(-170);
- button0.setMarginLeft(680);
- button0.setPadding(20,20,20,20);
- button0.setBackground(background);
- layout.addComponent(button0);
- ShapeElement background0 = new ShapeElement();
- background0.setRgbColor(new RgbColor(174, 158, 143));
- background0.setCornerRadius(100);
- Button button1=new Button(this);
- button1.setText("↑");
- button1.setTextAlignment(TextAlignment.CENTER);
- button1.setTextColor(Color.WHITE);
- button1.setTextSize(100);
- button1.setMarginLeft(500);
- button1.setMarginTop(70);
- button1.setPadding(10,0,10,0);
- button1.setBackground(background0);
- button1.setClickedListener(new Component.ClickedListener() {
- @Override
- public void onClick(Component component) {
- changeGrids(grids,2);
- }
- });
- layout.addComponent(button1);
- Button button2=new Button(this);
- button2.setText("←");
- button2.setTextAlignment(TextAlignment.CENTER);
- button2.setTextColor(Color.WHITE);
- button2.setTextSize(100);
- button2.setMarginTop(10);
- button2.setMarginLeft(400);
- button2.setPadding(10,0,10,0);
- button2.setBackground(background0);
- button2.setClickedListener(new Component.ClickedListener() {
- @Override
- public void onClick(Component component) {
- changeGrids(grids,-1);
- }
- });
- layout.addComponent(button2);
- Button button3=new Button(this);
- button3.setText("→");
- button3.setTextAlignment(TextAlignment.CENTER);
- button3.setTextColor(Color.WHITE);
- button3.setTextSize(100);
- button3.setMarginLeft(600);
- button3.setMarginTop(-130);
- button3.setPadding(10,0,10,0);
- button3.setBackground(background0);
- button3.setClickedListener(new Component.ClickedListener() {
- @Override
- public void onClick(Component component) {
- changeGrids(grids,1);
- }
- });
- layout.addComponent(button3);
- Button button4=new Button(this);
- button4.setText("↓");
- button4.setTextAlignment(TextAlignment.CENTER);
- button4.setTextColor(Color.WHITE);
- button4.setTextSize(100);
- button4.setMarginLeft(500);
- button4.setMarginTop(10);
- button4.setPadding(10,0,10,0);
- button4.setBackground(background0);
- button4.setClickedListener(new Component.ClickedListener() {
- @Override
- public void onClick(Component component) {
- changeGrids(grids,-2);
- }
- });
- layout.addComponent(button4);
- drawGrids(grids);
- }
然后添加一个函数slideGrids()为布局layout添加一个滑动事件,并获取滑动开始与结束的坐标,并计算出大致的滑动方向,分别调用对应的changeGrids(grids,direction)函数实现空白方格周围对应位置的方格便会随之向对应的方向移动一格,并调用drawGrids(grids)函数用于绘制新的方阵,并在开头添加相应的变量。
- private float starX, starY, distanceX, distanceY;
- public void slideGrids(){
- layout.setTouchEventListener(new Component.TouchEventListener() {
- @Override
- public boolean onTouchEvent(Component component, TouchEvent touchEvent) {
- MmiPoint point = touchEvent.getPointerScreenPosition(0);
- switch (touchEvent.getAction()) {
- case TouchEvent.PRIMARY_POINT_DOWN:
- starX = point.getX();
- starY = point.getY();
- break;
- case TouchEvent.PRIMARY_POINT_UP:
- distanceX = point.getX() - starX;
- distanceY = point.getY() - starY;
- break;
- }
- if (gameover() == false){
- if (Math.abs(distanceX) > Math.abs(distanceY)) {
- if (distanceX > 200) {
- changeGrids(grids,1);
- } else if (distanceX < -200) {
- changeGrids(grids,-1);
- }
- } else if (Math.abs(distanceX) < Math.abs(distanceY)){
- if (distanceY > 200) {
- changeGrids(grids,-2);
- } else if (distanceY < -200) {
- changeGrids(grids,2);
- }
- }
- }
- drawGrids(grids);
- return false;
- }
- });
- }
最后在initialize()函数中调用slideGrids()函数和drawButton()函数。
- public void initialize(){
- layout = new DirectionalLayout(this);
- grids = new int[][]{{1, 2, 3, 4}, {5, 6, 7, 8,}, {9, 10, 11, 12}, {13, 14, 15, 0}};
- createGrids(grids);
- slideGrids();
- drawButton();
- drawGrids(grids);
- }
至此,这一部分完成了。
实现游戏成功界面
点击“重新开始”按钮即会重新生成随意打乱的1至15的数字和一个空白方格的方阵,点击“返回”按钮即会切换到数字华容道的初始界面,经过若干次滑动或点击后,当所有的数字按顺序排列后,则会弹出游戏成功的界面,再滑动或点击也不会有任何变化。

在entry>src>main>java>com.example.myphoneapplication>slice>SecondAbilitySlice编写代码。
首先定义一个函数drawText()用于绘制游戏成功字样。
- public void drawText(){
- Text text=new Text(this);
- text.setText("游戏成功");
- text.setTextSize(100);
- text.setTextColor(Color.BLUE);
- text.setTextAlignment(TextAlignment.CENTER);
- text.setMarginsTopAndBottom(-2000,0);
- text.setMarginsLeftAndRight(350,0);
- layout.addComponent(text);
- setUIContent(layout);
- }
然后定义一个函数gameover()用于判断二维数组的数字是否按顺序排列,当二维数组的数字按顺序排列时返回true,否则返回false。
- public boolean gameover() {
- int[][] gameoverGrids = {{1, 2, 3, 4}, {5, 6, 7, 8,}, {9, 10, 11, 12}, {13, 14, 15, 0}};
- for (int row = 0; row < 4; row++) {
- for (int column = 0; column < 4; column++) {
- if (grids[row][column] != gameoverGrids[row][column]) {
- return false;
- }
- }
- }
- return true;
- }
再在drawButton()函数中重新开始按钮中添加一个响应点击事件的函数,用于调用函数initialize()实现重新生成随意打乱的1至15的数字和一个空白方格的方阵,返回按钮中添加一个响应点击事件的函数,用parsen函数返回数字华容道的初始界面,四个指示不同方向箭头的按钮的响应点击事件的函数中增加一个判断,当函数gameover()返回为false时才调用各自的changeGrids(grids,direction)函数,最后增加一个判断,当函数gameover()返回为true时调用函数drawText()。
- public void drawButton(){//部分代码没有贴出,可自行下载源代码查看
- button.setClickedListener(new Component.ClickedListener() {
- @Override
- public void onClick(Component component) {
- initialize();
- }
- });
- button0.setClickedListener(new Component.ClickedListener() {
- @Override
- public void onClick(Component component) {
- present(new SecondAbilitySlice(),new Intent());
- }
- });
- button1.setClickedListener(new Component.ClickedListener() {
- @Override
- public void onClick(Component component) {
- if (gameover() == false){
- changeGrids(grids,2);
- }
- }
- });
- button2.setClickedListener(new Component.ClickedListener() {
- @Override
- public void onClick(Component component) {
- if (gameover() == false){
- changeGrids(grids,-1);
- }
- }
- });
- button3.setClickedListener(new Component.ClickedListener() {
- @Override
- public void onClick(Component component) {
- if (gameover() == false){
- changeGrids(grids,1);
- }
- }
- });
- button4.setClickedListener(new Component.ClickedListener() {
- @Override
- public void onClick(Component component) {
- if (gameover() == false){
- changeGrids(grids,-2);
- }
- }
- });
- if(gameover()){
- drawText();
- }
- }
在函数slideGrids()函数中增加一个判断,当函数gameover()返回为false时才调用changeGrids(grids,direction)函数,最后增加一个判断,当函数gameover()返回为true时调用函数drawText()。
- public void slideGrids(){//部分代码没有贴出,可自行下载源代码查看
- if (gameover() == false){
- //{...}
- }
- if(gameover()){
- drawText();
- }
- }
至此,整个demo全部完成了。
结语
以上就是数字华容道小游戏在手机的主要编写思路以及代码,源码将放在附件中,欢迎大家下载,感兴趣的读者可以自行跟着编写学习,相信你们也能够完成的。更多深鸿会深大小组学习项目可以查看荔园Harmony,如果有遇到什么问题,或者查找出其中的错误之处,或者能够优化代码和界面,也欢迎各位在评论区留言讨论,让我们一起学习进步!
©著作权归作者和HarmonyOS技术社区共同所有,如需转载,请注明出处,否则将追究法律责任
https://harmonyos.51cto.com/#zz

相关文章
- 一个Java程序员对2011年的回顾
- 大数据发展历程
- Android高级进阶之路【一】Android中View绘制流程浅析
- 可信服务管理(Trusted Service Manager)介绍
- GIS应用|快速开发REST空间分析服务
- 未来十年微软长盛不衰的两项战略
- 领域驱动设计模式的收益与挑战
- cocos 3.0 一键打包android平台应该注意的细节
- 数智化时代,驱动企业转型升级的“三驾马车”是什么?
- 基于MINA构建高性能的NIO应用
- 使用Rainbond实现离线环境软件交付
- 工作流引擎 jBPM 5.2 发布
- 微信小程序Minium自动化测试(三)
- 桌面应用抢先体验,这次有点料!
- 甲骨文Java专利遭拒 起诉Android侵权受挫
- 云计算的应用领域及发展前景
- Java效率真的很低吗?Android为何要采用?
- Android高级进阶之路【二】十分钟彻底弄明白 View 事件分发机制
- 庖丁解牛之-Android平台RTSP|RTMP播放器设计
- 手机直付,超级方便