
Android12窗口模糊(二)在WindowManager的addView方法添加的视图中实现高斯模糊效果
前言
在 Android 12 中,提供了一些用于实现窗口模糊处理效果(例如背景模糊处理和模糊处理后方屏幕)的公共 API。窗口模糊处理或跨窗口模糊处理用于模糊处理给定窗口后方的屏幕。
有两种窗口模糊处理方式,可用于实现不同的视觉效果:
-
背景模糊处理(Background blur):可用于创建具有模糊背景的窗口,创造出磨砂玻璃效果,模糊区域是窗口。
-
模糊处理后方屏幕(Blur behind):可用于模糊处理(对话框)窗口后方的整个屏幕,创造出景深效果,模糊区域是整个屏幕。
这两种效果可以单独使用,也可以组合使用,如下图所示:
上面的三张效果图是谷歌官方所提供的效果图:
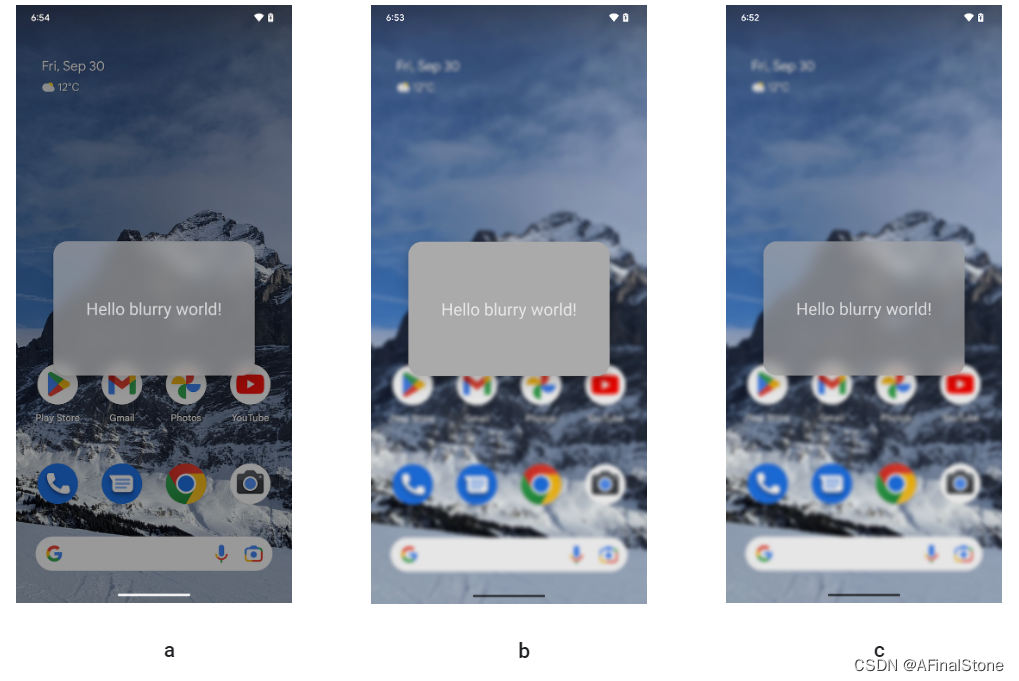
(a)仅背景模糊处理(Background blur)
(b)仅模糊处理后方屏幕(Blur behind)
(c)背景模糊处理和模糊处理后方屏幕(Background blur)+(Blur behind)
上一篇我们已经讲述了Android12如何使用原生API实现高斯模糊效果,本篇文章我们将会在分析原生API实现背景高斯模糊效果底层逻辑的基础上,使得通过WindowManager的addView方法所添加的视图也能实现背景高斯模糊效果。
一、Android12中和高斯模糊相关的关键代码:
1、关键代码
# 背景高斯模糊
android.view.Window#setBackgroundBlurRadius(int blurRadius)

# 后方屏幕高斯模糊
android.view.WindowManager.LayoutParams#FLAG_BLUR_BEHIND
android.view.WindowManager.LayoutParams#setBlurBehindRadius(int blurBehindRadius)

# 跨窗口高斯模糊监听器
android.view.WindowManager#isCrossWindowBlurEnabled()
android.view.WindowManager#addCrossWindowBlurEnabledListener(@NonNull Consumer<Boolean> listener)
android.view.WindowManager#removeCrossWindowBlurEnabledListener(Consumer<Boolean> listener)
2、关键样式属性
<declare-styleable name="Theme">
   <attr name="windowBackgroundBlurRadius" format="dimension" />
   <attr name="windowBlurBehindRadius" format="dimension"/>
   <attr name="windowBlurBehindEnabled" format="boolean" />
</declare-styleable>
二、背景高斯模糊API源码分析:
1、背景高斯模糊所对应的API是抽象类Window的setBackgroundBlurRadius方法,在Android中Window只有一个实现类PhoneWindow,PhoneWindow类中的setBackgroundBlurRadius方法如下所示:
frameworks/base/core/java/com/android/internal/policy/PhoneWindow.java
public class PhoneWindow extends Window implements MenuBuilder.Callback {
    @Override
    public final void setBackgroundBlurRadius(int blurRadius) {
        super.setBackgroundBlurRadius(blurRadius);
        if (CrossWindowBlurListeners.CROSS_WINDOW_BLUR_SUPPORTED) {
            if (mBackgroundBlurRadius != Math.max(blurRadius, 0)) {
                mBackgroundBlurRadius = Math.max(blurRadius, 0);
                mDecor.setBackgroundBlurRadius(mBackgroundBlurRadius);
            }
        }
    }
}
setBackgroundBlurRadius首先会判断用户有没有设置blurRadius,如果设置了会继续调用DecorView的setBackgroundBlurRadius方法。
2、DecorView的setBackgroundBlurRadius方法如下所示:
frameworks/base/core/java/com/android/internal/policy/DecorView.java
public class DecorView extends FrameLayout implements RootViewSurfaceTaker, WindowCallbacks {
    void setBackgroundBlurRadius(int blurRadius) {
        mOriginalBackgroundBlurRadius = blurRadius;
        if (blurRadius > 0) {
            if (mCrossWindowBlurEnabledListener == null) {
                mCrossWindowBlurEnabledListener = enabled -> {
                    mCrossWindowBlurEnabled = enabled;
                    //更新背景高斯模糊效果的半径
                    updateBackgroundBlurRadius();
                };
                getContext().getSystemService(WindowManager.class)
                        .addCrossWindowBlurEnabledListener(mCrossWindowBlurEnabledListener);
                getViewTreeObserver().addOnPreDrawListener(mBackgroundBlurOnPreDrawListener);
            } else {
                //更新背景高斯模糊效果的半径
                updateBackgroundBlurRadius();
            }
        } else if (mCrossWindowBlurEnabledListener != null) {
            //更新背景高斯模糊效果的半径
            updateBackgroundBlurRadius();
            removeBackgroundBlurDrawable();
        }
    }

 }
DecorView的setBackgroundBlurRadius方法根据不同的情况会执行不同的分支,但最终都会调用一个关键的方法updateBackgroundBlurRadius。
3、DecorView的updateBackgroundBlurRadius方法如下所示:
    //更新背景高斯模糊效果半径
    private void updateBackgroundBlurRadius() {
        //如果viewRootImpl为空直接返回
        if (getViewRootImpl() == null) return;

        //获取背景高斯模糊效果半径
        mBackgroundBlurRadius = mCrossWindowBlurEnabled && mWindow.isTranslucent()
                ? mOriginalBackgroundBlurRadius : 0;

        if (mBackgroundBlurDrawable == null && mBackgroundBlurRadius > 0) {
            //调用ViewRootImpl的方法创建高斯模糊Drawable对象
            mBackgroundBlurDrawable = getViewRootImpl().createBackgroundBlurDrawable();
            updateBackgroundDrawable();
        }

        if (mBackgroundBlurDrawable != null) {
            mBackgroundBlurDrawable.setBlurRadius(mBackgroundBlurRadius);
        }
    }
updateBackgroundBlurRadius方法首先获取ViewRootImpl实例对象,如果为空直接返回;如果不为空则获取背景高斯模糊效果半径,当mCrossWindowBlurEnabled 为true且窗口是透明样式的时候,才会获取之前设置的高斯模糊效果半径,否则高斯模糊效果半径直接设置为0;然后会检测mBackgroundBlurDrawable是否为空,如果为空且获取的mBackgroundBlurRadius大于0,便会调用ViewRootImpl的createBackgroundBlurDrawable方法创建BackgroundBlurDrawable对象实例,BackgroundBlurDrawable对象是系统实现背景高斯模糊效果的关键。
4、ViewRootImpl的createBackgroundBlurDrawable方法如下所示:
frameworks/base/core/java/android/view/ViewRootImpl.java
public final class ViewRootImpl implements ViewParent,
        View.AttachInfo.Callbacks, ThreadedRenderer.DrawCallbacks,
        AttachedSurfaceControl {

	private final BackgroundBlurDrawable.Aggregator mBlurRegionAggregator =
            new BackgroundBlurDrawable.Aggregator(this);

    public BackgroundBlurDrawable createBackgroundBlurDrawable() {
        return mBlurRegionAggregator.createBackgroundBlurDrawable(mContext);
    }
 }
createBackgroundBlurDrawable方法仅仅是进一步调用mBlurRegionAggregator的createBackgroundBlurDrawable方法,mBlurRegionAggregator是BackgroundBlurDrawable的一个内部静态类。
5、Aggregator的createBackgroundBlurDrawable方法如下所示:
/frameworks/base/core/java/com/android/internal/graphics/drawable/BackgroundBlurDrawable.java
public final class BackgroundBlurDrawable extends Drawable {

    public static final class Aggregator {

        private final ViewRootImpl mViewRoot;
		...代码省略...

        public Aggregator(ViewRootImpl viewRoot) {
            mViewRoot = viewRoot;
        }

        /**
         * 使用默认背景模糊圆角半径创建一个模糊区域Drawable对象
         */
        public BackgroundBlurDrawable createBackgroundBlurDrawable(Context context) {
            BackgroundBlurDrawable drawable = new BackgroundBlurDrawable(this);
            drawable.setBlurRadius(context.getResources().getDimensionPixelSize(R.dimen.default_background_blur_radius));
            return drawable;
        }
		...代码省略...
    }
}
Aggregator的createBackgroundBlurDrawable将自己作为参数,创建了一个继承自Drawable的BackgroundBlurDrawable对象实例,并设置模糊半径为dimens.xml文件中配置的default_background_blur_radius字段,该字段默认为100dp。
/frameworks/base/core/res/res/values/dimens.xml
<dimen name="default_background_blur_radius">100dp</dimen>
6、重新回到第3步DecorView的updateBackgroundBlurRadius方法中:
    //更新高斯模糊背景的高斯半径
    private void updateBackgroundBlurRadius() {
    	...代码省略...
        if (mBackgroundBlurDrawable == null && mBackgroundBlurRadius > 0) {
            mBackgroundBlurDrawable = getViewRootImpl().createBackgroundBlurDrawable();
            //更新背景Drawable
            updateBackgroundDrawable();
        }

        if (mBackgroundBlurDrawable != null) {
            mBackgroundBlurDrawable.setBlurRadius(mBackgroundBlurRadius);
        }
    }
在调用createBackgroundBlurDrawable方法为mBackgroundBlurDrawable进行赋值之后,会继续调用DecorView的updateBackgroundDrawable方法来更新当前DecorView所对应的背景Drawable,最后再使用mBackgroundBlurRadius更新mBackgroundBlurDrawable的模糊圆角半径数值。
7、DecorView的updateBackgroundDrawable方法如下所示:
    private void updateBackgroundDrawable() {
        // Background insets can be null if super constructor calls setBackgroundDrawable.
        if (mBackgroundInsets == null) {
            mBackgroundInsets = Insets.NONE;
        }

        if (mBackgroundInsets.equals(mLastBackgroundInsets)
                && mBackgroundBlurDrawable == mLastBackgroundBlurDrawable
                && mLastOriginalBackgroundDrawable == mOriginalBackgroundDrawable) {
            return;
        }

        Drawable destDrawable = mOriginalBackgroundDrawable;
        if (mBackgroundBlurDrawable != null) {
            //将刚刚创建的类型为BackgroundBlurDrawable的mBackgroundBlurDrawable
            //和原来类型为Drawable的mOriginalBackgroundDrawable合并成一个LayerDrawable实例对象
            destDrawable = new LayerDrawable(new Drawable[]{mBackgroundBlurDrawable,
                    mOriginalBackgroundDrawable});
        }

        if (destDrawable != null && !mBackgroundInsets.equals(Insets.NONE)) {
            //将当前类型为LayerDrawable的destDrawable再封装成InsetDrawable实例对象
            destDrawable = new InsetDrawable(destDrawable,
                    mBackgroundInsets.left, mBackgroundInsets.top,
                    mBackgroundInsets.right, mBackgroundInsets.bottom) {

                /**
                 * Return inner padding so we don't apply the padding again in
                 * {@link DecorView#drawableChanged()}
                 */
                @Override
                public boolean getPadding(Rect padding) {
                    return getDrawable().getPadding(padding);
                }
            };
        }
        //调用父类方法设置这个类的背景Drawable
        super.setBackgroundDrawable(destDrawable);

        mLastBackgroundInsets = mBackgroundInsets;
        mLastBackgroundBlurDrawable = mBackgroundBlurDrawable;
        mLastOriginalBackgroundDrawable = mOriginalBackgroundDrawable;
    }
updateBackgroundDrawable方法中最关键的一点就是将前面通过ViewImpl创建的类型为BackgroundBlurDrawable的高斯模糊mBackgroundBlurDrawable对象和原来类型为Drawable的原始背景mOriginalBackgroundDrawable对象合并成一个LayerDrawable实例对象,最后再调用父类(View)的setBackgroundDrawable将LayerDrawable设置为新的背景。
三、比较Activity/Dialog添加DecorView和调用WindowManager的addView方法添加View视图的相同点
1、结合前面第二步对PhoneWindow类中的setBackgroundBlurRadius方法的分析可以知道,该API所作的主要工作主要包含两个方面:
1)调用ViewImpl的createBackgroundBlurDrawable方法创建BackgroundBlurDrawable实例对象。
2)将BackgroundBlurDrawable和原本的背景Drawable文件合并成一个全新的LayerDrawable实例对象,最后再将LayerDrawable实例对象设置成DecorView的背景,这样就实现了Decorview的背景高斯模糊效果。
2、我们知道Activity和Dialog视图能显示到屏幕上,最关键的一步其实就是调用WindowManager的addView方法将它们所对应的Decorview添加到Window上:
View decor = getDecorView();//获取Activity和Dialog所对应的DecorView
ViewManager wm = a.getWindowManager();//获取WindowManager实例
wm.addView(decor, layoutParams);//将DecorView添加到屏幕上
结合前面第二步的分析我们可以知道,Activity和Dialog实现背景高斯模糊效果的关键,就在于它们可以调用getWindow()获取PhoneWindow实例对象,然后调用PhoneWindow的setBackgroundBlurRadius,该方法最终为DecorView设置了一个包含有BackgroundBlurDrawable和原背景的LayerDrawable,这样当WindowManager的addView将DecorView添加到屏幕上的时候,DecorView所对应的视图背景实现了跨窗口高斯模糊效果。
3、调用WindowManager的addView添加View的一般流程如下所示:
		//创建自定义视图
        mView = LayoutInflater.from(mContext).inflate(R.layout.window_blur, null, false);
        //获取WindowManager对象
        mWindowManager = (WindowManager) mContext.getSystemService(Context.WINDOW_SERVICE);
        //调用Window的addView方法将mView添加到屏幕上
        mWindowManager.addView(mView, mLayoutParams);
通过WindowManager调用addView的添加视图的方式无法获取PhoneWindow实例,导致无法使用setBackgroundBlurRadius方法来设置高斯模糊效果;那么我们要如何做呢?我们能否自己模拟setBackgroundBlurRadius方法,直接给自定义视图mView设置一个包含有BackgroundBlurDrawable和原背景的LayerDrawable来实现背景高斯模糊呢?答案当然是可以的!
四、在WindowManager的addView方法添加的视图中实现高斯模糊效果
1、新建一个BlurWindowHelper:
public class BlurWindowHelper {

	...代码省略...
    private WindowManager mWindowManager;
    private Context mContext;
    private View mView;
	...代码省略...

    public BlurWindowHelper(Context context) {
        this.mContext = context;
    }

    public void showWindow() {
        mWindowManager = (WindowManager) mContext.getSystemService(Context.WINDOW_SERVICE);
        //自定义视图
        mView = LayoutInflater.from(mContext).inflate(R.layout.window_blur, null, false);
        //为自定义视图设置点击事件,被点击的时候从屏幕上将自己移除
        mView.setOnClickListener(new View.OnClickListener() {
            @Override
            public void onClick(View v) {
                mWindowManager.removeView(mView);
            }
        });
        WindowManager.LayoutParams mLayoutParams = new WindowManager.LayoutParams(
                ViewGroup.LayoutParams.WRAP_CONTENT, ViewGroup.LayoutParams.WRAP_CONTENT,
                WindowManager.LayoutParams.TYPE_APPLICATION,
                WindowManager.LayoutParams.FLAG_NOT_FOCUSABLE
                        | WindowManager.LayoutParams.FLAG_NOT_TOUCH_MODAL
                        | WindowManager.LayoutParams.FLAG_WATCH_OUTSIDE_TOUCH
                        | WindowManager.LayoutParams.FLAG_SPLIT_TOUCH,
//                PixelFormat.TRANSLUCENT);//半透明
                PixelFormat.TRANSPARENT);//全透明
        mLayoutParams.setTitle("LeapMotorNavigationBar");
        mLayoutParams.windowAnimations = 0;
        mLayoutParams.gravity = Gravity.CENTER;

        initBlur();//初始化高斯模糊配置

        mWindowManager.addView(mView, mLayoutParams);
    }

    private void initBlur() {
    	...代码省略...
    }
}
window_blur.xml
<?xml version="1.0" encoding="utf-8"?>
<LinearLayout xmlns:android="http://schemas.android.com/apk/res/android"
    android:layout_width="match_parent"
    android:layout_height="match_parent"
    android:gravity="center"
    android:orientation="vertical">

    <TextView
        android:layout_width="400dp"
        android:layout_height="400dp"
        android:gravity="center"
        android:text="你好,我是高斯模糊Window"
        android:textAllCaps="false"
        android:textSize="30sp" />

</LinearLayout>
此类只对外提供了一个方法showWindow,该方法主要就是将R.layout.window_blur布局文件所对应的视图内容添加到屏幕上。
2、继续来看一下初始化高斯模糊配置的initBlur方法。
public class BlurWindowHelper {

    //窗口背景高斯模糊程度
    private int mBackgroundBlurRadius;
    private int mBackgroundCornersRadius;

    // 根据窗口高斯模糊功能是否开启来为窗口设置不同的不透明度
    private final int mWindowBackgroundAlphaWithBlur = 170;
    private final int mWindowBackgroundAlphaNoBlur = 255;

    private void initBlur() {
        mBackgroundBlurRadius = dp2px(40);
        mBackgroundCornersRadius = dp2px(20);
        mWindowBackgroundDrawable = mContext.getDrawable(R.drawable.window_background);
        mView.setBackground(mWindowBackgroundDrawable);
        setupWindowBlurListener();
    }

}
window_background.xml文件
<?xml version="1.0" encoding="utf-8"?>
<shape xmlns:android="http://schemas.android.com/apk/res/android"
    android:shape="rectangle">
    <corners android:radius="20dp" />
    <solid android:color="#AAAAAA" />
</shape>
initBlur方法首先将背景高斯模糊效果半径设置为40dp,圆角半径设置为20dp,然后获取window_background.xml所对应的Drawable对象,并将该对象作为背景设置给mView,然后继续调用setupWindowBlurListener方法。
3、setupWindowBlurListener方法如下所示:
    private void setupWindowBlurListener() {
        Consumer<Boolean> windowBlurEnabledListener = this::updateWindowForBlurs;
        mView.addOnAttachStateChangeListener(new View.OnAttachStateChangeListener() {
            @Override
            public void onViewAttachedToWindow(View v) {
                mWindowManager.addCrossWindowBlurEnabledListener(windowBlurEnabledListener);
            }

            @Override
            public void onViewDetachedFromWindow(View v) {
                mWindowManager.removeCrossWindowBlurEnabledListener(windowBlurEnabledListener);
            }
        });
    }
setupWindowBlurListener主要是为mView添加监听,当mView被添加到窗口和从窗口移除的时候,会回调updateWindowForBlurs方法:
public class BlurWindowHelper {
    private void updateWindowForBlurs(boolean blursEnabled) {
        // 根据窗口高斯模糊功能是否开启来为窗口设置不同的不透明度
        mWindowBackgroundDrawable.setAlpha(blursEnabled ? mWindowBackgroundAlphaWithBlur : mWindowBackgroundAlphaNoBlur);//调整背景的透明度
        setBackgroundBlurRadius(mView);//设置背景模糊程度
    }
 }
updateWindowForBlurs方法会根据是否开启高斯模糊效果来调整mView背景Drawable对象的透明度,并调用setBackgroundBlurRadius方法设置背景高斯模糊程度。
4、setBackgroundBlurRadius方法如下所示:
    /**
     * 为View设置高斯模糊背景
     *
     * @param view
     */
    private void setBackgroundBlurRadius(View view) {
        if (view == null) {
            return;
        }
        ViewParent target = view.getParent();
        //获取BackgroundBlurDrawable实例对象
        Drawable backgroundBlurDrawable = getBackgroundBlurDrawableByReflect(target);
        Drawable originDrawable = view.getBackground();
        Drawable destDrawable = new LayerDrawable(new Drawable[]{backgroundBlurDrawable, originDrawable});
        view.setBackground(destDrawable);
    }
setBackgroundBlurRadius方法的功能和原生高斯模糊API接口功能相似,首先调用getBackgroundBlurDrawableByReflect方法获取BackgroundBlurDrawable实例对象,再将BackgroundBlurDrawable和原本的背景Drawable文件合并成一个全新的LayerDrawable实例对象,最后再将LayerDrawable实例对象设置成mView的背景,这样其实就已经实现了mView的背景高斯模糊效果。
5、获取BackgroundBlurDrawable实例对象的getBackgroundBlurDrawableByReflect方法如下所示:
    /**
     * 通过反射获取BackgroundBlurDrawable对象实例
     *
     * @param viewRootImpl
     * @return
     */
    private Drawable getBackgroundBlurDrawableByReflect(Object viewRootImpl) {
        Drawable drawable = null;
        try {
            //调用ViewRootImpl的createBackgroundBlurDrawable方法创建实例
            Method method_createBackgroundBlurDrawable = viewRootImpl.getClass().getDeclaredMethod("createBackgroundBlurDrawable");
            method_createBackgroundBlurDrawable.setAccessible(true);
            drawable = (Drawable) method_createBackgroundBlurDrawable.invoke(viewRootImpl);
            //调用BackgroundBlurDrawable的setBlurRadius方法
            Method method_setBlurRadius = drawable.getClass().getDeclaredMethod("setBlurRadius", int.class);
            method_setBlurRadius.setAccessible(true);
            method_setBlurRadius.invoke(drawable, mBackgroundBlurRadius);
            //调用BackgroundBlurDrawable的setCornerRadius方法
            Method method_setCornerRadius = drawable.getClass().getDeclaredMethod("setCornerRadius", int.class);
            method_setCornerRadius.setAccessible(true);
            method_setCornerRadius.invoke(drawable, mBackgroundCornersRadius);
        } catch (Exception e) {
            e.printStackTrace();
        }
        return drawable;
    }
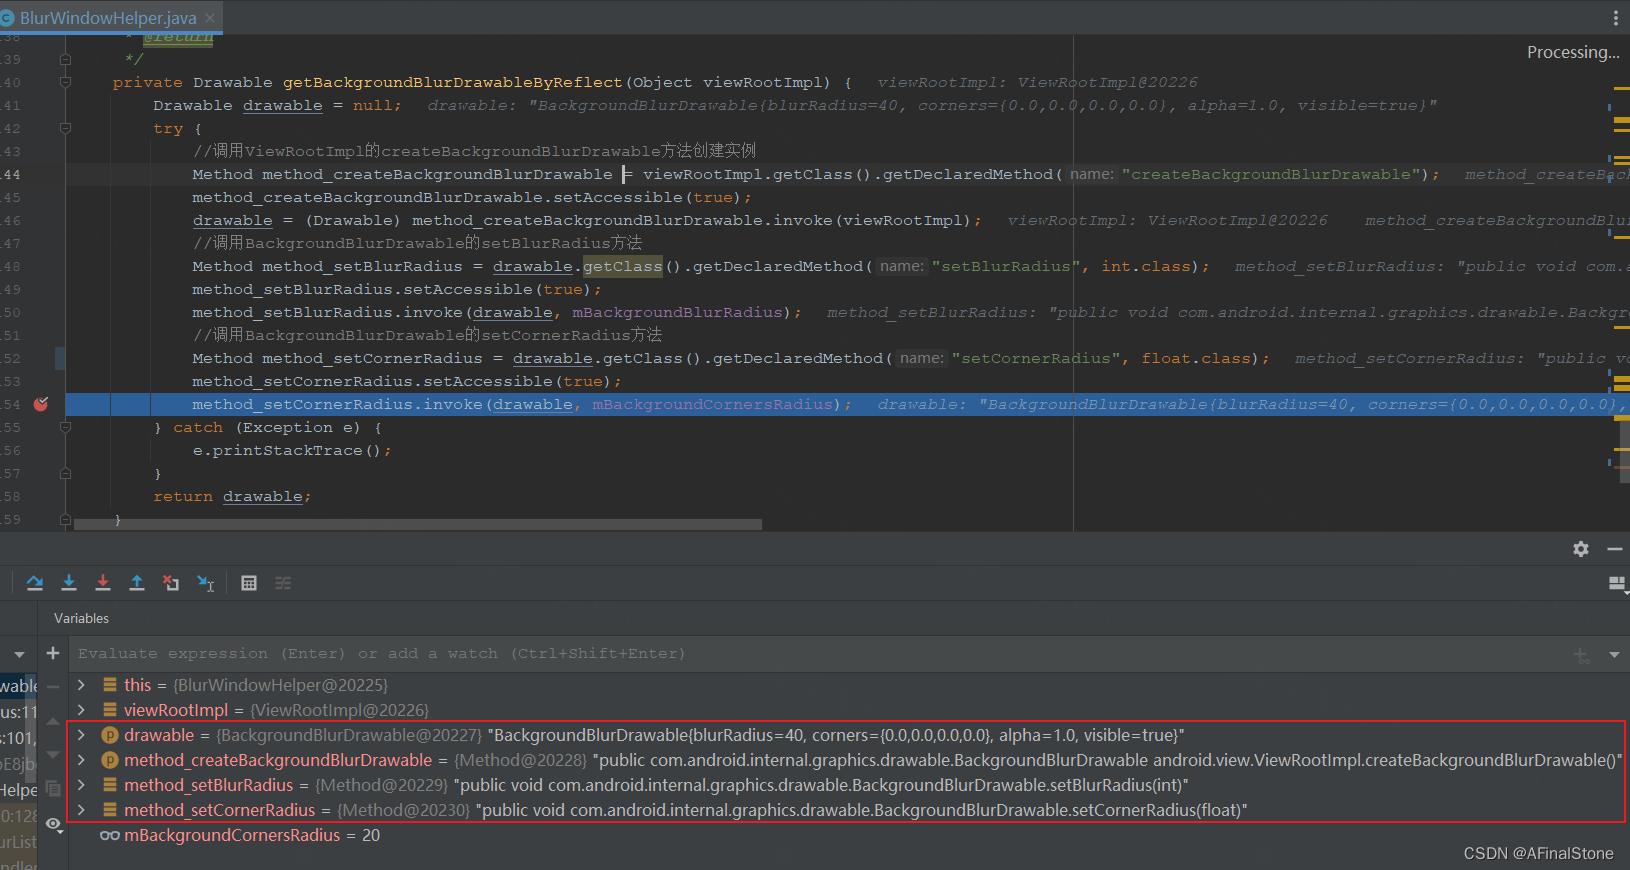
getBackgroundBlurDrawableByReflect主要就是通过反射调用ViewRootImpl的createBackgroundBlurDrawable方法创建BackgroundBlurDrawable对象实例,然后调用setBlurRadius方法设置高斯模糊效果半径,调用setCornerRadius方法圆角背景,最后将BackgroundBlurDrawable对象实例返回。下面是调试断点,可以看到我们通过反射成功获取到了源码中的类方法。
6、除了通过反射获取BackgroundBlurDrawable,身为系统开发的工作人员,还可以通过为项目添加android12所对应的framework.jar包或者直接在android12的系统源码中定制,直接调用下面方法获取BackgroundBlurDrawable对象:
    /**
     * 通过添加framework.jar依赖获取BackgroundBlurDrawable实例对象
     *
     * @param target
     * @return
     */
    private BackgroundBlurDrawable getBackgroundBlurDrawableByFramework(ViewRootImpl target) {
        BackgroundBlurDrawable backgroundBlurDrawable = ((ViewRootImpl)target).createBackgroundBlurDrawable();
        backgroundBlurDrawable.setBlurRadius(mBackgroundBlurRadius);
        backgroundBlurDrawable.setCornerRadius(mBackgroundCornersRadius);
        return backgroundBlurDrawable;
    }
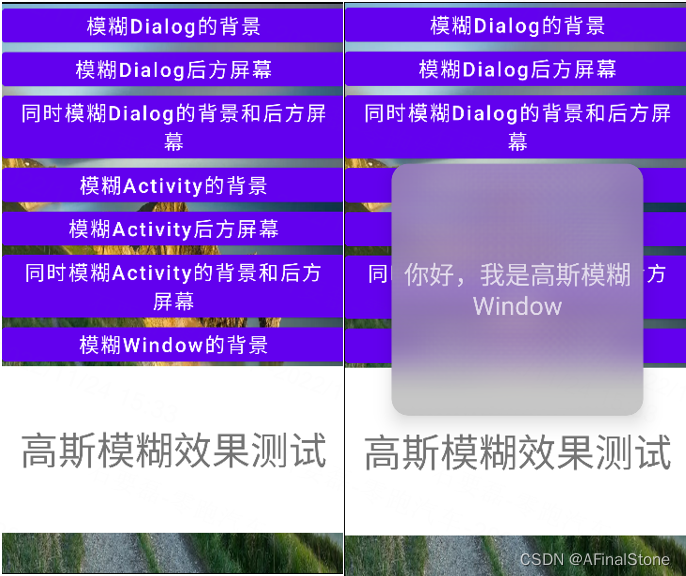
五、效果图和代码
1、效果图
2、BlurWindowHelper的完整代码:
public class BlurWindowHelper {

    private WindowManager mWindowManager;
    //窗口背景高斯模糊程度
    private int mBackgroundBlurRadius;
    private int mBackgroundCornersRadius;

    // 根据窗口高斯模糊功能是否开启来为窗口设置不同的不透明度
    private final int mWindowBackgroundAlphaWithBlur = 170;
    private final int mWindowBackgroundAlphaNoBlur = 255;

    //使用一个矩形drawable文件作为窗口背景,这个矩形的轮廓和圆角确定了窗口高斯模糊的区域
    private Context mContext;
    private View mView;
    private Drawable mWindowBackgroundDrawable;

    public BlurWindowHelper(Context context) {
        this.mContext = context;
    }

    public void showWindow() {
        mWindowManager = (WindowManager) mContext.getSystemService(Context.WINDOW_SERVICE);
        mView = LayoutInflater.from(mContext).inflate(R.layout.window_blur, null, false);
        mView.setOnClickListener(new View.OnClickListener() {
            @Override
            public void onClick(View v) {
                mWindowManager.removeView(mView);
            }
        });
        WindowManager.LayoutParams mLayoutParams = new WindowManager.LayoutParams(
                ViewGroup.LayoutParams.WRAP_CONTENT, ViewGroup.LayoutParams.WRAP_CONTENT,
                WindowManager.LayoutParams.TYPE_APPLICATION,
                WindowManager.LayoutParams.FLAG_NOT_FOCUSABLE
                        | WindowManager.LayoutParams.FLAG_NOT_TOUCH_MODAL
                        | WindowManager.LayoutParams.FLAG_WATCH_OUTSIDE_TOUCH
                        | WindowManager.LayoutParams.FLAG_SPLIT_TOUCH,
//                PixelFormat.TRANSLUCENT);//半透明
                PixelFormat.TRANSPARENT);//全透明
        mLayoutParams.setTitle("LeapMotorNavigationBar");
        mLayoutParams.windowAnimations = 0;
        mLayoutParams.gravity = Gravity.CENTER;

        initBlur();

        mWindowManager.addView(mView, mLayoutParams);
    }

    private void initBlur() {
        mBackgroundBlurRadius = dp2px(40);
        mBackgroundCornersRadius = dp2px(20);
        mWindowBackgroundDrawable = mContext.getDrawable(R.drawable.window_background);
        mView.setBackground(mWindowBackgroundDrawable);
        setupWindowBlurListener();
    }

    private void setupWindowBlurListener() {
        Consumer<Boolean> windowBlurEnabledListener = this::updateWindowForBlurs;
        mView.addOnAttachStateChangeListener(new View.OnAttachStateChangeListener() {
            @Override
            public void onViewAttachedToWindow(View v) {
                mWindowManager.addCrossWindowBlurEnabledListener(windowBlurEnabledListener);
            }

            @Override
            public void onViewDetachedFromWindow(View v) {
                mWindowManager.removeCrossWindowBlurEnabledListener(windowBlurEnabledListener);
            }
        });
    }


    private void updateWindowForBlurs(boolean blursEnabled) {
        // 根据窗口高斯模糊功能是否开启来为窗口设置不同的不透明度
        mWindowBackgroundDrawable.setAlpha(blursEnabled ? mWindowBackgroundAlphaWithBlur : mWindowBackgroundAlphaNoBlur);//调整背景的透明度
        setBackgroundBlurRadius(mView);//设置背景模糊程度
    }

    /**
     * 为View设置高斯模糊背景
     *
     * @param view
     */
    private void setBackgroundBlurRadius(View view) {
        if (view == null) {
            return;
        }
        ViewParent target = view.getParent();
        Drawable backgroundBlurDrawable = getBackgroundBlurDrawableByReflect(target);
        Drawable originDrawable = view.getBackground();
        Drawable destDrawable = new LayerDrawable(new Drawable[]{backgroundBlurDrawable, originDrawable});
        view.setBackground(destDrawable);
    }

    /**
     * 通过添加framework.jar依赖获取BackgroundBlurDrawable实例对象
     *
     * @param target
     * @return
     */
    private BackgroundBlurDrawable getBackgroundBlurDrawableByFramework(ViewRootImpl target) {
        BackgroundBlurDrawable backgroundBlurDrawable = ((ViewRootImpl)target).createBackgroundBlurDrawable();
        backgroundBlurDrawable.setBlurRadius(mBackgroundBlurRadius);
        backgroundBlurDrawable.setCornerRadius(mBackgroundCornersRadius);
        return backgroundBlurDrawable;
    }

    /**
     * 通过反射获取BackgroundBlurDrawable实例对象
     *
     * @param viewRootImpl
     * @return
     */
    private Drawable getBackgroundBlurDrawableByReflect(Object viewRootImpl) {
        Drawable drawable = null;
        try {
            //调用ViewRootImpl的createBackgroundBlurDrawable方法创建实例
            Method method_createBackgroundBlurDrawable = viewRootImpl.getClass().getDeclaredMethod("createBackgroundBlurDrawable");
            method_createBackgroundBlurDrawable.setAccessible(true);
            drawable = (Drawable) method_createBackgroundBlurDrawable.invoke(viewRootImpl);
            //调用BackgroundBlurDrawable的setBlurRadius方法
            Method method_setBlurRadius = drawable.getClass().getDeclaredMethod("setBlurRadius", int.class);
            method_setBlurRadius.setAccessible(true);
            method_setBlurRadius.invoke(drawable, mBackgroundBlurRadius);
            //调用BackgroundBlurDrawable的setCornerRadius方法
            Method method_setCornerRadius = drawable.getClass().getDeclaredMethod("setCornerRadius", float.class);
            method_setCornerRadius.setAccessible(true);
            method_setCornerRadius.invoke(drawable, mBackgroundCornersRadius);
        } catch (Exception e) {
            e.printStackTrace();
        }
        return drawable;
    }

    /**
     * dip转换成px
     */
    private int dp2px(float dpValue) {
        final float scale = mContext.getResources().getDisplayMetrics().density;
        return (int) (dpValue * scale + 0.5f);
    }
}
相关文章
- 开发微信订阅消息推送
- Android短信监听实现,及Android4.4之后短信机制变更
- 微信小程序获取用户openid
- Django同时支持http/https(转载)
- 微信小程序获取当前的位置
- 原生微信小程序/uniapp使用空格占位符无效解决方法
- Node.js error: ERR_OSSL_EVP_UNSUPPORTED
- 【微信小程序】web-view 无法打开该页面不支持打开
- uniapp h5跳转微信小程序(wx-open-launch-weapp)
- uni.getLocation和wx.getLocation方法调用无效,也不返回失败,解决方案!!!
- RabbitMQ的使用介绍
- 【Python】Windows微信清理工具v.3.0.2
- 微信小程序:用户微信登录流程(附:流程图+源码)
- 《RPC实战与核心原理》学习笔记Day15
- 基于物联网的智慧农业监测系统(前端界面有web端和微信小程序端)
- 《RPC实战与核心原理》学习笔记Day13
- 《RPC实战与核心原理》学习笔记Day12
- 微信小程序分包
- 【CSS应用篇】——CSS如何实现渐变背景
- 《RPC实战与核心原理》学习笔记Day1