
Rsync报错踩坑记录(一):一次小疏忽引发的麻烦及新手会遇到的三种常见报错原因
2023-04-18 15:25:26 时间
Rsync报错踩坑记录(一)

1.三种常见报错原因之一:防火墙问题
造成该报错的原因是:客户端和服务端防火墙未放行873端口
具体会出现如下错误提示:
rsync: failed to connect to x.x.x.x: No route to host (113)

rsync error: error in socket IO (code 10) at clientserver.c(107) [sender=2.6.8]
当出现这种错误时只需要在客户端和服务端的防火墙里都放行873端口即可
具体输入如下命令:
如果是Firewall(Centos7自带防火墙)则
firewall-cmd --permanent --add-rich-rule="rule family="ipv4" source address="允许的ip" port protocol="tcp" port="873" accept" #开放873端口
systemctl restart firewalld #重启防火墙
如果是Iptables防火墙则
iptables -I INPUT -s "允许的ip" -p tcp --dport 873 -j ACCEPT #开放873端口
service iptables save #保存设置
systemctl restart iptables #重启防火墙
2.三种常见报错原因之二:SELinux未关闭
如果服务器开启了SELinux,往往会出现如下报错
rsync: recv_generator: mkdir XXXX (in XXXX) failed: Permission denied (13)

*** Skipping any contents from this failed directory ***
如图

彻底解决这种报错的办法就是永久关闭SELinux
首先查看SELinux状态:
[root@gcstszlinux ~]# getenforce
Enforcing #这里显示SELinux是开启状态,我们需要将其永久关闭
这里的Enforcing表示SELinux是开启的状态,我们需要将其永久关闭
方法就是修改/etc/selinux/config
[root@gcstszlinux ~]# vim /etc/selinux/config


# This file controls the state of SELinux on the system.
# SELINUX= can take one of these three values:
#     enforcing - SELinux security policy is enforced.
#     permissive - SELinux prints warnings instead of enforcing.
#     disabled - No SELinux policy is loaded.
SELINUX=disabled #把这里改成disabled
# SELINUXTYPE= can take one of three values:
#     targeted - Targeted processes are protected,
#     minimum - Modification of targeted policy. Only selected processes are protected.
#     mls - Multi Level Security protection.
SELINUXTYPE=targeted
把“SELINUX= ”后面的值改为disabled,然后重启机器即可生效
3.三种常见报错原因之三:未授予Rsync免Root访问修改文件的权限(小疏忽)
当Rsync的配置文件里的fake super选项未正确配置时会出现如下错误:
rsync: chgrp "xxxx" (in xxxx) failed: Operation not permitted (1)
rsync: chgrp "xxxx/xxxx" (in xxxx) failed: Operation not permitted (1)
如图

在检查了相关同步文件夹的权限没问题后发现是Rsync的配置文件写的有问题:
cat /etc/rsyncd.conf
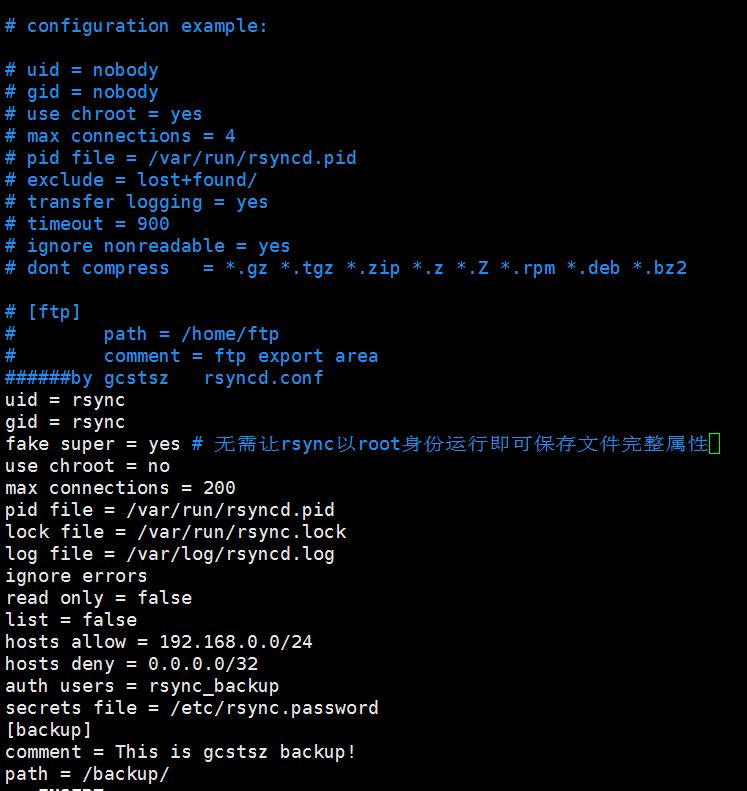
配置文件fake super = yes 这一行有问题,就是我说的小疏忽,如果配置文件里没有这一行的需要加入“fake super = yes”,而我所遇到的问题是有配置这一行,让Rsync免Root身份运行,但是这一行后面的注释没有去掉也是不行的,会导致这一行配置不生效,正确的配置应该是这样:
 [root@rsync01 backup]# cat /etc/rsyncd.conf -n
     1	# /etc/rsyncd: configuration file for rsync daemon mode
     2
     3	# See rsyncd.conf man page for more options.
     4
     5	######by gcstsz   rsyncd.conf
     6	uid = rsync
     7	gid = rsync
     8	fake super = yes
     9	use chroot = no
    10	max connections = 200
    11	pid file = /var/run/rsyncd.pid
    12	lock file = /var/run/rsync.lock
    13	log file = /var/log/rsyncd.log
    14	ignore errors
    15	read only = false
    16	list = false
    17	hosts allow = 192.168.0.0/24
    18	hosts deny = 0.0.0.0/32
    19	auth users = rsync_backup
    20	secrets file = /etc/rsync.password
    21	[backup]
    22	comment = This is gcstsz backup!
    23	path = /backup/
注意看这里的第八行,fake super = yes,不能有任何注释,如此保存好修改后的文件,然后重启Rsync服务就行:
systemctl restart rsyncd
这就是新手使用Rsync会遇到的三种常见报错原因,感谢大家阅读,欢迎大家指出问题和不足!!!
相关文章
- Widows和Linux下如何安装MySQL | MySQL(前传)
- clion mac 下刷题最佳配置
- 用代码在浏览器挂上一个专属自己的小猫咪
- Go语言核心36讲(Go语言实战与应用九)--学习笔记
- linux 之拖拽上传文件
- Diff算法核心原理
- Activity启动流程
- 启动优化
- Android APP启动流程
- datax_web环境搭建
- EL-ADMIN
- Flink TaskManager 内存模型详解
- Flink源码
- flutter 模块化
- Flutter代码可插拨_解耦方案
- golang如何使用原生RPC及微服务简述
- Istio 实践手册 | 服务网格介绍
- IOS 列表性能优化-图片解码性能优化
- iOS 内存概述
- IOS 算法