
使用java代码调用rabbitmq接口进行新增编辑mq用户、虚拟机vhost、动态创建交换机exchange、队列queue以及设置权限,绑定vhost与exchange等操作
使用java代码操作rabbitmq时,首先需要一个有创建用户等权限的管理员账号,需要在rabbitmq的后台管理页面手动创建这个账号,系统推荐的这几个tag可以让账号有rabbitmq后台管理页面的访问权限
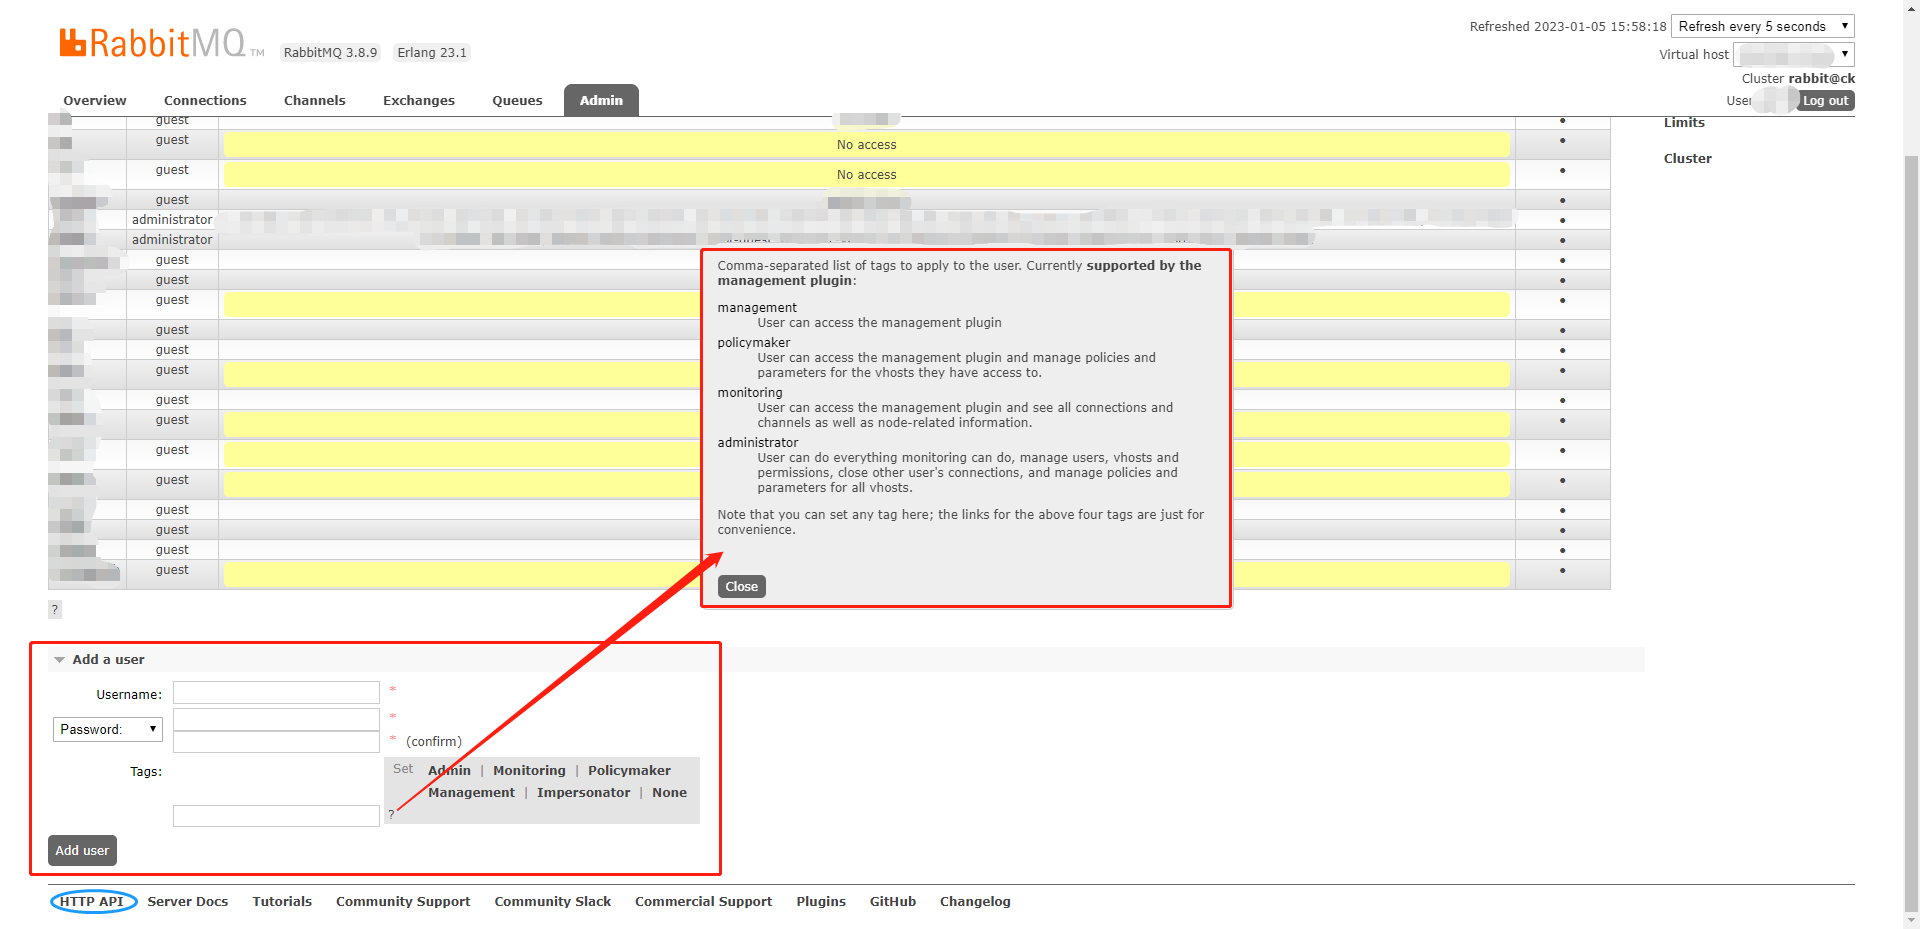
图一
管理账号创建完成后就可以在代码中操作新增编辑mq账号及vhost等等了,点击rabbitmq后台管理页面左下角的HTTP API(见上文图一左下角)可以查看所有API接口
以下代码中,rabbitmqUsername 为管理员账号的用户名,rabbitmqPassword为管理员账号的密码,rabbitmqUrl为rabbitmq服务器接口地址(例:http://127.0.0.1:15672/api/)
1. 新增用户或修改用户密码
1.1 API

1.2 代码示例
以下代码中,yourUsername为新增账号的用户名,yourPassword为新增账号的密码,guest为新增账号的tag,可以自定义,也可以使用rabbitmq提供的tag(见上文图一),该接口也可以用来修改已有账号的密码
  //add user
  String enc = new String( Base64.encodeBase64((rabbitmqUsername + ":" + rabbitmqPassword).getBytes() ) );
  HttpPut putCriaUsuario = new HttpPut( rabbitmqUrl+"users/"+yourUserName );
  // RabbitMQ requires a user with create permission, create it mannually first
  putCriaUsuario.addHeader( "Authorization", "Basic " + enc );
  putCriaUsuario.addHeader( "content-type", "application/json" );
  putCriaUsuario.setEntity( new StringEntity( "{"password":""+yourPassword+"","tags":"guest"}" ) );
  CloseableHttpClient client = HttpClients.createDefault();
  client.execute( putCriaUsuario );
2. 新增vhost
2.1 API
2.2 代码示例
以下代码中 yourVhost 为新增vhost的名称,guest为自定义的tag
 // 管理员账号用户名密码
 String enc = new String( Base64.encodeBase64((rabbitmqUsername + ":" + rabbitmqPassword).getBytes() ) );
 //add vhost
HttpPut putVhost = new HttpPut( rabbitmqUrl+"vhosts/"+yourVhost );
 putVhost.addHeader( "Authorization", "Basic " + enc );
 putVhost.addHeader( "content-type", "application/json" );
 putVhost.setEntity( new StringEntity( "{"tags":"guest"}" ) );
 CloseableHttpClient putVhostClient = HttpClients.createDefault();
 putVhostClient.execute( putVhost );
3. mq用户绑定vhost并设置权限
3.1 API

3.2 代码示例
以下代码中,yourVhost 与yourUsername为绑定的mq用户与vhost的名称,代码示例中该用户对该vhost只开启了read权限,如果需要开启全部的configure(配置),write(写入),read(读取)权限,参数需要写成:
"{"configure":".*","write":".*","read":".*"}"
//管理员账号用户名密码
String enc = new String( Base64.encodeBase64((rabbitmqUsername + ":" + rabbitmqPassword).getBytes() ) );
//add permissions and bind user&vhost
HttpPut putPermissions = new HttpPut( rabbitmqUrl+"permissions/"+yourVhost+"/"+yourUsername);
putPermissions.addHeader( "Authorization", "Basic " + enc );
putPermissions.addHeader( "content-type", "application/json" );
putPermissions.setEntity( new StringEntity( "{"configure":"","write":"","read":".*"}" ) );
CloseableHttpClient putPermissionsClient = HttpClients.createDefault();
putPermissionsClient.execute( putPermissions );
4. 动态创建exchange交换机和queue队列,并绑定指定vhost虚拟机
            //add exchange, queue and bind vhost
            RabbitModuleInfo rabbitModuleInfo = new RabbitModuleInfo();
            rabbitModuleInfo.setVhost(vhost);
            RabbitModuleInfo.Queue queue = new RabbitModuleInfo.Queue();
            Map<String, Object> arguments = new HashMap<>();
            //消息过期时间
            arguments.put("x-message-ttl",3600000);
            queue.setName(queueName);
            queue.setArguments(arguments);
            rabbitModuleInfo.setQueue(queue);

            RabbitModuleInfo.Exchange exchange = new RabbitModuleInfo.Exchange();
            exchange.setName(exchangeName);
            rabbitModuleInfo.setExchange(exchange);
            rabbitModuleInfo.setRoutingKey(queueName);

            rabbitModuleInitializer.declareRabbitModule(rabbitModuleInfo);
/**
 * RabbitMQ队列初始化器
 */
public class RabbitModuleInitializer{

    private AmqpAdmin amqpAdmin;
    private RealtimePushProducer realtimePushProducer;

    public RabbitModuleInitializer(AmqpAdmin amqpAdmin,RealtimePushProducer realtimePushProducer) {
        this.amqpAdmin = amqpAdmin;
        this.realtimePushProducer = realtimePushProducer;
    }


    /**
     * RabbitMQ 根据配置动态创建和绑定队列、交换机
     */
    public void declareRabbitModule(RabbitModuleInfo rabbitModuleInfo) {
        configParamValidate(rabbitModuleInfo);

        // 队列
        Queue queue = convertQueue(rabbitModuleInfo.getQueue());
        // 交换机
        Exchange exchange = convertExchange(rabbitModuleInfo.getExchange());
        // 绑定关系
        String routingKey = rabbitModuleInfo.getRoutingKey();
        String queueName = rabbitModuleInfo.getQueue().getName();
        String exchangeName = rabbitModuleInfo.getExchange().getName();
        Binding binding = new Binding(queueName, Binding.DestinationType.QUEUE, exchangeName, routingKey, null);

        realtimePushProducer.bindVhostExchangeQueue(rabbitModuleInfo.getVhost(),exchange,queue,binding);
    }

    /**
     * RabbitMQ动态配置参数校验
     *
     * @param rabbitModuleInfo
     */
    public void configParamValidate(RabbitModuleInfo rabbitModuleInfo) {

        String routingKey = rabbitModuleInfo.getRoutingKey();

        Assert.isTrue(StrUtil.isNotBlank(routingKey), "RoutingKey 未配置");

        Assert.isTrue(rabbitModuleInfo.getExchange() != null, "routingKey:{}未配置exchange", routingKey);
        Assert.isTrue(StrUtil.isNotBlank(rabbitModuleInfo.getExchange().getName()), "routingKey:{}未配置exchange的name属性", routingKey);

        Assert.isTrue(rabbitModuleInfo.getQueue() != null, "routingKey:{}未配置queue", routingKey);
        Assert.isTrue(StrUtil.isNotBlank(rabbitModuleInfo.getQueue().getName()), "routingKey:{}未配置exchange的name属性", routingKey);

    }

    /**
     * 转换生成RabbitMQ队列
     *
     * @param queue
     * @return
     */
    public Queue convertQueue(RabbitModuleInfo.Queue queue) {
        Map<String, Object> arguments = queue.getArguments();

        // 转换ttl的类型为long
        if (arguments != null && arguments.containsKey("x-message-ttl")) {
            arguments.put("x-message-ttl", Convert.toLong(arguments.get("x-message-ttl")));
        }

        // 是否需要绑定死信队列
        String deadLetterExchange = queue.getDeadLetterExchange();
        String deadLetterRoutingKey = queue.getDeadLetterRoutingKey();
        if (StrUtil.isNotBlank(deadLetterExchange) && StrUtil.isNotBlank(deadLetterRoutingKey)) {

            if (arguments == null) {
                arguments = new HashMap<>(4);
            }
            arguments.put("x-dead-letter-exchange", deadLetterExchange);
            arguments.put("x-dead-letter-routing-key", deadLetterRoutingKey);

        }

        return new Queue(queue.getName(), queue.isDurable(), queue.isExclusive(), queue.isAutoDelete(), arguments);
    }


    /**
     * 转换生成RabbitMQ交换机
     *
     * @param exchangeInfo
     * @return
     */
    public Exchange convertExchange(RabbitModuleInfo.Exchange exchangeInfo) {

        AbstractExchange exchange = null;

        RabbitExchangeTypeEnum exchangeType = exchangeInfo.getType();

        String exchangeName = exchangeInfo.getName();
        boolean isDurable = exchangeInfo.isDurable();
        boolean isAutoDelete = exchangeInfo.isAutoDelete();

        Map<String, Object> arguments = exchangeInfo.getArguments();

        switch (exchangeType) {
            case DIRECT:// 直连交换机
                exchange = new DirectExchange(exchangeName, isDurable, isAutoDelete, arguments);
                break;
            case TOPIC: // 主题交换机
                exchange = new TopicExchange(exchangeName, isDurable, isAutoDelete, arguments);
                break;
            case FANOUT: //扇形交换机
                exchange = new FanoutExchange(exchangeName, isDurable, isAutoDelete, arguments);
                break;
            case HEADERS: // 头交换机
                exchange = new HeadersExchange(exchangeName, isDurable, isAutoDelete, arguments);
                break;
        }
        return exchange;
    }
}
    /**
     * 根据配置动态创建和绑定队列、交换机
     * @param vhost
     * @param exchange
     * @param queue
     * @param binding
     */
    @Override
    public void bindVhostExchangeQueue(String vhost, Exchange exchange, Queue queue, Binding binding) {
        ConnectionFactory factory = queueConfig.pushConnectionFactory(rabbitProperties,vhost);
        RabbitAdmin rabbitAdmin = new RabbitAdmin(factory);
        log.debug("bind vhost={},exchange={},queue={}",vhost,exchange.getName(),queue.getName());
        // 创建队列
        rabbitAdmin.declareQueue(queue);
        // 创建交换机
        rabbitAdmin.declareExchange(exchange);
        // 队列 绑定 交换机
        rabbitAdmin.declareBinding(binding);
    }
    /**
     * 生成指定vhost的ConnectionFactory
     * @param rabbitProperties
     * @param vhost
     * @return
     */
    public ConnectionFactory pushConnectionFactory(RabbitProperties rabbitProperties, String vhost) {
        CachingConnectionFactory cachingConnectionFactory = new CachingConnectionFactory();
        cachingConnectionFactory.setHost(rabbitProperties.getHost());
        cachingConnectionFactory.setPort(rabbitProperties.getPort());
        cachingConnectionFactory.setUsername(rabbitProperties.getUsername());
        cachingConnectionFactory.setPassword(rabbitProperties.getPassword());
        cachingConnectionFactory.setVirtualHost(vhost);
        return cachingConnectionFactory;
    }
相关文章
- 金融服务领域的大数据:即时分析
- 影响大数据、机器学习和人工智能未来发展的8个因素
- 从0开始构建一个属于你自己的PHP框架
- 如何将Hadoop集成到工作流程中?这6个优秀实践必看
- SEO公司使用大数据优化其模型的5种方法
- 关于Web Workers你需要了解的七件事
- 深入理解HTTPS原理、过程与实践
- 增强分析:数据和分析的未来
- PHP协程实现过程详解
- AI专家:大数据知识图谱——实战经验总结
- 关于PHP的错误机制总结
- 利用数据分析量化协同过滤算法的两大常见难题
- 怎么做大数据工作流调度系统?大厂架构师一语点破!
- 2019大数据处理必备的十大工具,从Linux到架构师必修
- OpenCV中的KMeans算法介绍与应用
- 教大家如果搭建一套phpstorm+wamp+xdebug调试PHP的环境
- CentOS下三种PHP拓展安装方法
- Go语言HTTP Server源码分析
- Go语言HTTP Server源码分析
- 2017年4月编程语言排行榜:Hack首次进入前五十